What a lovely morning! I woke up to the birds chirping in my backyard. Spring is here! It is finally here after the long anticipation in the winter.
The chilly, fresh air is filled with new energy I started walking around to see what was happening. To my surprise I saw many plants waking up after their long winter slumber.
Well hello my friends!
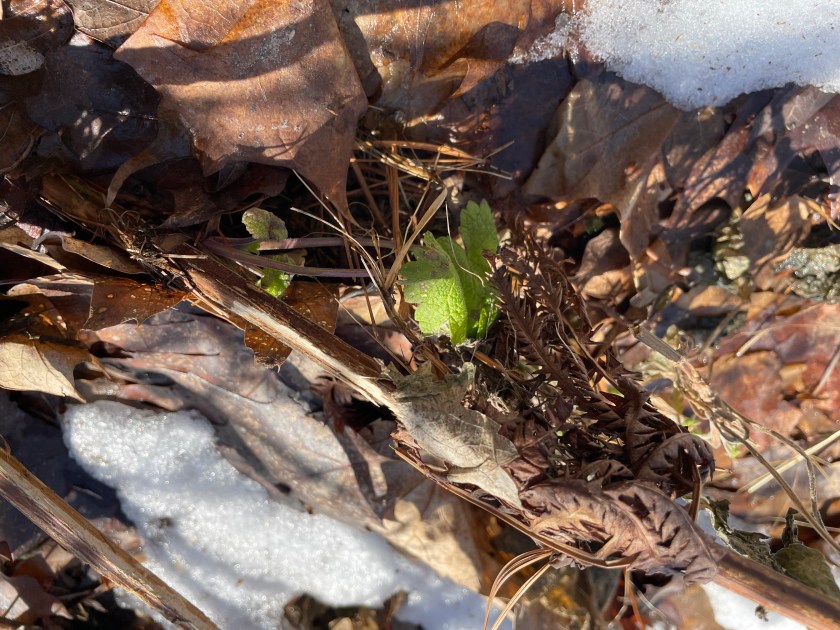
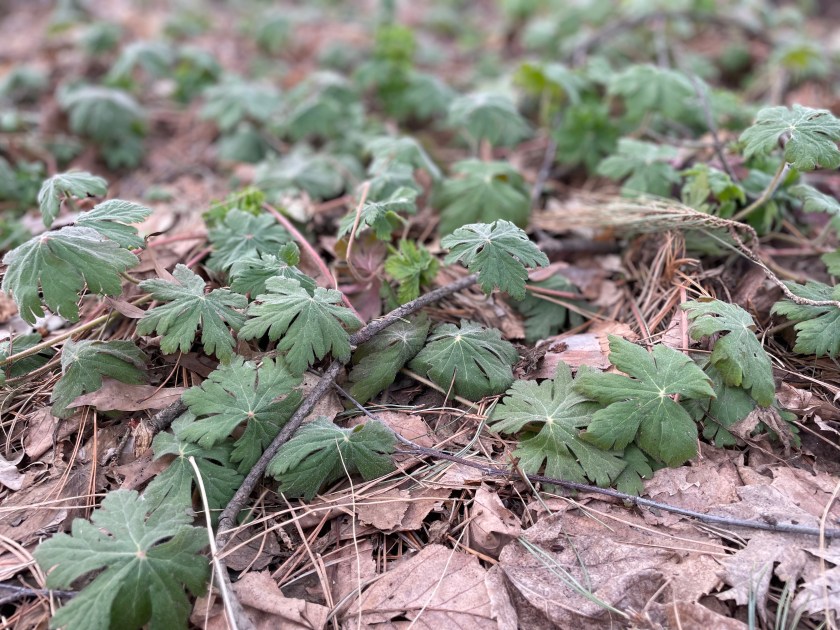
The Wild Geraniums and the Creeping Charlies are still here from last fall. Yes they are always here but it is nice to see them again now.
The gentle looking Wild Geranium overwinters under the wet snow. It is great when you need a potent astringent or just want to look beautiful.
The long forgotten Creeping Charlie is an evergreen perennial available all year long and even under the snow. Think of it when you need protection, it was once was called a heal-all.
Under the pine trees, the Hellebore flowers are peaking through the snow, It is quite the show but for me the true sign of spring comes when my native plants show.
The Dandelion leaves are coming up like every year ready to start spring. Make a salad with its bitter leaves to get you through spring.
The gentle Mullein rosettes are peering through the snow Their tender leaves are ready to try to comfort you in your sorrows.
Yarrow with its finely cut leaves just started to show. They are here to heal your wounds internal or external.
Motherwort like a tough mother is here whether you want it or not. It may clear away your unwanted tension and energy.
Elderberry shoots are moving up and out, ready to try to get you through troubled times. Respect it, As it lives in the world of fairies.
Hello all my lovely garden allies! It was such a delight to check in with you all. Feeling the energy of the spring In my garden.
A big theme for my blog is ‘Eating with the seasons’. I have been eating seasonal foods my entire life. I grew up in Hungary and the only foods we were able to eat were foods grown in Hungary. At the time, we were not able to get the exotic foods from Mediterranean countries or Africa. One exception was the bananas around Christmas time. When I moved to the United States, I tried to stay with this concept and only ate locally grown foods as much as possible.
What are seasonal foods?
Foods like fruits, vegetables and other products grown and harvested in a specific region where you live. In other-words, these are foods that are naturally available in your area.
But why eat with the seasons?
Earlier, people ate with the seasons out of necessity, there were no foods available from faraway places. They ate what they got. However, ancient traditions were also aware of the benefits of local foods. The ancient Chinese believe that eating with the seasons supported the balance between the body’s internal environment and the external world. They also believe that instead of counting calories and eating fad diets, we should be looking to our environment and see what we need to do to stay in balance. Let’s look at why local foods are important.
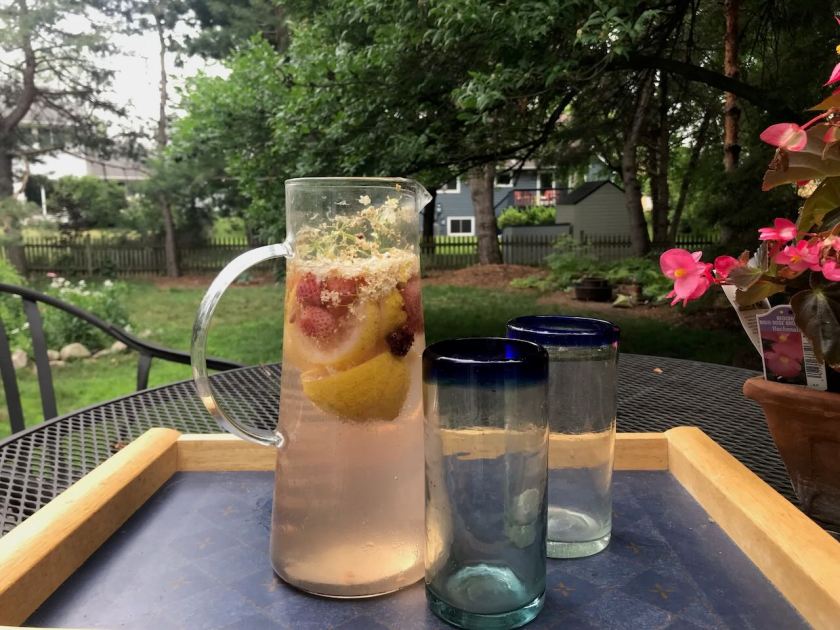
Elder flower drink in the spring
Taste and nutrition
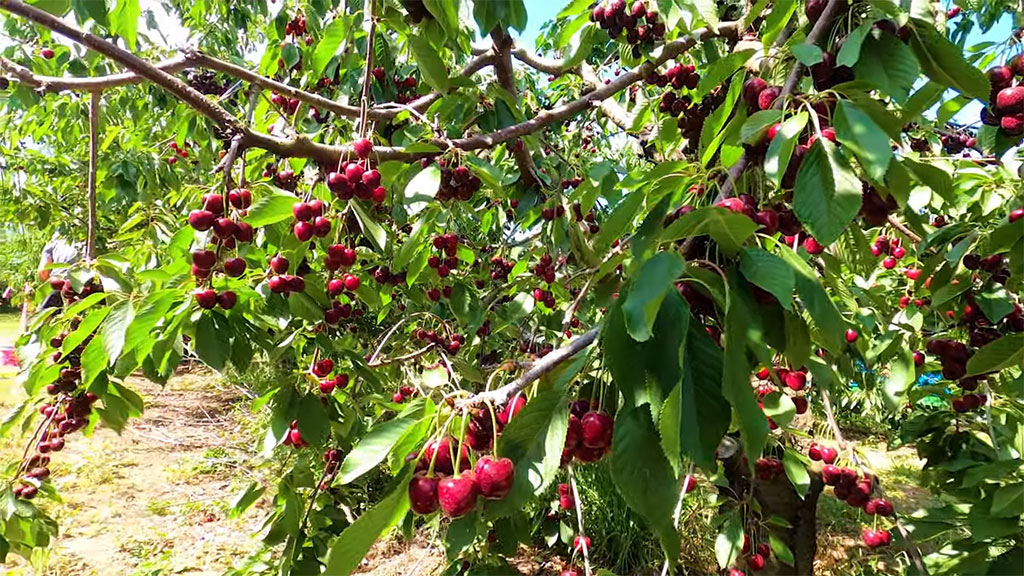
One obvious benefit is that local foods taste better and have more nutrients than foods brought in from far away places. For instance, a cherry picked from a local tree is superior to any exotic fruits. When cherries are picked at peak of their ripeness, they are bursting with flavor and nutrients as opposed to bananas that were picked early so they could be sold at super markets after the long travel.
Sustainability
Another benefit is that eating with the seasons is more economical for sure. Our foods have minimal traveling if any so there is less carbon foot print. There is less traveling involved, food is cheaper. Also, another important consideration is that we can support our neighbors and local farmers. This further helps support our community.
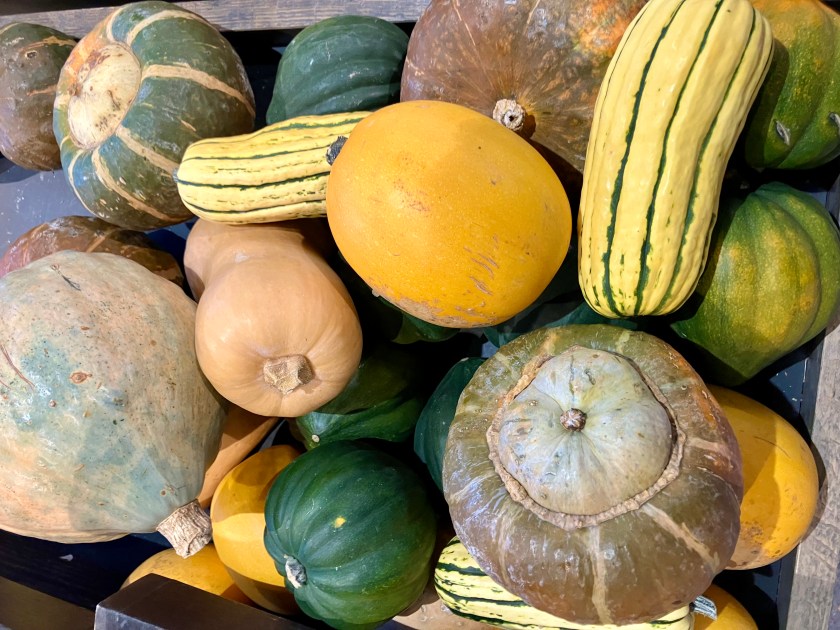
Squashes from the farmers market are an excellent example for food sustainability. Squashes grown locally are bursting with flavor in the fall and are available in abundance … and we can support our local farmers as well.
Benefits our body
Also, foods grown in our area we live in support our body, our immune system. The energy of the food has the energy that surrounds us and helps us cope with the environmental challenges. They have the nutrients we need and can help the body ward off pathogens easier. As we move through the seasons, we face similar challenges; in other words, the plants have to deal with the same climate to make it through the year. Also, the plants get the native pollinators to pollinate their flowers.
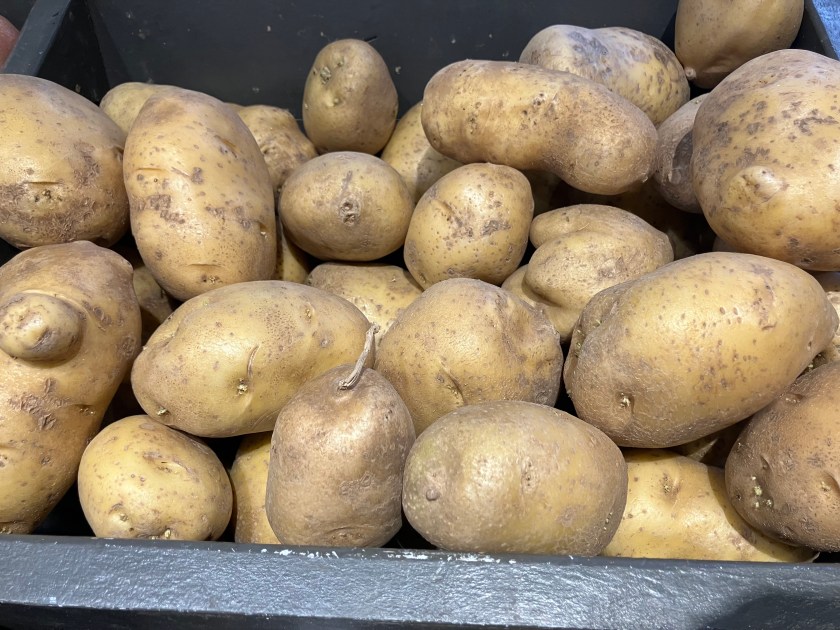
Potatoes in the middle of the winter come to my mind for a good example. Potatoes grown locally and stored in a root cellar have everything we need in the winter. Seriously, we don’t need to get expensive vegetables from warmer places.
Summary
Eating with the seasons has been an important concept for a long time. For many, it is a way of life because there are no other foods available. However, eating seasonal foods has many benefits. The foods grown locally taste better, have the nutrients we need and can support our energies to cope with our environment, hence can support our body. Also, they are cheaper and can support our local community as well. Honestly with all these benefits, I can’t imagine not eating the foods that grow in my back yard or I can get at the farmers market.
Honey butter is very easy to make. All you have to do is mix soft butter with a little honey. For a dairy free version you can use coconut butter, it is equally delicious. Serve it anytime you want to add a little hint of sweetness to your food… it is great for pancakes or toast. My favorite is corn pancakes!
RECIPE
INGREDIENTS
8 Tbsp butter or coconut butter, room temperature
1 Tbsp honey
METHODS
1. Mix the soft butter with the honey. If it is too cold in your space, you can heat it up. It will solidify soon after you add the honey or it can be placed in the refrigerator.
2. Store on the counter at room temperature or the fridge if it gets too hot.
According to Ancient Chinese Medicine, the root cause of so many health problems is Dampness and many of us especially in the Western industrial countries have it.
So what is Dampness in the body?
Dampness is a condition of having excess fluid like substance in the body. Dampness is considered one of the evils in Traditional Chinese Medicine, capable of disrupting the internal balance of our body. It can negatively impact the energy (Qi) flow (3).
Imagine a house where water is flowing through the inner pipes. You have access to the water only in the bathroom and the kitchen. You should not have water floating around anywhere in the house and the faucets should not be leaking. There should be no water seeping into the house from the outside either.
This same scenario is present in our body. Fluids should be in areas where they are supposed be and should be able to move without impedance. Fluids are important for our body to function properly. It moistens the digestive tract and the mucosa. However, when it is not flowing in its proper place, it can create Dampness (3).
When trapped, Dampness can turn into Phlegm, a more serious condition and can cause stagnation in the body. It may also lead to other more complex problems like tumors and cancer (3).
In our body, our Spleen is mainly in charge of moving this fluid. So if our Spleen is not healthy, we can see Dampness (3).
What can cause it?
Poor diet: Overeating, eating too much raw, cold, sweet, greasy, processed, poorly grown and sugary foods. Excess alcohol. Eating while distracted. Not chewing our food properly.
Food intolerance.
Stress, unresolved emotional problems.
Inactivity.
Constitutional weakness. Some people have genetic dispositions for dampness.
Overgrowth of yeasts, viruses, putrefactive bacteria, parasites
Joint problems
Brain fog
Weight problems (2).
So what can we do?
1. Strengthen digestion.
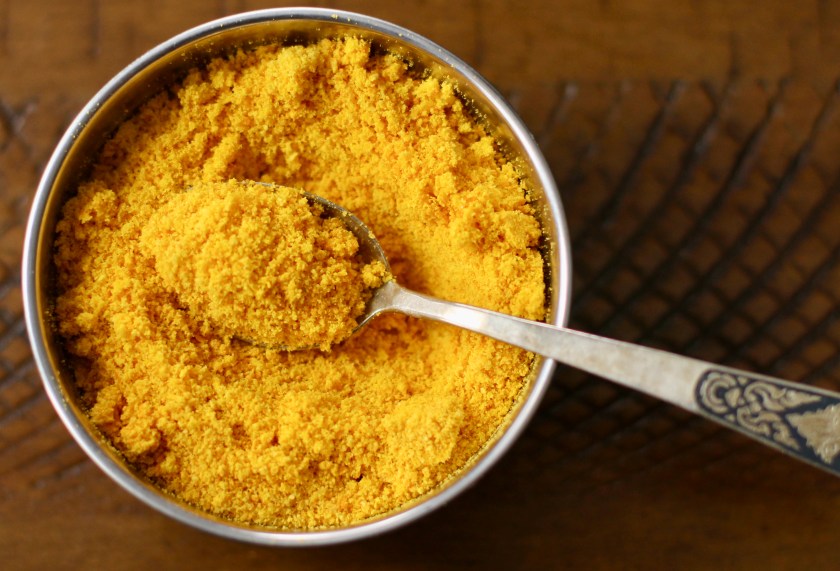
Use carminative herbs. Carminative herbs support our digestion. They are warming pungent and bitter plants that stimulate and excite secretion from the mouth on down the gastrointestinal canal (1). Cook with these plants on a regular basis. Carminative herbs are paprika, ginger, fennel, cumin, coriander, thyme, garlic, sage, mint, turmeric, rosemary, cinnamon, all spice, caraway seeds, anise seeds, fennel, cardamom, mustard seeds, oregano etc (2). In other words, these are the so called culinary spices. Ancient doctors have added them to our foods so we can have their benefits on a daily basis. Most of my recipes have one or more of these spices.
2. Eat nourishing foods.
According to Hippocrates, a physician who lived about 2000 years ago, “Let food be thy medicine and medicine be thy food”. This is a very powerful statement that sums it all up: Treat your food as medicine else your medicine will become your food. Our food and our body are intimately related.
Nourishing our organs especially the Spleen is crucial to prevent dampness. In addition, according to Chinese Medicine, Phlegm is made in the Spleen and stored in the Lungs. So the health of the Lungs and its twin organ the Large Intestine are important too. Also, the Water element organs, the Kidneys and the Bladder can contribute to the accumulated moisture if they are not transforming the fluids (2). For more information, please check out my blog posts on the Earth, Metal and Water elements.
3. Emotions
Our emotions can negatively effect our organs and cause Dampness. Use stress relieving methods like meditation or flower essences (4).
4. Exercise
Keep moving. Exercise is good for our digestion, Lungs and keeps fluids moving. It is so good for the whole body in general and can prevent Dampness (2).
5. Anti-dampness plants
There are many plants that can help with Dampness. Chicory root, Chamomile or Fennel seeds are great bitter herbs that help dry Dampness (2). Also, there are many excellent foods that we can incorporate into our daily diet. Beneficial foods to prevent Dampness include turnips, burdock, aduki beans, celery, barley, mung beans (2), all mushrooms, garlic, cranberries.
6. Keep calm!
Staying calm is a big theme in Natural Medicine. A calm body and mind are essential for health. A stressed body can lead to so many problems including Dampness. It also involves eating without distractions in a pleasant environment and properly chewing our food (3).
The plants mentioned in this post can be drying so use them in moderation or use them with other moistening substances. These include water, oil, small amount of salt. Of course, when served with a meal, this should not be a problem. For the records moistening foods include chard, tomatoes, spinach, barley, millet, pears, seaweed, almonds, eggs, pork, mussels, pine nuts. In addition, moistening herbs include Plantain, Marshmallow, Slippery Elm (2).
Summary
Dampness is one of the most important health problems today effecting a lot of people. It mainly involves our digestive system. Poor dietary habits and life style choices contribute to it. In addition, poorly functioning Lungs and the Kidneys can add to the problem. They can often be prevented with awareness toward what and how we eat and how we live. Of course, avoiding all the things that caused the problem is essential. It is no surprise people for thousands of years put a big emphasis on the importance of diet and life style (3).
Note: I capitalized some words in the post. In Chinese Medicine, words that are associated with additional Chinese medicine theories/functions are capitalized to differentiate them from their Western meanings.
The information provided is for educational purposes and is not intended to be a substitute for medical treatment. Consult your medical care provider before using herbal medicine, particularly if you have a known medical condition, are on any medication or if you are pregnant or nursing.
SOURCES
(1) Mathew Wood. The Practice of Traditional Western Herbalism.
(2) Paul Pitchfort. Healing with Whole Foods.
(3) Giovanni Maciocia. The Foundations of Chinese Medicine
(4) Pablo Noriega. Bach Flower Essences and Chinese Medicine
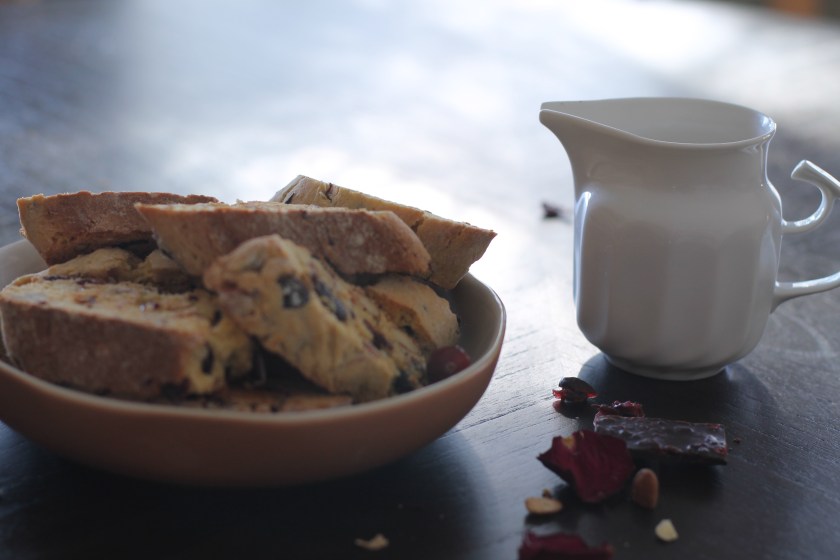
These twice baked cookies have a crisp texture and a sophisticated flavor. The basic dough is gently infused with almond extract and is filled with almonds and cranberries … and the aromas of these cookies baking in the oven can create a heart warming atmosphere for your Valentine’s Day!
Originally, biscotti was a travelers’ food that was meant to be eaten on long journeys. It was used for soldiers during the wars of the Roman Empire. After the fall of Rome, it reemerged during the Renaissance. A baker in the city of Prato, in the region of Tuscany, created a new version that was served with local wine. Originally almonds from the plentiful almond groves of Prato were used. They called this dessert Cantucci of Prato. The Italians still call this delicious dessert cantucci. Biscotti is the Italian word that refers to all twice baked cookies.
Ever since it became popular in Tuscany, chefs have created new versions of this basic recipe adding raisins, chocolate, lemon, anise, pistachio nuts, cranberries, butter and the list is endless. I guess making it with raisins and almonds would be the most common addition.
I personally like using cranberries and almonds. I love the synergy of these two ingredients, the sweet, tangy cranberries and the mildly bitter almonds creating a gently sweet dessert. One caution is the more things you add, the harder the dough will be to work with … but of course it does enhance its flavor and the texture.
EDIT: I just made these cookies with almond flour instead of wheat flour … they are even better! (Traditionally they are made with almond flour). So I now made a change to my recipe. Try it with almond flour and please let me know what you think. Otherwise, everything is the same.
RECIPE
Yields about 10 cookies
INGREDIENTS
1/4 cup high quality light olive oil
2 eggs
1/4 -3/4 cup white granulated sugar
1/2 teaspoon almond extract or 1 tsp vanilla extract
2 teaspoons fresh lemon or orange zest or 1 Tbsp dried lemon or orange zest
2 cups almond flour or all-purpose flour + more for kneading the dough
1/4 tsp salt
1 tsp baking powder
3/4 cup chopped pistachio nuts or almonds
3/4 cup dried cranberries or raisins
INSTRUCTIONS
Preheat oven to 325 F. Oil a cookie sheet.
In a large bowl, sift flour with salt, baking powder.
In a separate bowl, cream olive oil, eggs, sugar, almond extract and lemon zest. Add to the flour mixture from earlier. Mix thoroughly.
Chop the nuts lightly by hand. I would not use a machine. Add the cranberries and the nuts, mix. You can add a small amount of water if the dough doesn’t stay together.
Let the dough rest for an hour.
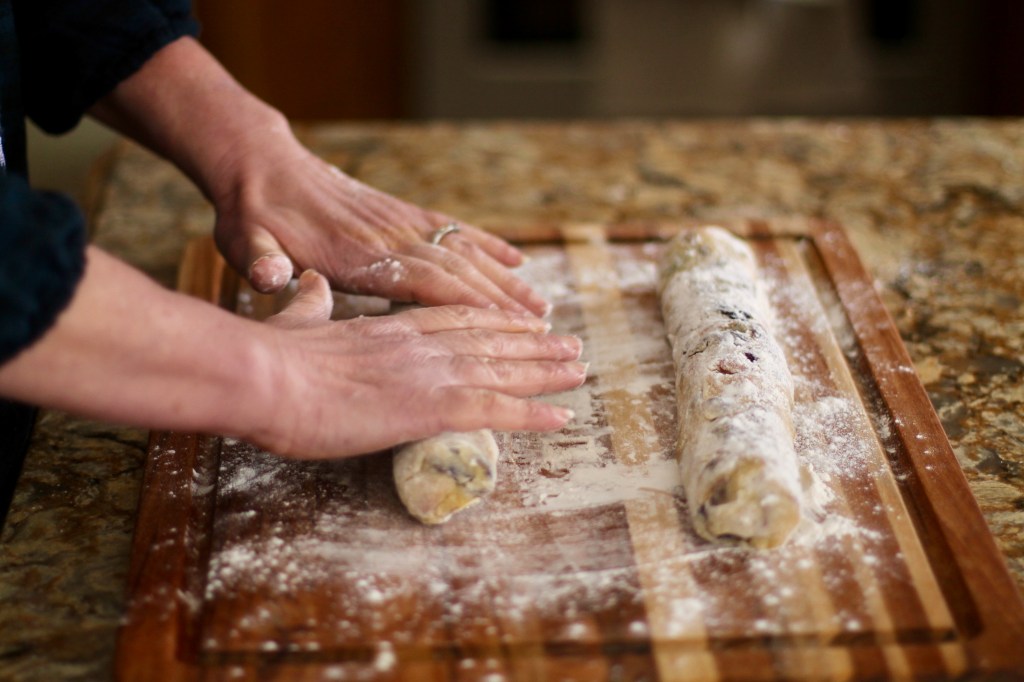
Divide the dough into two equal sized portions. Lightly flour the surface of a cutting board. Using your hand, shape each piece into a 6 x 2 x 1 inch log shape. You want to roll each piece like you roll a rolling pin. Place the logs on the baking sheet.
Bake for 30 minutes on the rack placed in the middle of the oven. You don’t need to worry about the color of the top as the logs will be baked again.
Take the sheet out of the oven. Place the logs on a cutting board and let them cool for 30 – 60 minutes.
Using a serrated knife, slice the logs about 1/2 inch wide. You can cut them on an angle or straight.
Reduce oven temperature to 300 F. Place each cookie slice upright on the cookie sheet about 1/2 inch apart and bake them for another 20 minutes or until golden in color and crisp. (Turn the cookies over on the other side half way though, after 10 minutes).
Remove and let the cookies cool on a wire rack. They will get firmer.
Serve with coffee, vine or tea.
Store in an air tight container. They will keep for a long time.
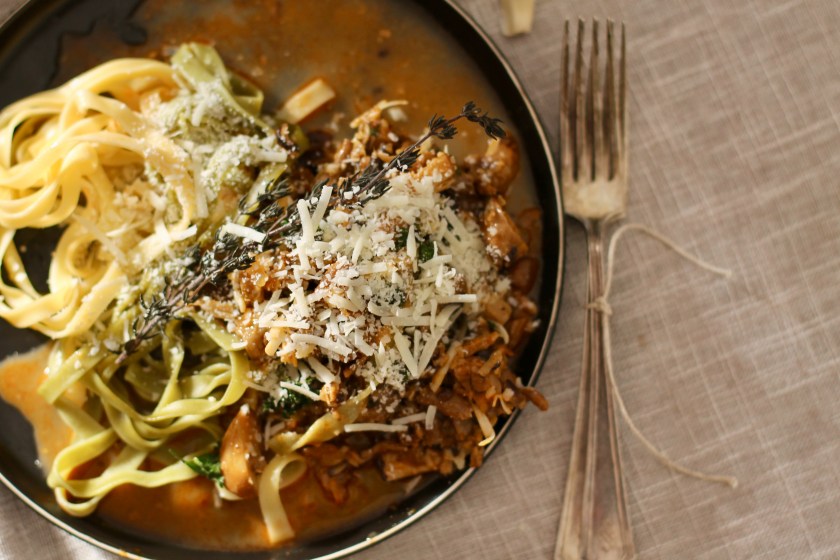
This is a festive, delicious entree. The main ingredient is the chestnut mushroom but you can use any hardy mushrooms that you’d like, even crimini mushrooms would work well. The mushrooms are sauteed with the delicate shallots. It is seasoned with paprika, thyme and Dijon mustard. Also, I used beef broth that boosts the savory depth and creates the unami flavor, bringing this dish to another level. Honestly, everything in this dish comes together to a taste sensation that you can’t stop eating. It is truly a crowd-pleaser!
RECIPE
Serves 4 people
INGREDIENTS
1 lbs Chestnut mushrooms, cleaned and sliced
1/4 cup shallots, finally chopped
2 Tbsp butter
1 tsp Hungarian paprika
3 cloves garlic, chopped
2 cups cold stock (I used beef but chicken or vegetable would be fine too)
1 tsp Dijon mustard
1 tsp dried thyme or 3 springs fresh thyme
1/4 cup cream
1/2 cup white wine (optional) or extra stock
pepper and salt to taste
parsley for garnishing
METHODS
In a wide skillet, melt the butter over medium heat. Add and saute the shallots for 5 minutes. Add the mushrooms and keep sauteing for 10 minutes or until they release their juice.
Clear the middle portion by pulling all the ingredients to the side. Add the paprika and garlic for 1 minute. Stir.
Add the wine. Stir. Cook for a couple of minutes. (Omit if not using wine, use additional 1/2 cup stock instead).
Add the cold stock, Dijon mustard and thyme. Stir. Bring to a boil and turn the heat down. Cook for 5 more minutes covered. Turn off heat.
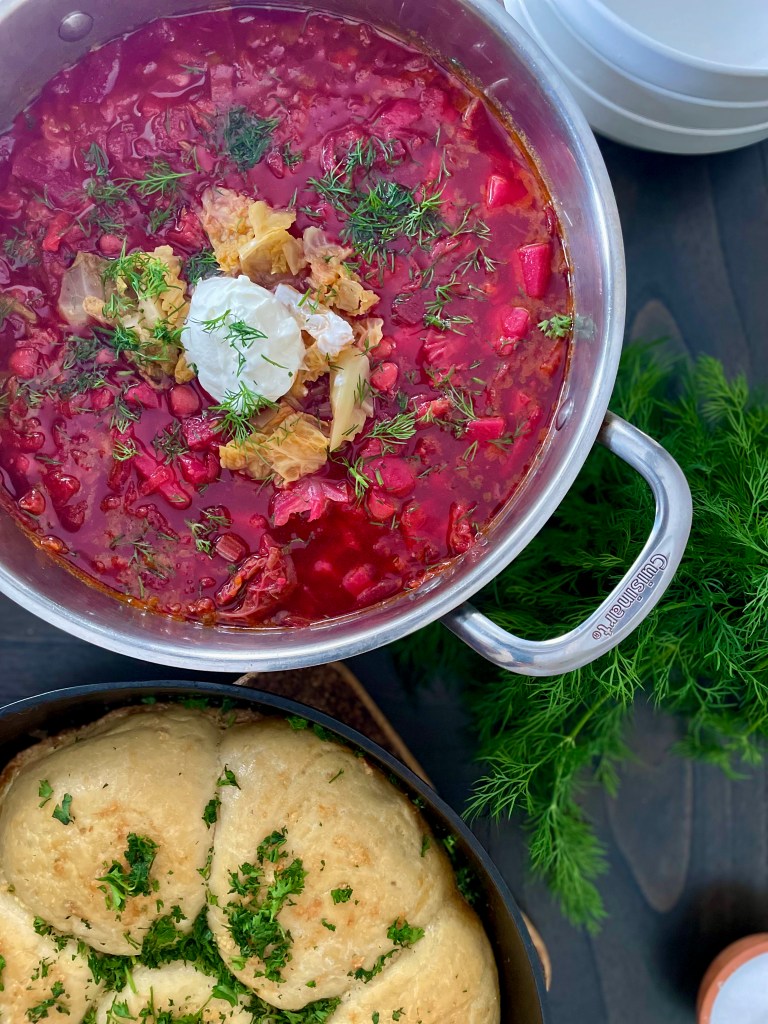
Pampushka means a beautiful plum women in Ukrainian. (I let you figure out the connection to this dish). These tasty dinner rolls are baked in the oven and are slathered with garlic infused oil. They are traditionally served with Borscht or a meal.
RECIPE
INGREDIENTS
1 cup lukewarm water (104 – 108 F)
2 1/4 tsp dried yeast
1 tsp sugar
2 1/2 cups flour, divided
5 Tbsp olive oil, divided
1 tsp salt + more for the top
6 cloves garlic
2 duck or chicken eggs, divided
METHODS
1. Preheat oven to 400 F. Oil an 11 inch round oven proof pan.
2. Start making the yeast. In a mug, dissolve the yeast and sugar in lukewarm water and let it rise covered for about 10 minutes.
3. In a bigger bowl, mix 1 1/4 cup of flour and the yeast mixture from earlier. Let the dough rest overnight in the refrigerator covered with a plastic wrap.
4. Take the dough out of the refrigerator, take the wrap off and add the rest of the ingredients: 1 1/4 cup flour, 1 egg, 1 tablespoon oil and salt. Mix. Kneed for 5- 10 minutes. Let it rest for 1 hour covered.
5. Divide the dough into 8 pieces and shape them into ball shapes. Place them side by side in a 11 inch (30 cm) round oven proof dish putting one ball in the middle. Cover and let them rest again in a warm place for about an hour.
6. Make a garlic infused oil. Mix 3 tablespoon olive oil with 3 cloves of garlic. Set aside, this will be used after rolls are baked.
7. Beat an egg lightly, add a little salt and 3 cloves of garlic. Brush the rolls with the egg wash generously.
8. Bake the rolls for 20 – 25 minutes in the oven.
9. When done, take the rolls out of the oven and spread the garlic infused olive oil on the rolls.
Serve warm immediately. Store covered on the counter.
Borscht is a traditional Ukrainian dish and is popular all over Eastern Europe. This iconic soup is an ideal soup for the winter. It is made with hardy root vegetables: potatoes, beets and carrots. These vegetables can be stored in a root cellar over the winter. The soup gets its gorgeous red color from the beets and zesty flavor from the Zacharka. Zacharka is made with sautéing onions, carrots and beets and is briefly simmered in a tomato sauce mixed with vinegar. At the end, cabbage, garlic and beans are added. Put a dollop of sour cream and chopped dill in the soup. Traditionally, it is also served with Pampusky.
RECIPE
Serves 8 people
INGREDIENTS
Broth
1 lb beef bones or chicken bones or 2 large celery roots for vegetarian option
3 bay leaves
3 parsnips
1 onion
3 cloves garlic
1 heaping Tbsp black pepper corns
3 carrots
water
Soup
10 cups broth (vegetarian, beef or chicken)
lard or olive oil
2 strips bacon, chopped (optional)
3 potatoes (Yukon, Russet), peeled and cubed.
4 medium beets, match stick
2 larger carrots, peeled and shredded
1 onion, finally chopped
2 celery stalks, chopped
1 larger tomato, chopped
1 Tbsp tomato puree
2 cloves garlic, crushed
4 Tbsp ketchup
1 Tbsp vinegar
1/4 small savoy cabbage, deveined, shredded
1 cup dry cannelloni beans or 1 can (14 oz) with the liquid
salt and pepper to taste
fresh or dried dill
METHODS
1. Making the stock. In a large pot, combine all the stock ingredients and add water well covering all the ingredients. Bring to a boil, turn down and cook for 2 hours. (Omit if using canned broth)
2. Cooking the beans. Soak the beans overnight. Place the raw beans in a smaller dish and cover well with water. Next day remove the soaking water, discard. In a medium sized pot cook the beans in fresh water. Bring to a boil and turn down. Cook for 1 hours or until soft but not mushy. (Omit if using canned beans).
3. Preparing the vegetables. Potatoes (peel and small cubes). Chop the onions. Carrots (peel and grate through large greater holes). Beets (sliced and cut lengthwise). Chop the tomatoes. Slice the cabbage leaves thin. Chop the garlic. Chop the dill.
4. Heat a large soup pot, pour in the stock, add the potatoes. Bring to a boil, turn down and cook for 30 minutes.
5. Meanwhile, in a smaller frying pan, saute onion in a small amount of lard or oil for 5 minutes. Add and render the chopped bacon for 5 minutes. Add carrots, chopped celery, beets, vinegar, ketchup, tomato and tomato paste. Continue sauteing for another 5- 10 minutes or until vegetables are soft. Set aside. (This mixture is called Zacharka).
6. Add the Zacharka from earlier, garlic, cabbage and the beans to the potatoes stock mixture. Mix. Cook for 10 minutes.
7. Add the salt and black pepper. Let the soup rest covered for about 20 minutes before serving. The flavor deepens as the soup sits.
8. Serve hot with a dollop of sour cream and dill. Traditionally it is also served with rye bread or Pampusky.
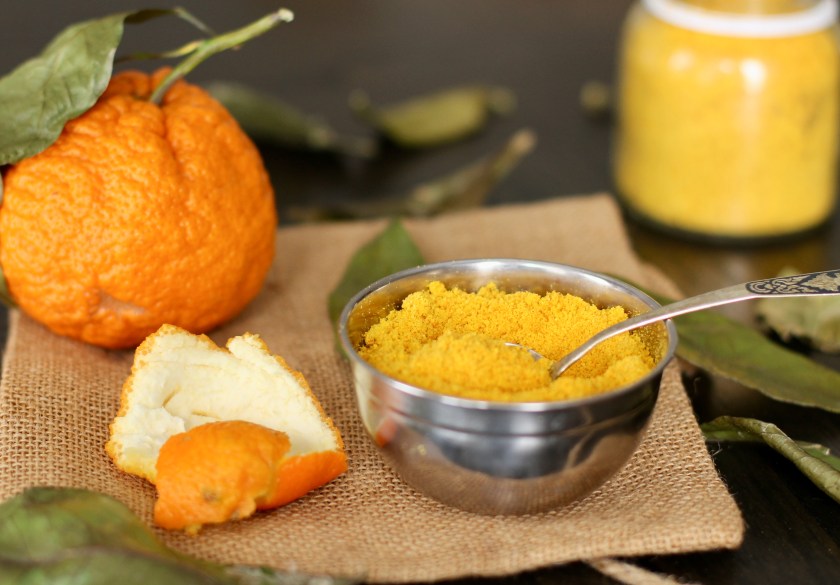
Orange peel can be used for cooking and baking especially in the winter. The aromatic sweet orange peel gives a hint of bitter flavor to desserts and savory dishes alike. It doesn’t shout, it is there to balance the dishes. I like to use all five flavors when I cook and orange peel can be used for the bitter flavor. I especially like to add it in my desserts when I need just a hint of the bitter flavor. They can also be used in cocktails and mulling spices.
It is very easy to make dried orange peel! I collect peels throughout the winter. After I eat the oranges, I dry them. Use this recipe so you can have some on hand when you need it. Most oranges will work. Just remove any wet, fleshy parts that might have stayed on the peel.
RECIPE
INGREDIENTS
peel from organic, untreated oranges (washed)- I use navel oranges.
METHOD
1. Carefully peel an orange. Remove any wet, fleshy parts that might have stayed on the peel. Place the peels on a paper towel in a single layer and put them in a dry place. The top of the cupboard is great. Don’t layer them as they can get soggy. Dry them for 1 month.
2. If you don’t want to wait for an entire month for the peels to dry, you can just dry them in the oven. The peels can be baked at 200 F for 90 minutes. They should be brittle and dry. If they are soft, continue baking them.
3. You can use the whole peels or grind the dried peels in a blender. Whole peels will last longer, finally powder will have a shorter shelf life.
4. Store in an airtight container in a cool place. They last for about 6-12 months depending how coarse you grind them.