I like challenges … well ok sometimes it is a bit uncomfortable … but then I end up with something delicious like the dish I’m presenting here today.
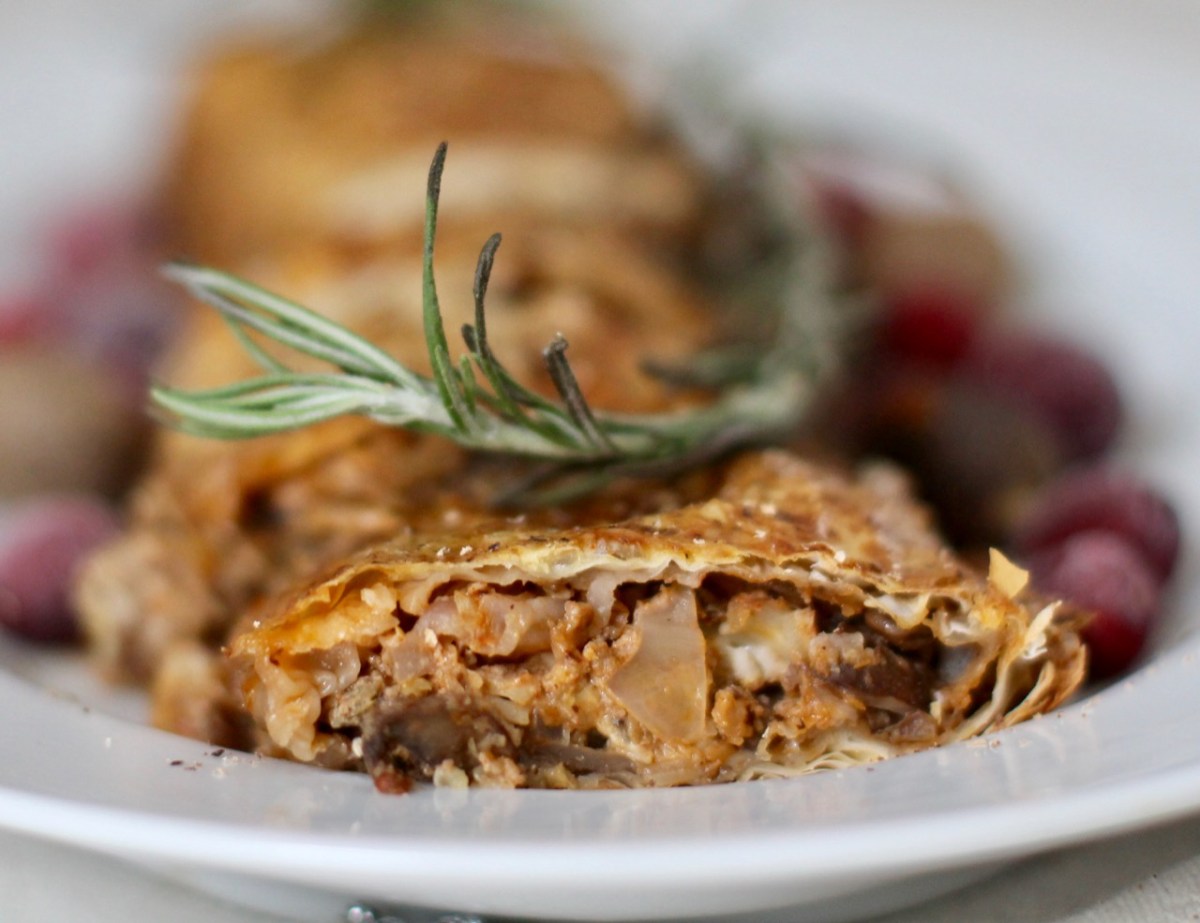
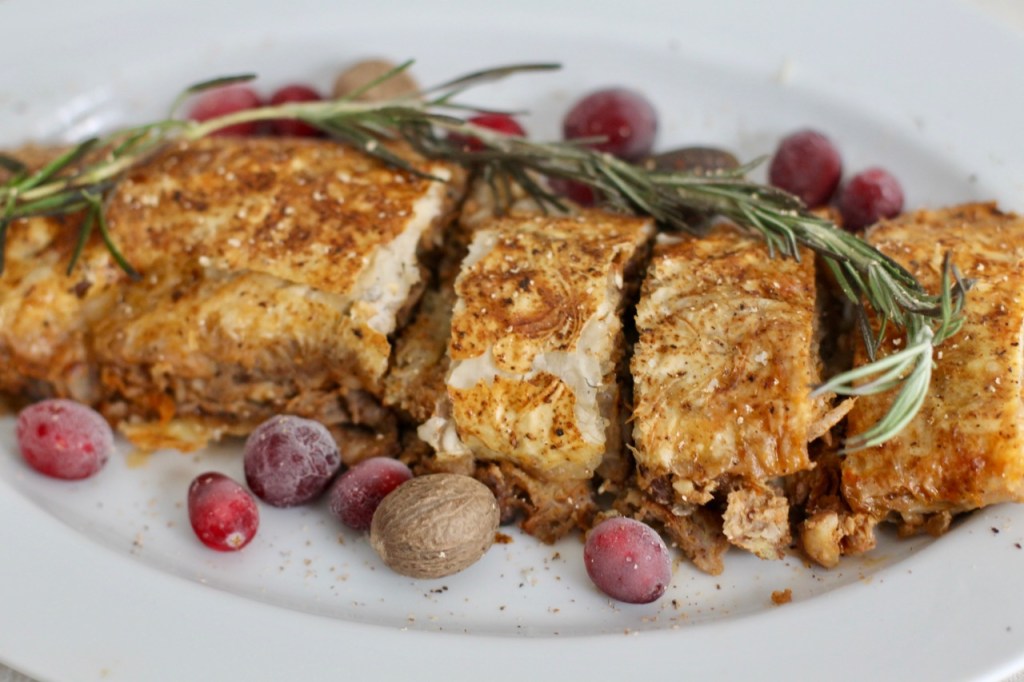
The savory stuffing made with cabbage, mushrooms and lentils is wrapped in a flaky strudel dough and is seasoned with the warming spices of the season. To make it even more festive, serve it with port sauce and brussel sprouts with chestnuts.
I was looking for a vegetarian Christmas dish… seriously, traditionally would there be such a thing? I have seen mushroom strudel served in the winter before but did not find it filling enough as a main dish. Then came the idea … maybe because I was craving cabbage strudel the whole fall … to make the strudel with half mushrooms and half cabbage … then added the lentils and the cheese in place of the meat, a few spices and … this festive dish was born. Cabbage is a staple vegetable for the winter and has been traditionally paired with mushrooms. My non-vegetarian guests really enjoyed a slice with their meat dish. Of course, the vegetarians were asking for seconds.
RECIPE
Ingredients
oil
5-7 sheets of filo dough
1/4 cup chopped shallots
4-8 oz mushrooms (crimini) (chopped into small pieces)
Quarter sliver of a medium sized savoy cabbage. ( Discard the lager veins of the cabbage so you are left with the tender leaves only).
1 celery stalk
2 garlic cloves
1 tsp paprika
1/4 cold stock (vegetarian or chicken) or water
1/4 cup uncooked lentils (1/2 cup of cooked lentils)
Take filo dough out of the freezer. Let it thaw slowly.
Clean and soak the lentils for a few hours. Cook lentils.
Chop up the shallots and the celery and sauté them in some oil for 5- 10 minutes. Add the mushrooms and continue sauteing for 5 more minutes or until the mushrooms are tender. Add paprika and the garlic to activate for 1 minute, stir and add the cold stock (1/4 cup). Add the cabbage. Add chopped thyme leaves, nutmeg and chopped rosemary leaves. Cook the mixture for about 10 minutes on low heat. Set aside.
Chop up the nuts. I leave the hazelnuts chunkier. The walnuts are coarsely chopped. A small food processor can be used. Add to previous onion mixture.
In a medium sized bowl, add 1 lightly beaten egg, mustard, the nuts, the cooked lentils, mushroom/ cabbage mixture from above, feta cheese, salt and pepper. Mix well.
Let the stuffing cool, refrigerate for about 1 hour.
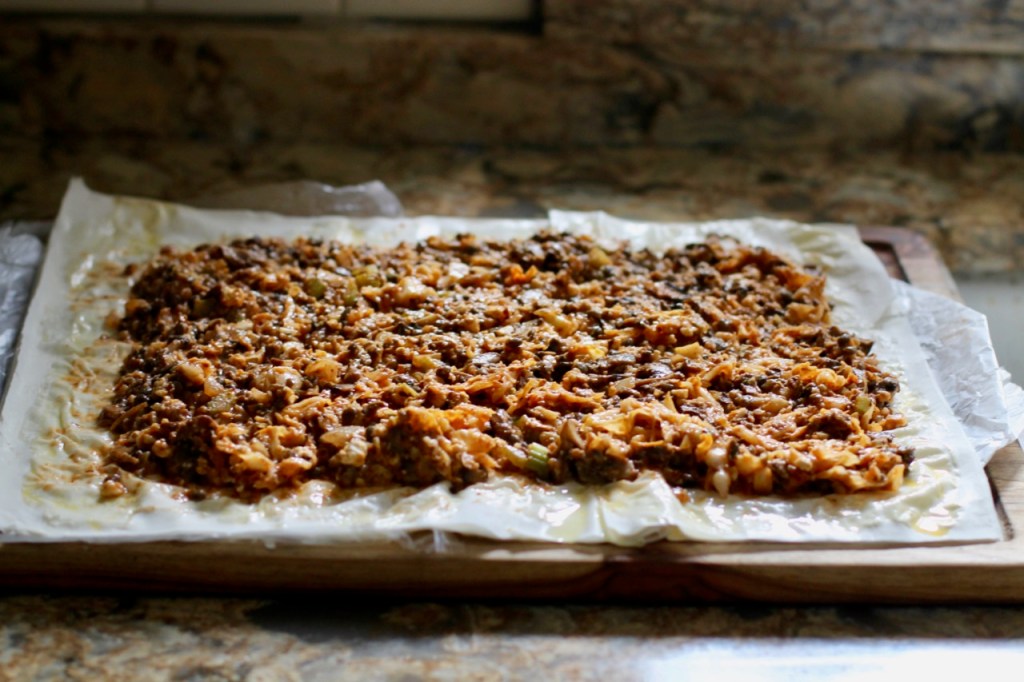
Take 7 sheets of filo dough and lay it on a wooden board. I like to put a piece of parchment paper below the filo dough, it is helpful for rolling. Drizzle some oil and grade some nutmeg. Spread the filling evenly on the sheet leaving 1 inch on each side empty. Roll it up. Placed it in an oiled baking dish.
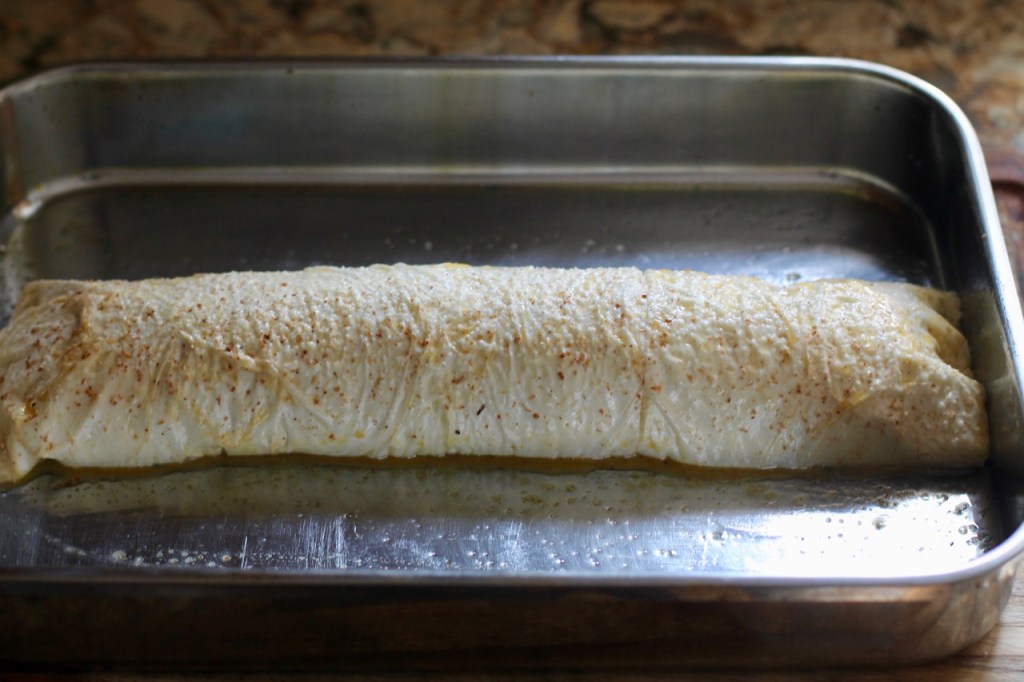
Lightly beat 1 egg, add some freshly graded nutmeg and salt. Spread it on top of the rolled strudel. Wait for 5-10 minutes until egg wash is absorbed. Apply the egg-wash again. The 1 egg should cover the strudel both times. You can sprinkle additional salt and nutmeg on the top. This will make the crust really tasty.
Bake in the pre-heated oven for 25-30 minutes or until top is nice and brown.
Put left-over filo dough if there is any left in the fridge gently wrapped up in plastic bags so the leaves don’t dry out.
Serve hot with the port sauce (see below) and brussel sprouts with chestnuts. I also like to add cranberry sauce (recipe).
Directions for the port sauce
In a small pot, saute the shallots in some oil or butter. Add the flour for 1 min, stir. Add the garlic, stir for 30 seconds.
Add the wine and stock. Stir.
Add the thyme and rosemary springs. Cover the pot.
Cook for about 20 minutes.
Take out the bay leaves, thyme and rosemary springs.
Take off the heat, add the cream, salt and pepper.
Serve right away. Can be stored in the fridge for many days.
Apple pie is a special American dessert. I have always wanted to make it ever since I took the first bite of my mother-in-laws home-made pie like 25 years ago but I was somehow afraid of making it. I even gifted a pie form for my husband’s birthday 15 years ago to make sure that I make it. Ok so a few years ago I ventured into making one from a recipe I found online. I thought all apple pie recipes were the same … hmmm not true it didn’t turn out good, in fact it was terrible. Then, I found Martha Stewart’s pie recipe … and it was a huge success. I felt such a great accomplishment after I made it. Here I have the full proof Martha’s apple pie recipe so you don’t have to hunt for a good one.
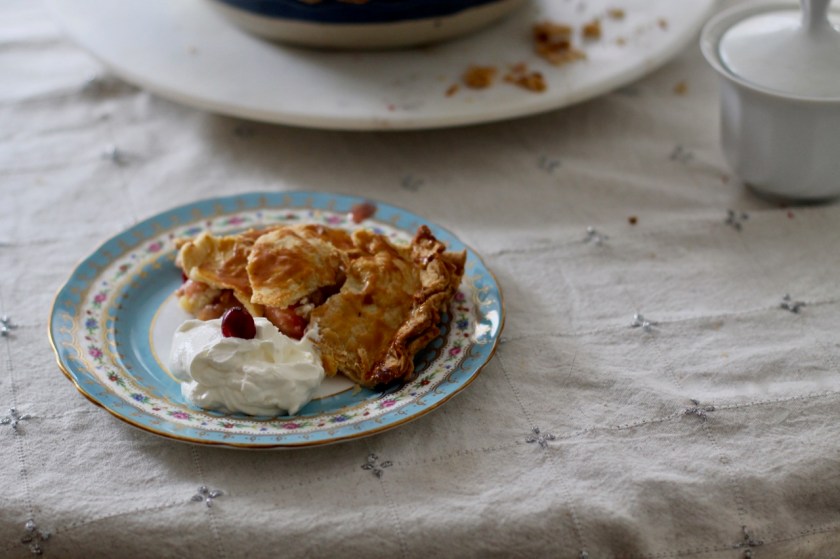
The apple pie is an important part of the Thanksgiving dinner for many people. The delicious savory apple filling is wrapped in a flaky buttery crust and is served with whipped cream. I used Martha Stewart’s basic apple pie recipe and added cranberries. I think the tart and sour cranberries elevate the pie to another level. If you prefer to leave out the cranberries, add an extra apple to the filling so instead of using 6 apples and 1 cup of cranberries, use 7 apples.
According to Martha Steart, there are three basic rules for making a fabulous apple pie: Use the best ingredients, keep the dough cold and when you handle the dough less is more. Have fun making the pie, it is so worth it!
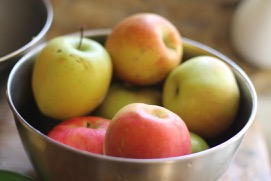
As Martha Stewart says you should get the best ingredients for your pie in other words your pie will be only as tasty as the ingredients are. The most important part of the pie at least as far as taste goes is the apples. When I go to the farmers’ market to get my baking apples, they always give me a mixture of apples. In fact, the lady at my favorite stand always gives 7-8 different apples. So how do you select the right apples?
Basically you want baking apples that are firm and keep their shapes while baking. The best apple for this is the Granny smith. If you like your pie more tart you can just use this variety. OK I know some people want more of a sweet apple pie. There are many other apple varieties that would make the pie sweeter like Cortland, Braeburn, Regent, Harlson. And I always like to add one very sweet one like Fuji, Honey crisp. Once you decide on the type, make sure they are also tasty. It is hard to describe but they should have a zesty flavor. When you try it you know what I mean! Sorry to say but supermarket apples often don’t have this. I personally like to get local apples for this purpose.
The other important part of a good pie is the crust. Of course keeping the surface cold is extremely important … but so is the quality of the flour you use. I would stay away from low quality flours that need to be enriched and have other additives in them. I buy only organic flour that fits this criteria. I used Bob’s Red Mill flour in this recipe but King Arthur’s flour is good too.
The third most important ingredient would be the shortening. The shortening is also crucial for a successful pie crust. Often people use butter flavored sysco shortening because it gives nice results. Well it is a good choice but I am not a fan because it is not that good for health. It is better to get a nice high quality butter or better yet lard if you have access to it. My mother-in-law always made her pies with lard and she honestly made the best pies.
Pie is a cold weather dessert. It is made starting September when the weather gets cold in the Northern hemisphere because it needs to be cold when handling the dough. The work area needs to be cold when you are working the dough to get the scrumptious flaky buttery crust. The pros use special board to work on that keeps the dough cold. If you don’t have these special tools, no worries. I just open the kitchen window and let the kitchen cool off a bit. It seems to be working fine.
Try to become familiar with the recipe. This is more of a challenging recipe as there are are many steps and specific instructions. I think the video (see below) is very helpful to watch for technique although the video is sometimes a little too cautious. For instance, you can handle the dough by hand. The recipe of the video and the one I’m presenting here are not exactly the same. Make sure you follow the recipe here to stay constant. The recipe is from her cook book, Martha Stewart Cooking School.
Ingredients
Crust
2 1/2 cups of unbleached all purpose flour (leveled with a knife)
1 tsp sugar
1 tsp salt
2 sticks of cold unsalted butter in 1/2 inch pieces
5-7 Tbsp of icy cold water
For the filling
6 baking bigger sized apples at room temperature (Granny smith, Cortland, Empire ) (about 2-2.5 pounds) (Martha uses 3 pounds of apples)
1 cup fresh cranberries, optional. Replace with another Granny smith if not used.
juice of 1 lemon or orange (Martha uses lemon juice)
1 Tbsp orange peel (optional)
1 tsp cinnamon or 1 tsp apple pie spice
If you use cranberries, use 3/4-1 cup of sugar. If not using cranberries, use 1/2-3/4 cup sugar. + Little more for the top.
Put 1/2 cup of water in the freezer or you can use ice cubes in water. This will be used for the dough in the next step.
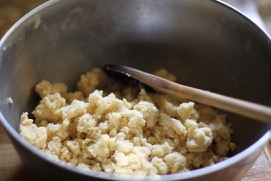
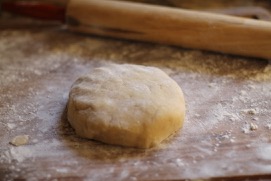
Making the dough. Mix flour with the sugar and the salt. Cut the cold butter into the flour with your finger tips, pastry cutter, knives or a food processor. If you are using a food processor, pulse for 10 seconds at a time, paying special attention not to over-process the dough. Stop when coarse crumbs form. The mixture should have pieces ranging from coarse crumbs to the size of small peas. Take water out of the freezer. Add 5 Tbsp of ice water slowly, 1 Tbsp at a time and mix until dough just holds together when pinched. Add more water only if needed. The mixture should retain a crumbly texture at his point; it should not be sticky. Again do not over-pulse the dough. If you are not using a food processor, you do not have to worry about over-processing that much, you’ll be most likely ready to stop. Do pay a close attention though what the dough should be like.
the crumbly dough
Shaping and chilling the dough. After making the dough, now it will be divided into two parts. Make sure the dough has all the loose pieces incorporated. Wrap each piece tightly with a plastic wrap and refrigerate at least for 1 hour or overnight. You can make this the day before and keep it in the fridge. This will help the crust to be flaky.
the dough wrapped in plastic
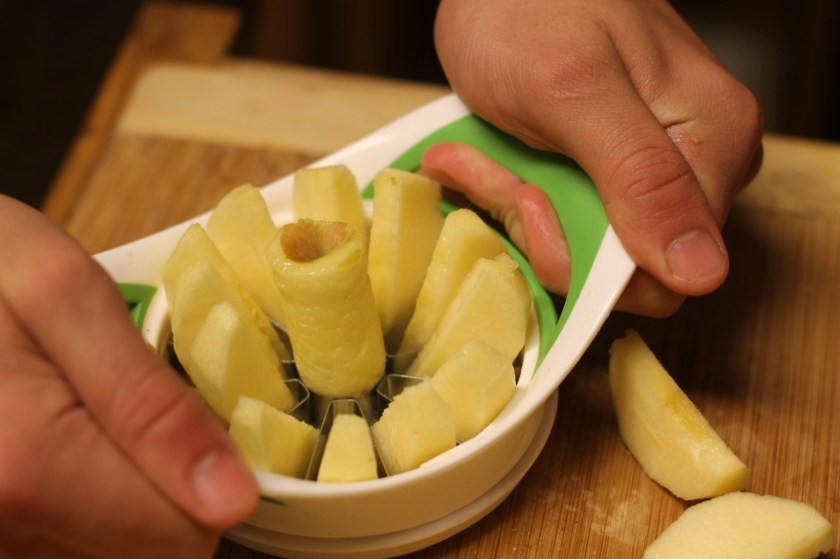
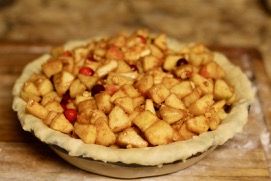
Preparing the filling. Wash, peel, core, and cut apples into 1/2 inch-thick slices. I like to use a mixture of baking apples for a more interesting flavor. I used 4 granny smith, 2 Cortland and 1 sweeter honey crisp apple. Add the orange/lemon juice and coat the apples well. Don’t add anything else to the apples until ready to assemble the pie. When ready add 1 cup of cranberries to get a more interesting flavor or add another apple instead. Then add everything else and mix. I happen to have an apple corer gadget. I have to say it was helpful for coring the apples but if you don’t have one, you don’t need to rush out to get one.
Assembling the pie. Your working area is supposed to be cold for this part. I just open the kitchen window while I’m doing this step and it should be cold enough.
Take the dough out of the fridge. On a lightly floured surface, roll out one disk of dough until 1/8 inch thick. I check the diameter by putting the bowl above the dough. I just eye it to see if the dough is large enough in diameter to cover the bowl. The finished dough should be about 13 inch big in diameter.
The chilled dough
Roll the dough around the rolling pin and unroll it over a 9 inch glass plate, pressing gently to fit into pan. Fill it with the apple mixture from above. Roll the other disk of dough in the same manner.
rolled out dough
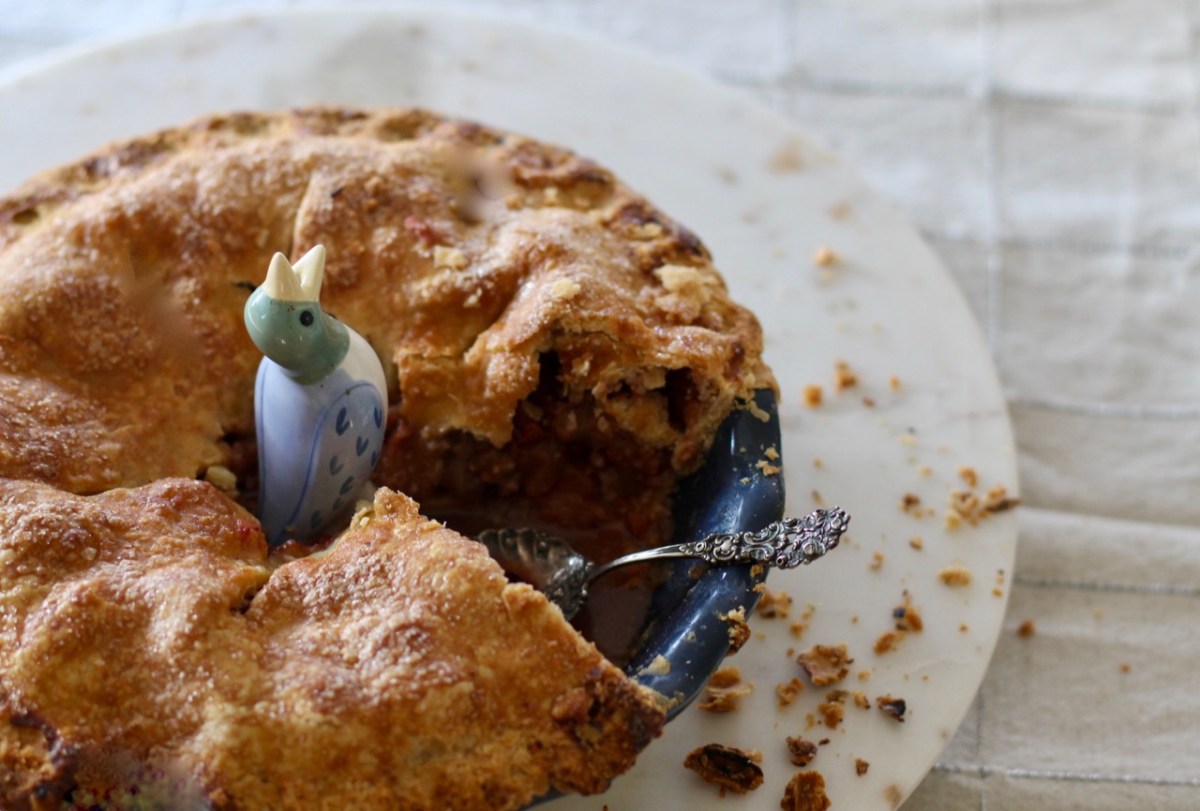
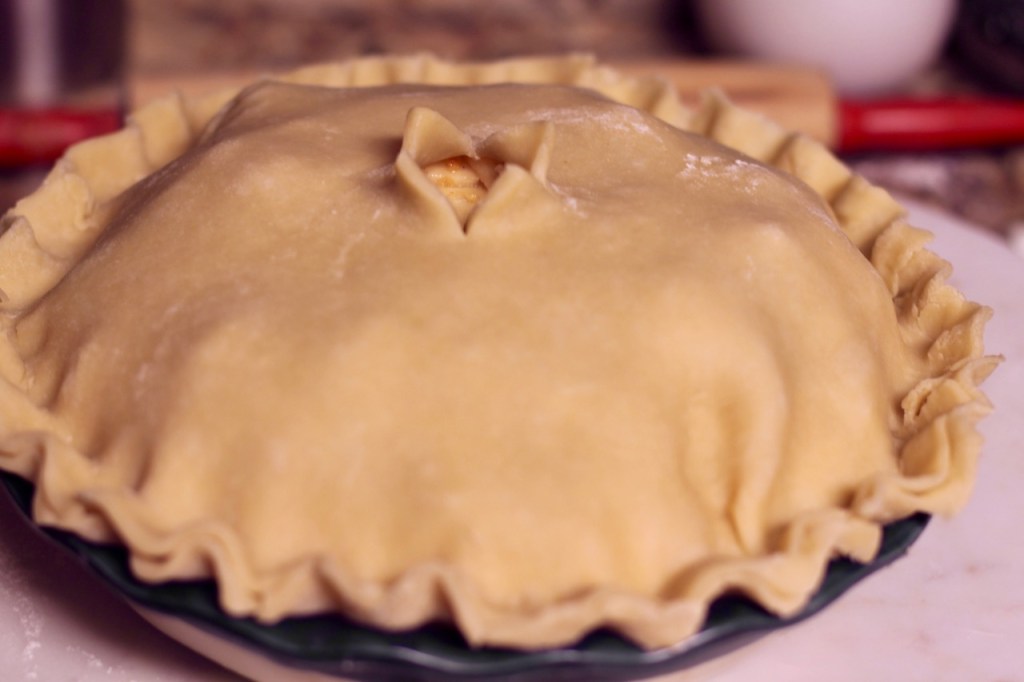
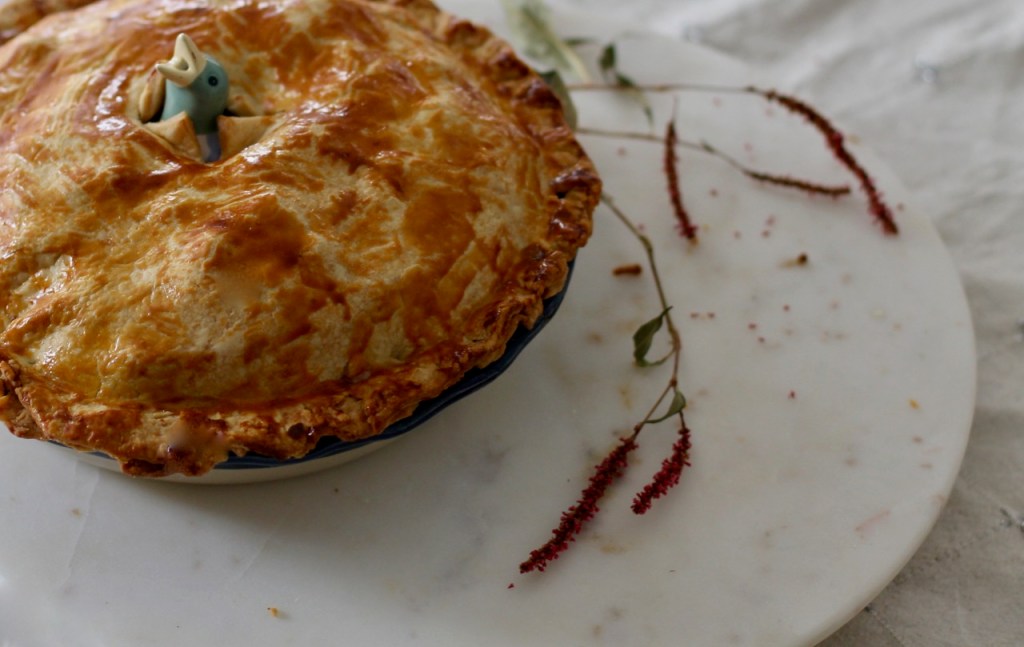
Drape over the bottom part. Use kitchen shears to trim overhang of both crusts to 1 inch. Press edges to seal. Fold overhang under and crimp edges: With thumb and index finger of your other hand, gently press dough against index finger of other hand. Continue around pie. Make several 3 inch slits in the top crust. This will allow the liquid to evaporate. I have a special clay bird that does this job. If you use the clay bird, you will not have to do this. If using the bird, cut 3 small slits in the middle of the pie, making an opening for the bird. Gently place the bird in and try to wiggle it around the apples. You can find these birds (see picture) at Williams Sonoma in the US -if anybody is interested.
Refrigerate the pie for 20 minutes. Preheat oven to 400 F.
Finishing the crust for baking. Whisk egg yolk and cream in a bowl; brush over the top of crust. Sprinkle the top with sugar.
Baking the pie. Place pie in preheated oven. Put a baking pan underneath to catch any liquid that escapes during the baking. Bake for 10 minutes. Reduce heat to 375 F. Continue baking until top and bottom crust are golden brown and juices are bubbling in the center for 70 to 85 minutes. Check on the pie after 1 hr and see if it is getting brown too quickly and needs to be covered with aluminum foil.
When ready, take the pie out and let it cool on a wire rack for at least 4 hours before serving. If you are not eating it all the same day, leave it on the counter loosely covered. Do not store in the refrigerator, the dough will get soggy.
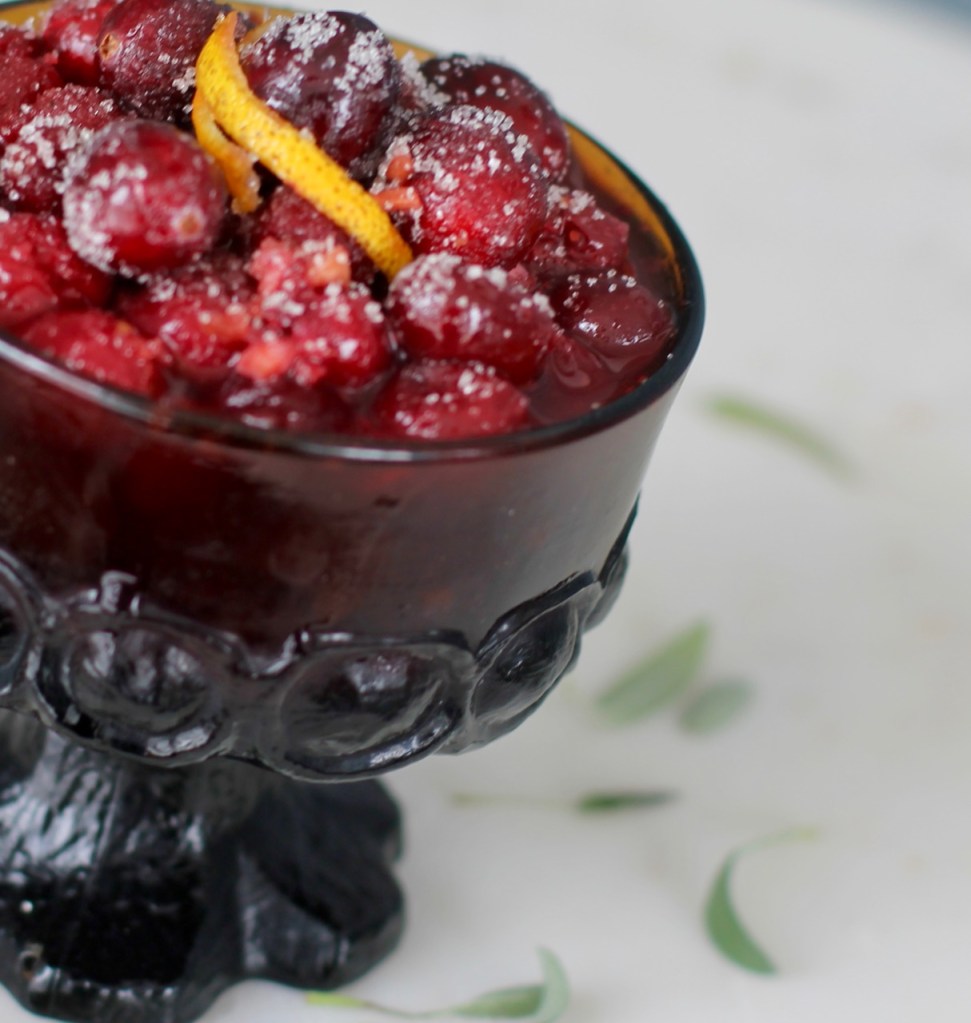
According to my mother-in-law, a good cranberry sauce should have whole cranberries and a nice sauce, so as to not be mushy or dry. I created this cranberry sauce keeping this in mind. It is gently infused with oranges and pungent spices and is slowly baked in the oven. In addition, the alcohol will elevate it to another level that gives an unexpected kick to the sauce. It will go nicely with any savory fall or winter dishes. You don’t have to wait until Thanksgiving, go ahead and you can try it now!
I really like how this cranberry sauce turned out. Here is my little story… As a foreigner I did not grow up eating cranberries so I have been relying on the Joy of Cooking cookbook for the recipe. I was contemplating whether to make some changes to the basic recipe or just let the cranberries be what they are and enjoy their true taste.
I started experimenting. First, I put the oranges to the test. Why add oranges, another bitter fruit?!? OK orange peels are bitter but are also sweet. I found that the sweet oranges paired nicely with the sour cranberries. Perhaps because their common denominator is the bitterness ?!?
In the culinary world, it is well known that pungent spices offset the sour flavors so I also added cinnamon, ginger, nutmeg, allspice. They bring a little warmth to the sauce, too. In addition, the allspice gave a nice citrusy flavor. They balanced out the sauce nicely and resulted in a pleasant sweet and sour dish. Again, I can’t imagine the sauce without them.
Oh and the sugar! Most recipes use sugar for cranberry sauce; after all it is a sour dish and sweet can offset sourness. I have nothing against sugar if used well in a dish, meaning it does not overpower the foods that it is added to. I am excited to say that I was able to reduce the sugar a bit in this recipe just by adding the seasonings. Not bad ehhh …
There is more! I used to cook the sauce in a pot that yielded a rather mushy appearance. It did not bother me, I did not even realize I did not cook the cranberries properly. To make sure the cranberries stayed whole, my mother-in-law used to prick each berry one by one with a needle so they didn’t burst open in the pot. I have recently learnt from a chef that slowly cooking them in the oven would give very nice results and the berries stay whole. I would like to mention that of course cranberries carefully made in a pot can stay whole as well.
I think my recipe made the cranberries more suitable to eat with savory foods, it has a pleasant flavor without overpowering the cranberries. You can keep it in the refrigerator for at least 1 week. The flavors come together while the sauce sits in the fridge. Hope you will enjoy it! Of course, there are many other techniques to cook cranberries that yield beautiful results too.
Cranberry sauce recipe
Serves 2-3 people.
Ingredients
1 cup of fresh cranberries (frozen is fine just make sure they are fully defrosted)
heaping 1.5 Tbsp brown sugar
1 tsp dried ginger (cut and sifted) or 2 tsp fresh ginger (chopped)
1 orange (chopped up peel and the juice) Chop up the orange peel into very small pieces it tastes great in the sauce or 2 Tbsp dried orange peel and 1/3 cup of orange juice
If you don’t have orange juice you can use 1/3 cup of other juices or even water and maybe even a little orange essence
1 cinnamon stick
3 pieces of all spice berries
1/8 tsp freshly ground nutmeg
few pink pepper corns
1 Tbsp of spirit of your choice: whiskey, fruit brandy (optional)
touch of freshly ground black pepper and salt to be added at the end
Directions
Wash cranberries, discard any with blemishes. Combine all ingredient in a baking/glass dish and wait until cranberries start releasing their liquid for about a half an hour. Set oven to 250 F and slowly bake for about two hours. Cranberries are ready when nicely cooked but not raw or mushy.
When done take the dish out of the oven and remove the larger spice pieces (cinnamon, allspice, pepper corn).
Add the salt and the pepper.
Serve at room temperature.
You can triple this recipe for Thanksgiving for 9- 10 people.