Honey butter is very easy to make. All you have to do is mix soft butter with a little honey. For a dairy free version you can use coconut butter, it is equally delicious. Serve it anytime you want to add a little hint of sweetness to your food… it is great for pancakes or toast. My favorite is corn pancakes!
RECIPE
INGREDIENTS
8 Tbsp butter or coconut butter, room temperature
1 Tbsp honey
METHODS
1. Mix the soft butter with the honey. If it is too cold in your space, you can heat it up. It will solidify soon after you add the honey or it can be placed in the refrigerator.
2. Store on the counter at room temperature or the fridge if it gets too hot.
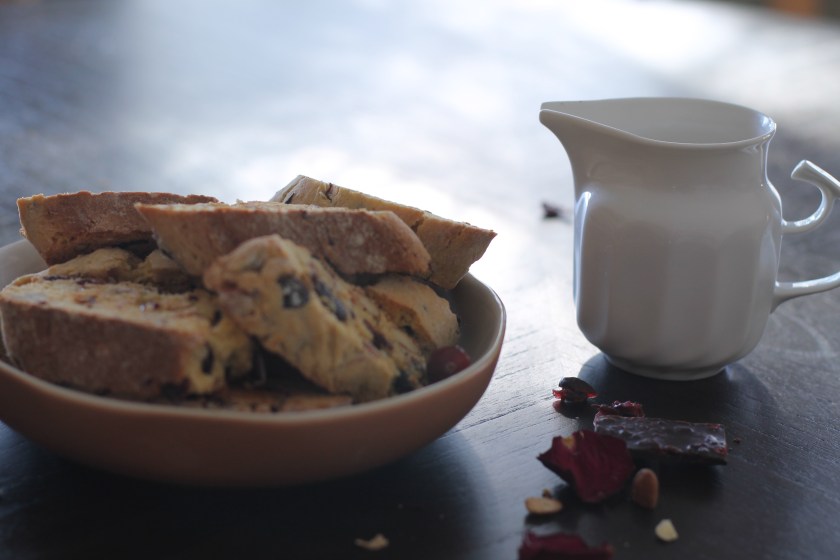
These twice baked cookies have a crisp texture and a sophisticated flavor. The basic dough is gently infused with almond extract and is filled with almonds and cranberries … and the aromas of these cookies baking in the oven can create a heart warming atmosphere for your Valentine’s Day!
Originally, biscotti was a travelers’ food that was meant to be eaten on long journeys. It was used for soldiers during the wars of the Roman Empire. After the fall of Rome, it reemerged during the Renaissance. A baker in the city of Prato, in the region of Tuscany, created a new version that was served with local wine. Originally almonds from the plentiful almond groves of Prato were used. They called this dessert Cantucci of Prato. The Italians still call this delicious dessert cantucci. Biscotti is the Italian word that refers to all twice baked cookies.
Ever since it became popular in Tuscany, chefs have created new versions of this basic recipe adding raisins, chocolate, lemon, anise, pistachio nuts, cranberries, butter and the list is endless. I guess making it with raisins and almonds would be the most common addition.
I personally like using cranberries and almonds. I love the synergy of these two ingredients, the sweet, tangy cranberries and the mildly bitter almonds creating a gently sweet dessert. One caution is the more things you add, the harder the dough will be to work with … but of course it does enhance its flavor and the texture.
EDIT: I just made these cookies with almond flour instead of wheat flour … they are even better! (Traditionally they are made with almond flour). So I now made a change to my recipe. Try it with almond flour and please let me know what you think. Otherwise, everything is the same.
RECIPE
Yields about 10 cookies
INGREDIENTS
1/4 cup high quality light olive oil
2 eggs
1/4 -3/4 cup white granulated sugar
1/2 teaspoon almond extract or 1 tsp vanilla extract
2 teaspoons fresh lemon or orange zest or 1 Tbsp dried lemon or orange zest
2 cups almond flour or all-purpose flour + more for kneading the dough
1/4 tsp salt
1 tsp baking powder
3/4 cup chopped pistachio nuts or almonds
3/4 cup dried cranberries or raisins
INSTRUCTIONS
Preheat oven to 325 F. Oil a cookie sheet.
In a large bowl, sift flour with salt, baking powder.
In a separate bowl, cream olive oil, eggs, sugar, almond extract and lemon zest. Add to the flour mixture from earlier. Mix thoroughly.
Chop the nuts lightly by hand. I would not use a machine. Add the cranberries and the nuts, mix. You can add a small amount of water if the dough doesn’t stay together.
Let the dough rest for an hour.
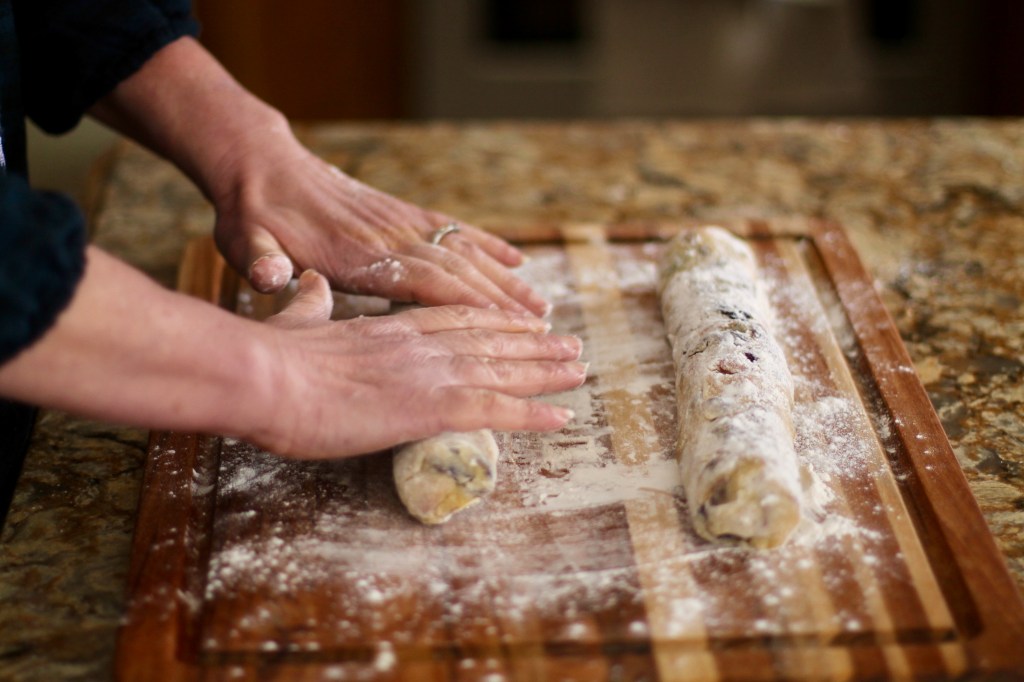
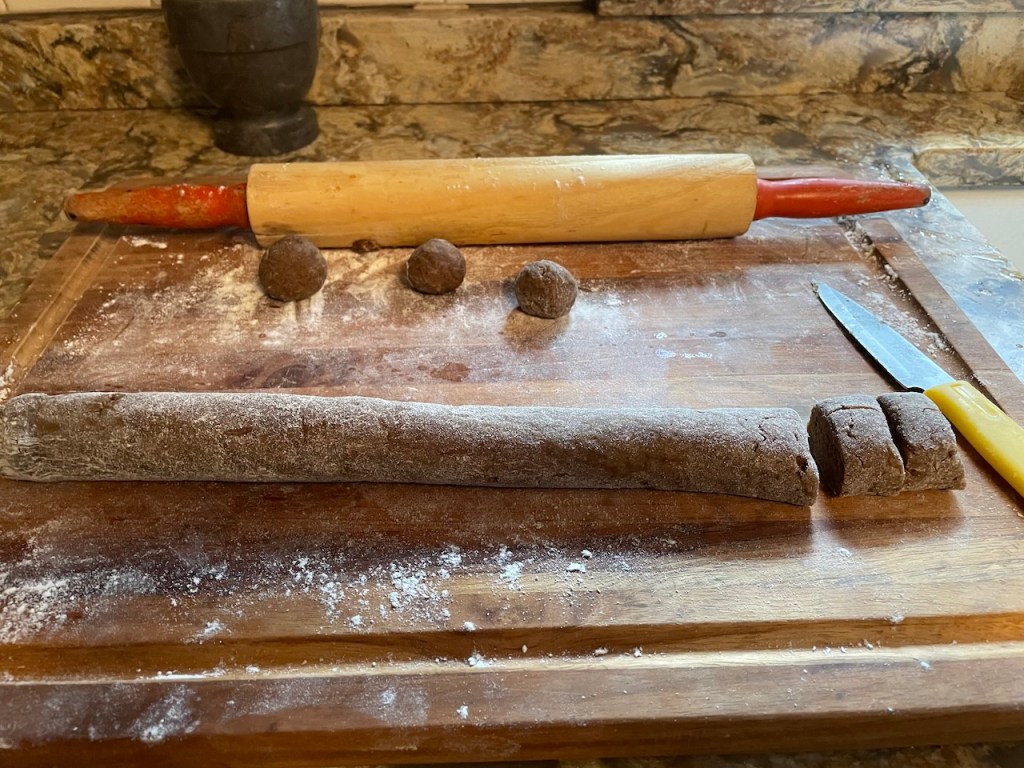
Divide the dough into two equal sized portions. Lightly flour the surface of a cutting board. Using your hand, shape each piece into a 6 x 2 x 1 inch log shape. You want to roll each piece like you roll a rolling pin. Place the logs on the baking sheet.
Bake for 30 minutes on the rack placed in the middle of the oven. You don’t need to worry about the color of the top as the logs will be baked again.
Take the sheet out of the oven. Place the logs on a cutting board and let them cool for 30 – 60 minutes.
Using a serrated knife, slice the logs about 1/2 inch wide. You can cut them on an angle or straight.
Reduce oven temperature to 300 F. Place each cookie slice upright on the cookie sheet about 1/2 inch apart and bake them for another 20 minutes or until golden in color and crisp. (Turn the cookies over on the other side half way though, after 10 minutes).
Remove and let the cookies cool on a wire rack. They will get firmer.
Serve with coffee, vine or tea.
Store in an air tight container. They will keep for a long time.
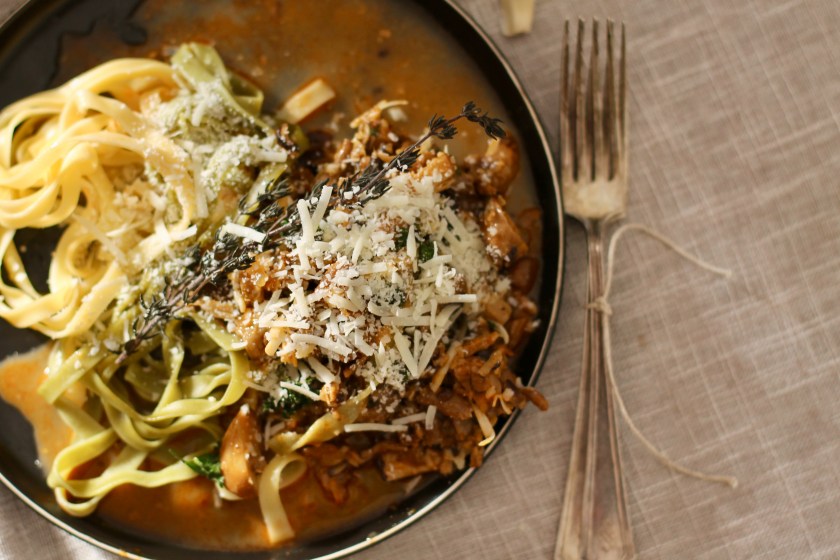
This is a festive, delicious entree. The main ingredient is the chestnut mushroom but you can use any hardy mushrooms that you’d like, even crimini mushrooms would work well. The mushrooms are sauteed with the delicate shallots. It is seasoned with paprika, thyme and Dijon mustard. Also, I used beef broth that boosts the savory depth and creates the unami flavor, bringing this dish to another level. Honestly, everything in this dish comes together to a taste sensation that you can’t stop eating. It is truly a crowd-pleaser!
RECIPE
Serves 4 people
INGREDIENTS
1 lbs Chestnut mushrooms, cleaned and sliced
1/4 cup shallots, finally chopped
2 Tbsp butter
1 tsp Hungarian paprika
3 cloves garlic, chopped
2 cups cold stock (I used beef but chicken or vegetable would be fine too)
1 tsp Dijon mustard
1 tsp dried thyme or 3 springs fresh thyme
1/4 cup cream
1/2 cup white wine (optional) or extra stock
pepper and salt to taste
parsley for garnishing
METHODS
In a wide skillet, melt the butter over medium heat. Add and saute the shallots for 5 minutes. Add the mushrooms and keep sauteing for 10 minutes or until they release their juice.
Clear the middle portion by pulling all the ingredients to the side. Add the paprika and garlic for 1 minute. Stir.
Add the wine. Stir. Cook for a couple of minutes. (Omit if not using wine, use additional 1/2 cup stock instead).
Add the cold stock, Dijon mustard and thyme. Stir. Bring to a boil and turn the heat down. Cook for 5 more minutes covered. Turn off heat.
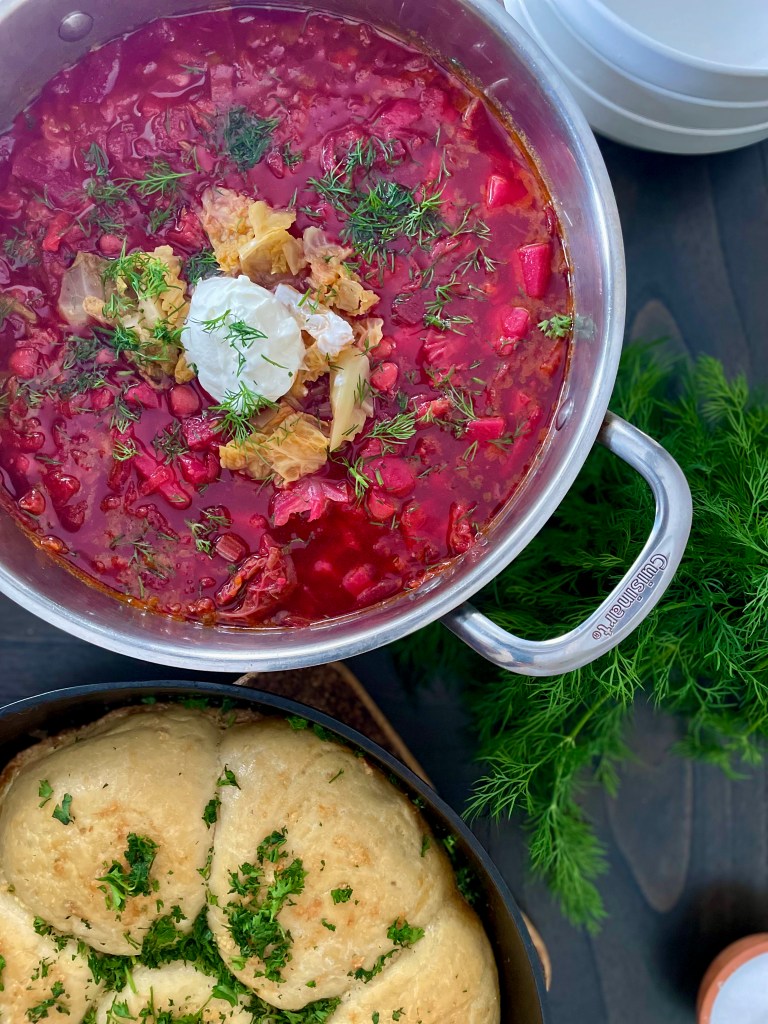
Pampushka means a beautiful plum women in Ukrainian. (I let you figure out the connection to this dish). These tasty dinner rolls are baked in the oven and are slathered with garlic infused oil. They are traditionally served with Borscht or a meal.
RECIPE
INGREDIENTS
1 cup lukewarm water (104 – 108 F)
2 1/4 tsp dried yeast
1 tsp sugar
2 1/2 cups flour, divided
5 Tbsp olive oil, divided
1 tsp salt + more for the top
6 cloves garlic
2 duck or chicken eggs, divided
METHODS
1. Preheat oven to 400 F. Oil an 11 inch round oven proof pan.
2. Start making the yeast. In a mug, dissolve the yeast and sugar in lukewarm water and let it rise covered for about 10 minutes.
3. In a bigger bowl, mix 1 1/4 cup of flour and the yeast mixture from earlier. Let the dough rest overnight in the refrigerator covered with a plastic wrap.
4. Take the dough out of the refrigerator, take the wrap off and add the rest of the ingredients: 1 1/4 cup flour, 1 egg, 1 tablespoon oil and salt. Mix. Kneed for 5- 10 minutes. Let it rest for 1 hour covered.
5. Divide the dough into 8 pieces and shape them into ball shapes. Place them side by side in a 11 inch (30 cm) round oven proof dish putting one ball in the middle. Cover and let them rest again in a warm place for about an hour.
6. Make a garlic infused oil. Mix 3 tablespoon olive oil with 3 cloves of garlic. Set aside, this will be used after rolls are baked.
7. Beat an egg lightly, add a little salt and 3 cloves of garlic. Brush the rolls with the egg wash generously.
8. Bake the rolls for 20 – 25 minutes in the oven.
9. When done, take the rolls out of the oven and spread the garlic infused olive oil on the rolls.
Serve warm immediately. Store covered on the counter.
Borscht is a traditional Ukrainian dish and is popular all over Eastern Europe. This iconic soup is an ideal soup for the winter. It is made with hardy root vegetables: potatoes, beets and carrots. These vegetables can be stored in a root cellar over the winter. The soup gets its gorgeous red color from the beets and zesty flavor from the Zacharka. Zacharka is made with sautéing onions, carrots and beets and is briefly simmered in a tomato sauce mixed with vinegar. At the end, cabbage, garlic and beans are added. Put a dollop of sour cream and chopped dill in the soup. Traditionally, it is also served with Pampusky.
RECIPE
Serves 8 people
INGREDIENTS
Broth
1 lb beef bones or chicken bones or 2 large celery roots for vegetarian option
3 bay leaves
3 parsnips
1 onion
3 cloves garlic
1 heaping Tbsp black pepper corns
3 carrots
water
Soup
10 cups broth (vegetarian, beef or chicken)
lard or olive oil
2 strips bacon, chopped (optional)
3 potatoes (Yukon, Russet), peeled and cubed.
4 medium beets, match stick
2 larger carrots, peeled and shredded
1 onion, finally chopped
2 celery stalks, chopped
1 larger tomato, chopped
1 Tbsp tomato puree
2 cloves garlic, crushed
4 Tbsp ketchup
1 Tbsp vinegar
1/4 small savoy cabbage, deveined, shredded
1 cup dry cannelloni beans or 1 can (14 oz) with the liquid
salt and pepper to taste
fresh or dried dill
METHODS
1. Making the stock. In a large pot, combine all the stock ingredients and add water well covering all the ingredients. Bring to a boil, turn down and cook for 2 hours. (Omit if using canned broth)
2. Cooking the beans. Soak the beans overnight. Place the raw beans in a smaller dish and cover well with water. Next day remove the soaking water, discard. In a medium sized pot cook the beans in fresh water. Bring to a boil and turn down. Cook for 1 hours or until soft but not mushy. (Omit if using canned beans).
3. Preparing the vegetables. Potatoes (peel and small cubes). Chop the onions. Carrots (peel and grate through large greater holes). Beets (sliced and cut lengthwise). Chop the tomatoes. Slice the cabbage leaves thin. Chop the garlic. Chop the dill.
4. Heat a large soup pot, pour in the stock, add the potatoes. Bring to a boil, turn down and cook for 30 minutes.
5. Meanwhile, in a smaller frying pan, saute onion in a small amount of lard or oil for 5 minutes. Add and render the chopped bacon for 5 minutes. Add carrots, chopped celery, beets, vinegar, ketchup, tomato and tomato paste. Continue sauteing for another 5- 10 minutes or until vegetables are soft. Set aside. (This mixture is called Zacharka).
6. Add the Zacharka from earlier, garlic, cabbage and the beans to the potatoes stock mixture. Mix. Cook for 10 minutes.
7. Add the salt and black pepper. Let the soup rest covered for about 20 minutes before serving. The flavor deepens as the soup sits.
8. Serve hot with a dollop of sour cream and dill. Traditionally it is also served with rye bread or Pampusky.
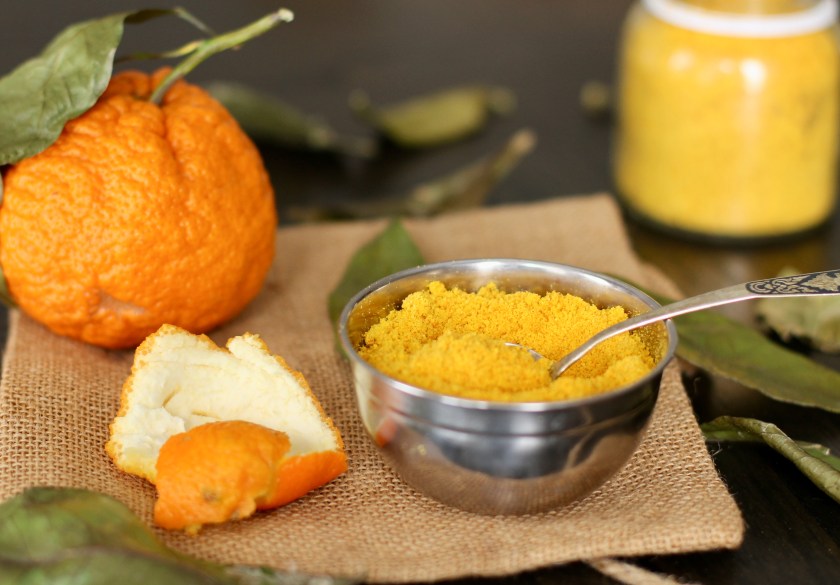
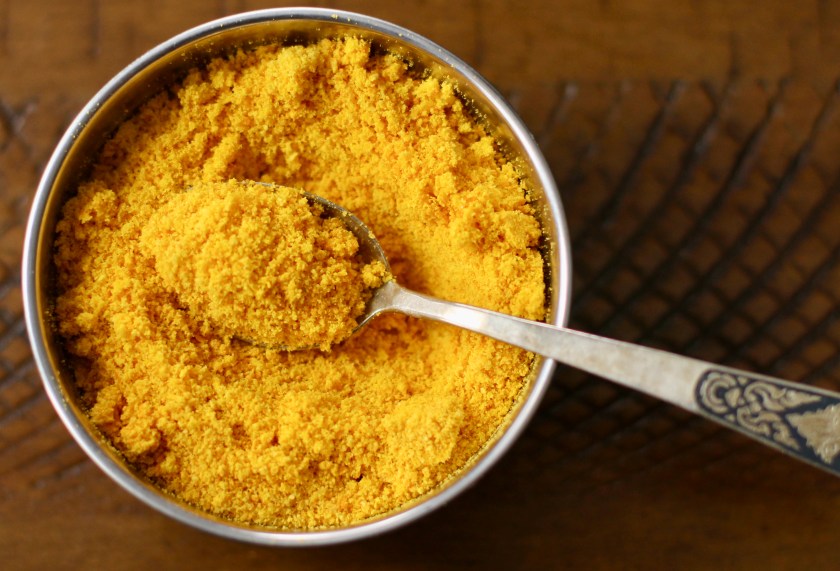
Orange peel can be used for cooking and baking especially in the winter. The aromatic sweet orange peel gives a hint of bitter flavor to desserts and savory dishes alike. It doesn’t shout, it is there to balance the dishes. I like to use all five flavors when I cook and orange peel can be used for the bitter flavor. I especially like to add it in my desserts when I need just a hint of the bitter flavor. They can also be used in cocktails and mulling spices.
It is very easy to make dried orange peel! I collect peels throughout the winter. After I eat the oranges, I dry them. Use this recipe so you can have some on hand when you need it. Most oranges will work. Just remove any wet, fleshy parts that might have stayed on the peel.
RECIPE
INGREDIENTS
peel from organic, untreated oranges (washed)- I use navel oranges.
METHOD
1. Carefully peel an orange. Remove any wet, fleshy parts that might have stayed on the peel. Place the peels on a paper towel in a single layer and put them in a dry place. The top of the cupboard is great. Don’t layer them as they can get soggy. Dry them for 1 month.
2. If you don’t want to wait for an entire month for the peels to dry, you can just dry them in the oven. The peels can be baked at 200 F for 90 minutes. They should be brittle and dry. If they are soft, continue baking them.
3. You can use the whole peels or grind the dried peels in a blender. Whole peels will last longer, finally powder will have a shorter shelf life.
4. Store in an airtight container in a cool place. They last for about 6-12 months depending how coarse you grind them.
I am in a face book group where somebody asked what our favorite herb right now was. I always have a hard time answering these questions as I have many favorites … but right now I can say with ease, it is chicory!
Chicory is known as a coffee alternative but it is not just a coffee alternative! It has an earthy, rich flavor and is caffeine free! It has a coffee like flavor and has many benefits. It would be beneficial for the body after eating all the rich foods during the holidays.
Chicory can help our digestion. The bitter flavor is especially helpful in removing the dampness that is caused by the rich, heavy meals and sweet foods. The dampness can adversely affect our digestive system. (1)
Chicory also contains Inulin, a prebiotic. Inulin can help feed the beneficial bacteria in the gut, that supports digestive and immune health.
Disclaimer: If you tend to have a drier, weaker body, drink chicory with caution or omit from your diet. (1)
RECIPE
INGREDIENTS
1 tsp chicory root -cut and sifted or powder (roasted if fine too)
1 cup of water
powdered cinnamon for serving (optional)
pinch of salt (optional)
METHODS
1. Boil the water. Place the chicory in a cup and pour the boiling water over the chichory root. Let it steep for 15 minutes.
2. Strain.
3. Serve it hot with cinnamon sprinkled on top and a pinch of salt added.
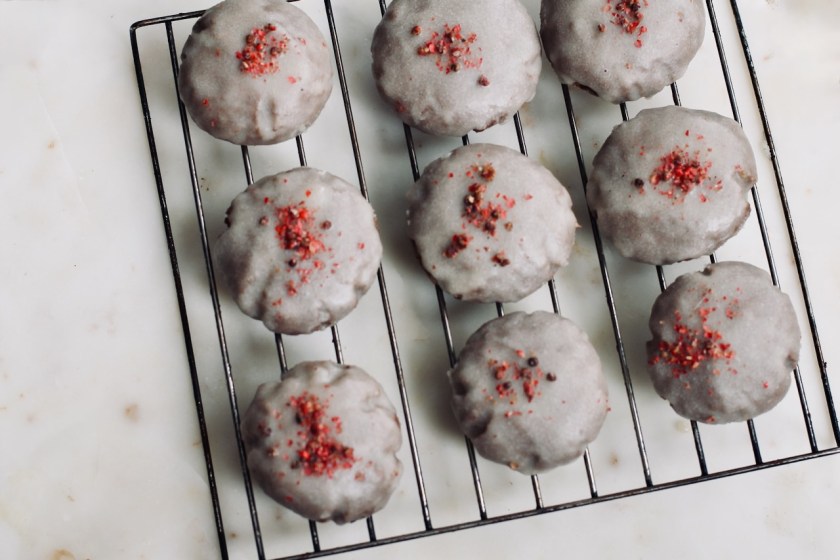
Turn on your favorite holiday music, put on your apron and start baking! The recipe comes from Martha Stewart. These cookies are a big favorite in Germany and are called Pfeffernüsse, pepper nuts in English. The small, round shaped cookies are made with gingerbread spices and molasses and then are glazed on the outside. Martha also did a little twist to the original German cookie recipe and added red peppercorns. And the smell of all these spices baking in the kitchen …
I think the red peppercorns elevated these cookies to another level. Yes, the cookies are already well flavored with many spices but these sweet red peppercorns bring everything together. Red peppers come from a flowering plant, Schinus terebinthifolius and are not peppers but belong to the cashew family. They are readily available in specialty stores. Taste it, it has a very unique, pleasant flavor.
Why are these cookies called pepper cookies? The cookies are made with spices cinnamon, nutmeg, allspice, cloves, black pepper and they are essential part of the recipe. So make sure they are high quality and fresh. I bought the whole spices and ended up grinding them in a mortar.
The recipe asks for confectioners’ sugar to make the glaze. Make sure you use this type of sugar instead of just the regular powdered sugar. Confectioners’ sugar is lightly powdered sugar with starch added to prevent it from caking as it sits. I didn’t have any at home so I grounded granulated sugar quickly in the grinder and added cornstarch. (I added 1 tbsp cornstarch to 1 cup of ground sugar).
For glazing, try to use a taller, narrow dish to dip the cookies. You need vertical space for the glaze.
The recipe also uses alcohol called kirsch. I didn’t have any so I used Hungarian plum brandy. You can also substitute with dry vermouth, grappa, or white (aka silver) rum. It is optional of course. Just make sure you are not using any sticky-sweet red liqueur concoctions.
You can add edible glitter if you want to make the cookies more festive. I didn’t use it as I don’t have it.
Another change I made to the recipe was letting the dough sit in the refrigerator overnight. In Martha’s recipe, the cookies are baked immediately after they are assembled. However, traditionally, the cookies are put in the refrigerator for some time. It allows the flour to fully hydrate, prevents spreading and allows the complex spice flavors to meld and deepen.
I also tried letting the cookies sit overnight on the counter and this method worked well too. I prepared the cookies, put them on the cookie sheets and baked them the next day. While the dough is traditionally refrigerated, this method worked fine too. The cookies tasted the same. The only difference is that the cookies will expand and be bigger in size.
Like any gingerbread dough, you can eat these cookies immediately but will taste even better in a week. They just need a little time to soften and the spices to settle. Otherwise these are fabulous cookies, well worth the time and effort. They taste just like the cookies from Germany.
RECIPE
Please read comments above.
INGREDIENTS
Cake
2 1/4 cups unbleached all-purpose flour
1/4 teaspoon baking soda
3/4 teaspoon fresh ground cinnamon
1/2 teaspoon fresh ground allspice
1/4 teaspoon fresh ground cloves
1/4 teaspoon fresh ground nutmeg
1/4 teaspoon fresh ground pepper
1/2 cup (1 stick) unsalted butter, room temperature
3/4 cup firmly packed light-brown sugar
1/4 cup unsulfured molasses
1 large egg, lightly beaten
1/2 teaspoon pure vanilla extract
Glaze
3 cups confectioners’ sugar
1/4 cup milk or water
1 teaspoon kirsch or other cherry-flavored liqueur (dry vermouth, grappa, or white (aka silver) rum, Hungarian pálinka) – optional
To decorate (optional)
Coarsely ground pink peppercorns
1 tsp edible glitter (optional)
DIRECTIONS
1. Preheat oven to 350 degrees. Grease 2 baking sheets. Take the butter out of the refrigerator.
2. In a medium bowl, sift together flour, baking soda and spices. Set aside.
3. In a medium sized bowl, cream eggs, brown sugar and molasses or until fluffy. Add in egg and vanilla, flour mixture; mix until just combined. Wrap the dough in a plastic bag and refrigerate overnight but at least for 3 hours.
4. Work in a cool space, maybe open the window. Remove the dough from the plastic wrap and immediately roll it into two strands, each 3/4 inch thick. Slice the rolls into 3/4 inch thick rounds and roll each round into a ball (each ball be about 3/4 inch large). Note: You can make them any size. Place the balls on the prepared baking sheet. Repeat process with remaining dough, spacing balls 1 1/2 inches apart. (Try to do this step as fast as possible so the dough doesn’t get too warm).
5. Baking. Bake, rotating sheets halfway through, until cookies are golden and firm to the touch with slight cracking, for about 10-15 minutes, depending on the size of the cookies. Transfer sheet to a wire rack to cool completely.
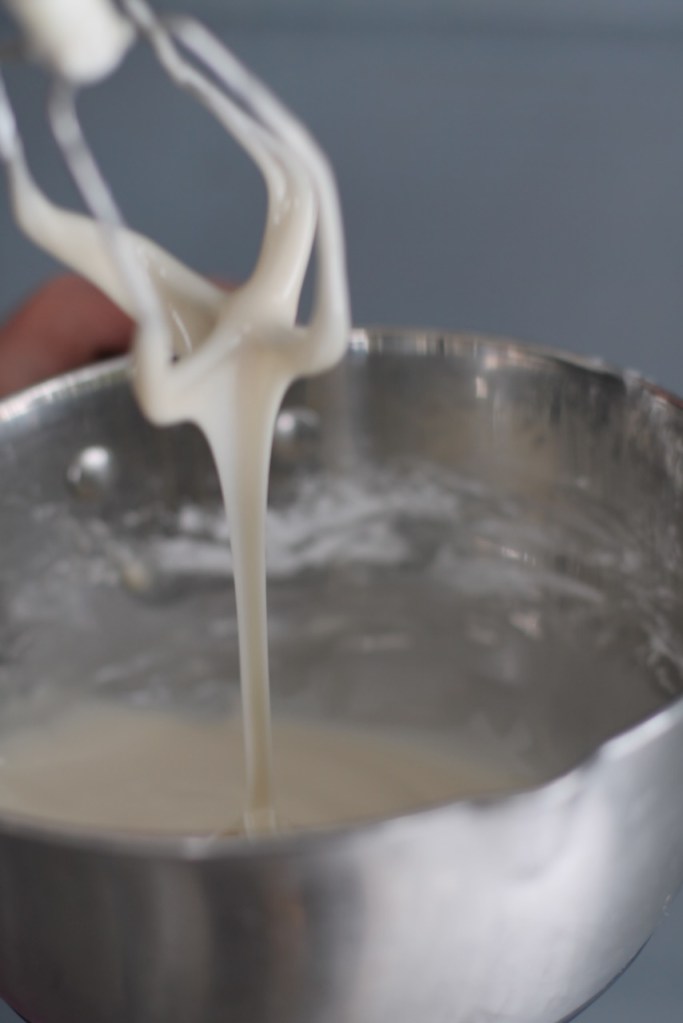
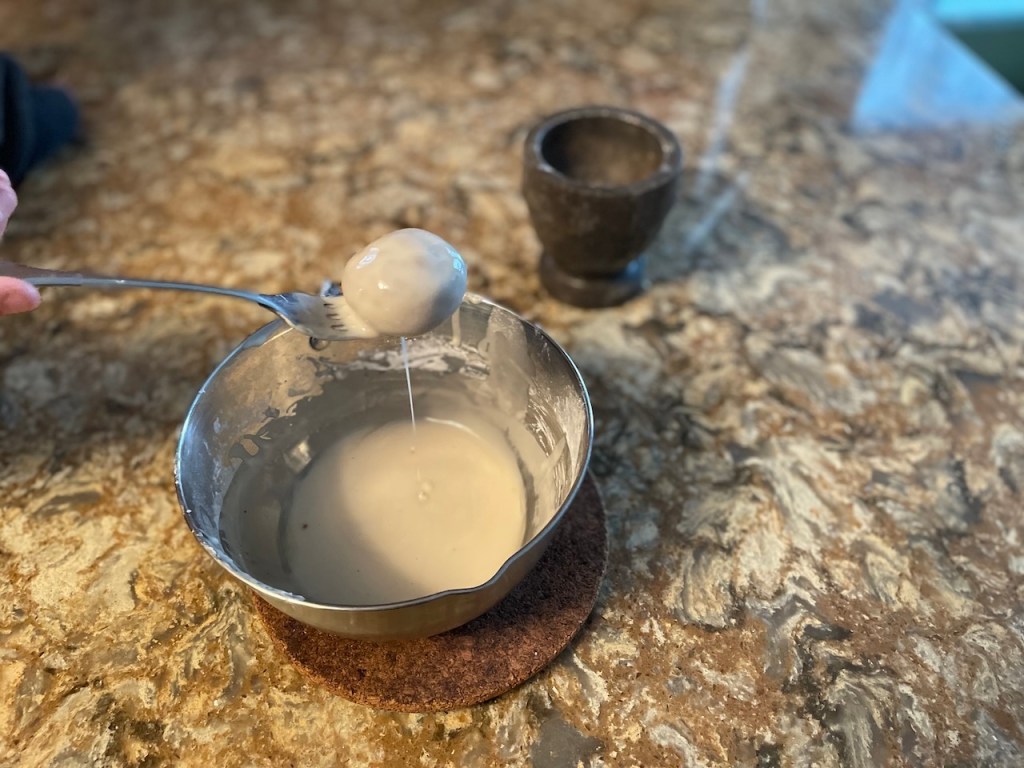
6. Glaze: Fit a rimmed baking sheet with a wire rack. In a medium bowl (tall and narrow), whisk together confectioners’ sugar, water and kirsch( if desired). Using a fork, dip each cookie in the glaze to coat. A quick dip and gentle shake off are all you need. Place on wire rack to dry. Repeat with remaining cookies.
7. To decorate (if desired): While the glaze is still wet, top cookies with a small pinch of peppercorns and the edible glitter.
8. Storage. Cookies can be stored in an airtight container at room temperature for up to 4 weeks (below 75 F).
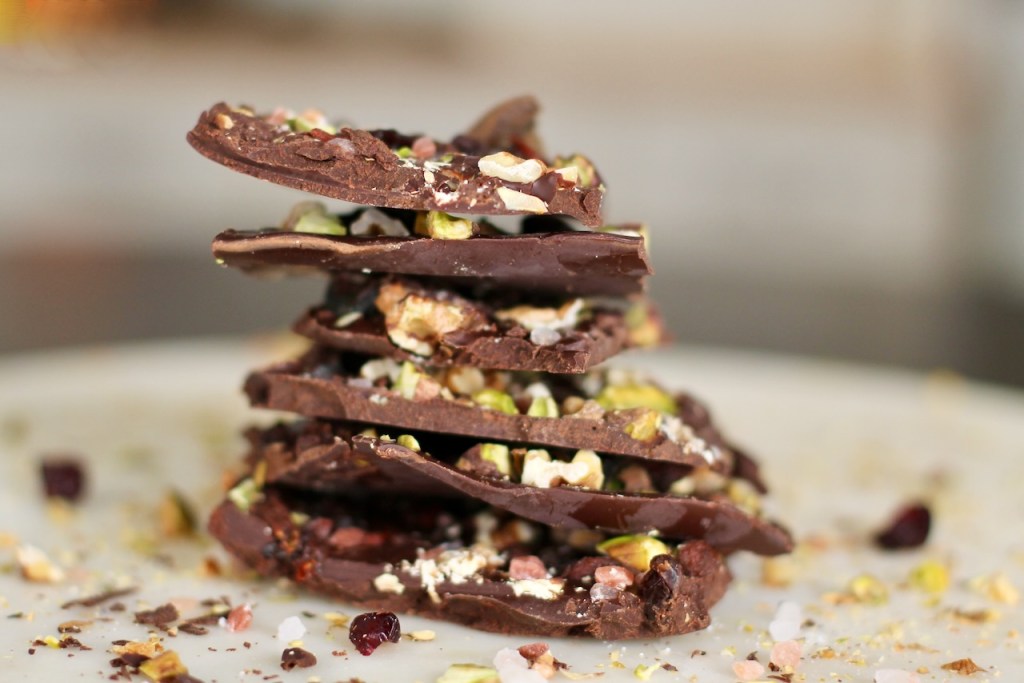
This festive chocolate bark is great for the holidays! Give it as a gift or treat yourself! It reminds me of the trail mix that I take with me when I go hiking … just a bit fancier of course.
It is super easy to make and is delicious! For the topping, you can use any nuts and dried fruits that you like. It is your choice and the combinations are endless! I used pistachio nuts and cranberries. Oh and the smell of the roasted nuts … priceless.
The perfect dessert … sweetened with only dried fruits and made crunchy with only nuts!
RECIPE
INGREDIENTS
12 oz high quality chocolate chunks or chips (I used 70% dark chocolate)
handful nuts, chopped
handful of dried fruits, chopped
1 tsp coarsely ground salt
METHOD
Preheat oven to 350 F.
On a baking sheet, toast the nuts in the preheated oven for about 6-9 min. Cut them into smaller pieces if you wish. Cut the dried fruits if you wish.
Melt the chocolate in a double boiler or a pot with a thick bottom. Spread the chocolate evenly onto a rimmed dish with a spatula. Try to get the thickness about 1/4″. The dish should be large enough to hold the melted chocolate. I used a 8 x 11 ” casserole dish.
Drop the dried fruits, toasted nuts and the salt pieces on the top.
Let it cool completely for 2-4 hours or refrigerate for 15 minutes.
When the chocolate is set, using your hand, break the chocolate into pieces.
They can be stored in an airtight container for weeks.
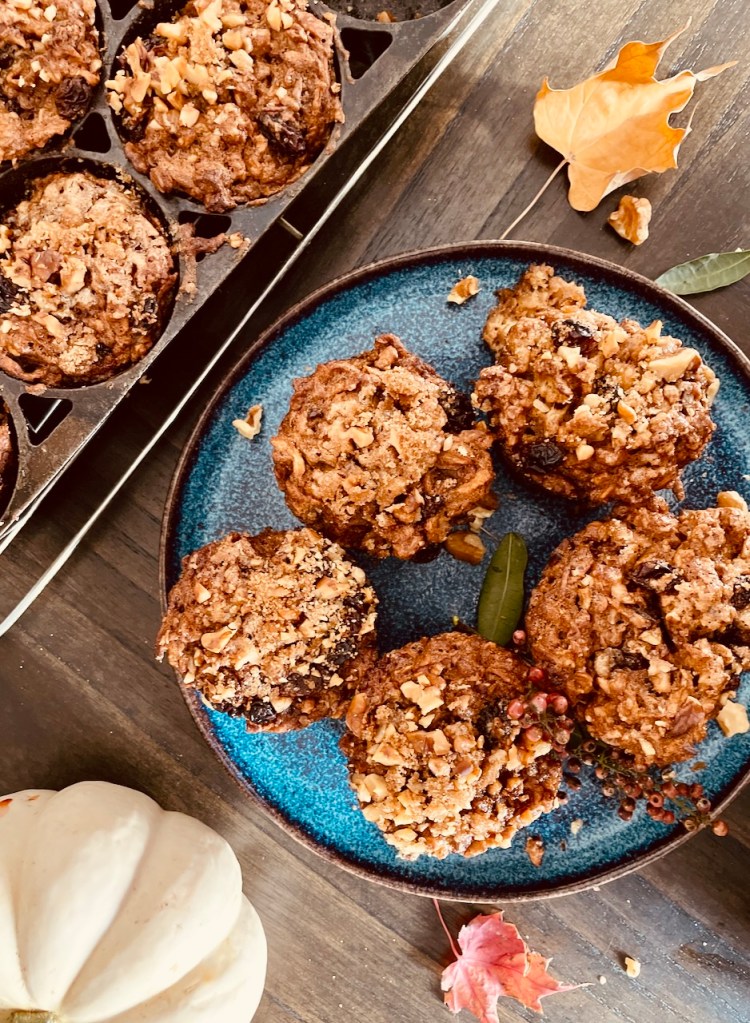
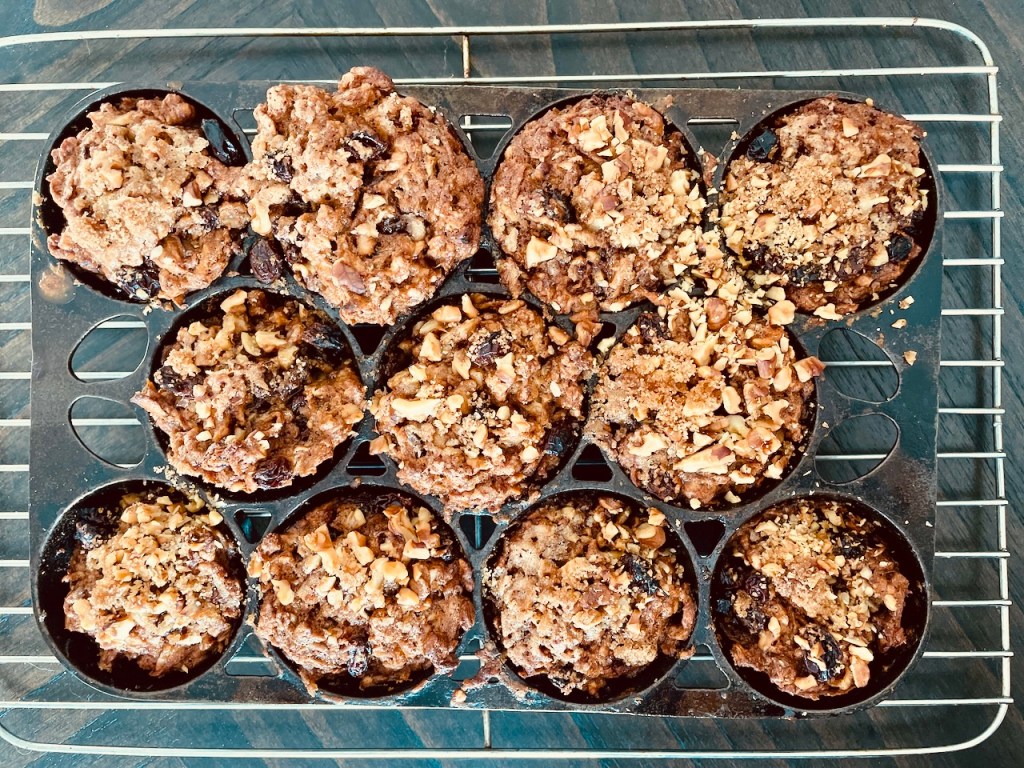
I ate my first oatmeal muffin when we visited my husband’s grandmother over 30 years ago. She made them for breakfast for us. I really liked it after I took the first bite and I have been making them ever since. I served them for breakfast when my parents came to visit us from Hungary and they were equally impressed. I remember my mom returned to Hungary with a muffin tin so she could make these delicious muffins.
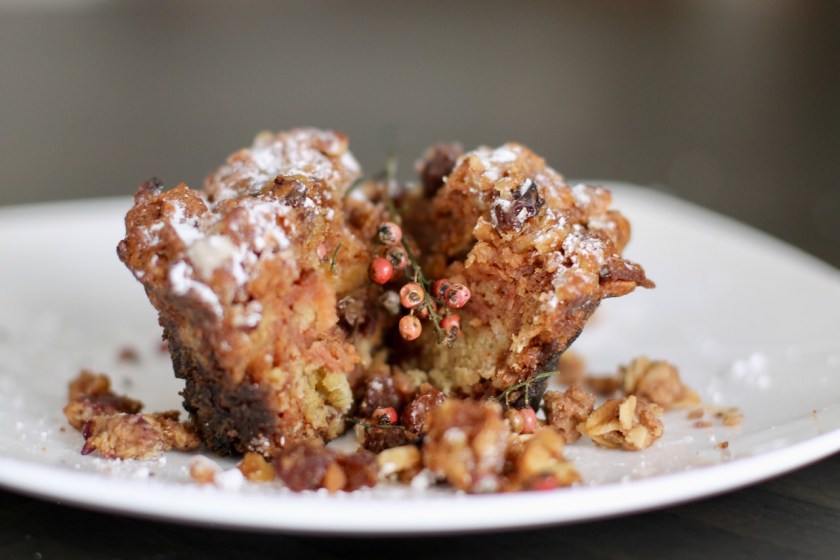
These apple oatmeal muffins are easy to make and are delicious. The oats give a nice texture and important nutrients. They are packed with raisins and nuts and infused with apple spice. I also added some grated apples to satisfy my autumn cravings and make the muffins moist. Also, as the apples made the muffins moist, I was able to remove the milk. I forgot to squeeze the juice out of the apples and didn’t add the milk … and my new recipe was born! I believe this recipe is even better than the original!
RECIPE
Serves 11 – 12 muffins
INGREDIENTS
1 cup wheat flour
1 cup old fashioned oatmeal
2 tsp apple cinnamon spice or cinnamon
1 tsp baking soda
2 tsp baking powder
pinch of salt
1/4-1 cup sugar (plus more for the top)
8 Tbsp butter or coconut oil, melted
3 eggs, lightly whisked
1 tsp vanilla
1 cup raisins
1 cup walnuts, chopped
2 heaping cups grated apples with the liquids (any baking apples like Fuji, Granny smith, Haralson would work well)
METHOD
Preheat oven to 350 F. Grease a muffin pan.
In a medium bowl, whisk together the flour, oatmeal, baking soda, baking powder, salt, apple cinnamon spice. Set aside.
In a separate bowl, cream vanilla, sugar, melted butter and eggs. Set aside.
Grate the apples. Set aside.
In a large bowl, mix the flour and the butter mixture. Fold in the apples, nuts and raisins. Mix just until combined. Don’t over mix, otherwise the muffins will be tough not tender.
Scoop the dough into a regular 11 – 12 cup muffin tin. Divide batter evenly between muffin cups. Sprinkle sugar on the top. (If there is an empty cup, fill the empty space with water).
Let the mixture sit for 1 hour if you have time.
Bake for 30 minutes.
Allow the muffins to cool for 10 minutes before taking them out of the tin. Then transfer them to a wire rack and wait for 10 minutes to completely cool.
Serve at room temperature.
Store on the counter covered with a cloth or in an airtight container.