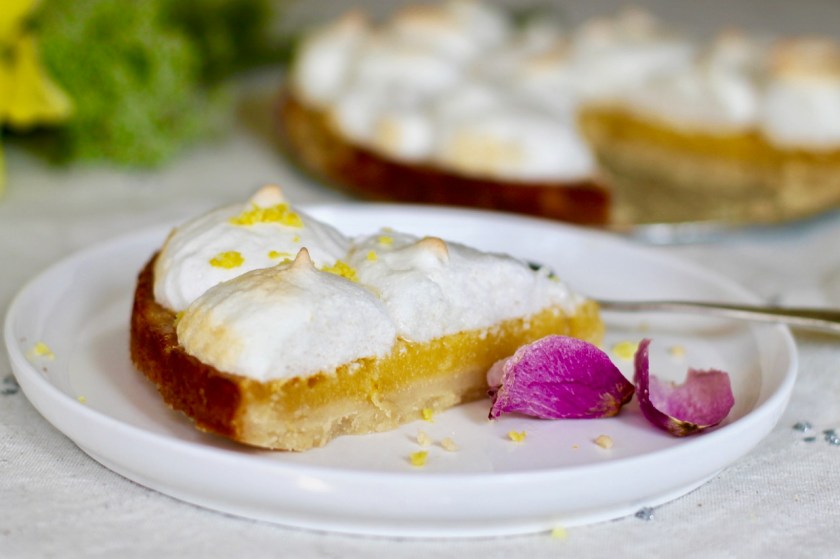
Turnip salad

In the Mid-West of the US, early April is the time when it gets really hard to eat local vegetables. There is nothing out there growing yet. But wait there are some crops from last fall like turnips … in fact raw turnips make a great spring salad. Past few weeks, I have been adding grated raw turnips to all my dishes. I have to admit it felt great to eat something raw. Try this simple salad, you can add a little olive oil, black pepper and carrots but honestly I often eat it just as it is, nothing added.

Turnip (Brassica rapa var) is a member of the mustard family that grows in temperate climate around the world. It has a neutral thermal energy and is slightly sweet, bitter and pungent … just what we need right now in the spring. It helps the liver, kidneys and spleen to function better and protects the lungs and blood vessels. It is especially high in fiber, nourishes digestive tracts and helps detoxify the body. It is considered to be high in many essential nutrients and minerals. Sounds like a super food to me …

RECIPE

Ingredients

  • 1 lb of turnips, medium or larger size
  • carrots strips (optional)
  • 1 Tbsp olive oil (optional)
  • freshly ground black pepper (optional)
  • 1 Tbsp of lemon juice (optional)

Directions

  • Clean, peel and grade the turnips. For grating, I use the largest hole of my cheese grater.
  • Cut up carrots into thin trips.
  • Add into a bowl. Serve with olive oil and black pepper if you wish.

enjoy!

Text, photo and recipe by twincitiesherbs.com.

Source

Paul Pitchford: Healing with Whole Foods

Chana masala (Indian chickpea dish)

Chana masala is a delicious Indian dish that would be great for the spring. I still vividly remember the first time I had chana masala at a friend’s house. He had us over for dinner when his parents came to visit from India like 25 years ago. I did not even recognize the chickpeas … I actually thought they were chestnuts. I never got the recipe but his mother gave me some tips. (Thanks to the internet I found this recipe on line and I think it is very close to what we had that night).

Chana means garbanzo beans and is the main ingredient in the dish. IMO it is crucial to prepare these beans properly. I remember our friend’s mother told me to cook the beans for a long time. They should be cooked for 3 hours or you can use a pressure cooker according to its instructions, of course. Cooking for this long will soften the beans and let the flavors come out. So if time is not an issue, I would recommend home cooked chickpeas instead of using the canned ones. The canned beans will not have the same results for sure.

Garam masala is the main spice in the dish. It is not just one spice but is actually a cleverly chosen mixture of a few spices: fennel seeds, star anise, mace, black cardamom. It is nicely balanced so one flavor will not overwhelm the dish. You can blend it yourself or you can just buy it. (I ended up buying it at the store).

This is a common dish that people in India make on a regular basis for lunch or dinner. It has an interesting flavor, taste and texture. It can be made less spicy, if you don’t like spicy dishes, just leave out the green chili. So chana masala is basically a chickpea curry cooked in an onion tomato sauce with the spices. I always wonder how poor people in India get by on very little money and still eat well. This dish might be one of their secrets …

RECIPE

-I doubled the recipe

serves 3-4 people

  • 1 cup of dried chickpeas or 1 (15oz) can
  • 3 cups of water

Ingredients for the tomato sauce

  • 2 Tbsp vegetable oil/ghee
  • 2 large onions, finally chopped
  • 2 garlic cloves, minced
  • 1 inch ginger piece, finally chopped
  • 2 medium tomatoes, chopped
  • 1/2-3/4 TBSP of red chili powder (adjust to taste)
  • 1/4 tsp turmeric powder
  • salt to taste

Ingredients for the chana masala gravy

  • 1 bay leaf
  • 1 inch cinnamon stick (If you double up the recipe, you will not need to add another cinnamon stick)
  • 2-3 clove pieces
  • 3 green cardamom pods without the shells.
  • 1 green chili pepper, chopped (optional)
  • 1-1 1/2 tsp garam masala
  • 1 1/2 tsp coriander powder
  • 2 pinch mango powder (amchur) (optional)
  • fenugreek leaves (optional)
  • coriander leaves

Directions

Clean and soak the chickpeas for at least 8 hours. Pour off soaking liquid. Add fresh cold water and cook for 3 hours. Less for pressure cooker. Save cooking liquid. Omit if using canned beans.

Directions for the tomato sauce

  • Sauté the onions in oil or ghee until golden. Add the chopped ginger for 1 minute, stir.
  • Add red chili powder and turmeric. Stir for 1 minute. Add garlic quickly, stir.
  • Quickly add chopped tomatoes and little salt, stir. Cook for 15-20 minutes or until there is a nice sauce. The onions should not taste raw.
  • Let this mixture cool. Add 1 tbsp liquid from the beans. Make a thick gravy with a blender. Set aside.

Directions for the Chana masala gravy

  • Dry heat the spices (cinnamon stick, bay leaf, cardamom, clove) in a pot for 1 minute until you can smell the aroma of the spices. Stir. I grind the cardamom as some people don’t like them in their foods whole.
  • Pour the blended tomato sauce mixture from the previous step back into the pot, the chopped green chili pepper, coriander and garam masala powders and the spices.
  • Mix and cook for a few minutes until ingredients are mixed nicely.
  • Add the cooked chickpeas and the cooking water. You might have to add more water.
  • Bring to a boil and simmer for 5-6 minutes.
  • Taste the mixture and see if you need more garam masala. Boil and simmer for 2 more minutes if spices were added.
  • Take out the larger spices like bay leaves, cinnamon, cloves.
  • I also added salt here.
  • Keep it covered until served.
  • Serve hot with cilantro, yoghurt, lemon, rice, vegetables and roti.

enjoy!

Source

https://www.indianhealthyrecipes.com/chana-masala/

Eating with the spring season (no recipe)

SPRING

No season brings more anticipation than spring … enjoying watching the plants grow and seeing how nature is slowly waking up. I know it is not everybody’s favorite season but I personally get very excited about spring. It is miraculous how the scenary quickly changes from snow and mud to lushous greenary. We can finally sit outside, eat fresh plants and wear lighter clothing. I feel that spring gives my creative energy a nice boost …

Spring is an important transition time of the year when we are moving out of the cold of the winter time into heat of the summer time. It is true as they say spring comes in as a lion and leaves as a lamb. If we prepare our body, our immune system will be able to handle the changes easier. In addition, it is important to work with this transitional season so we can cope with its harshness easier and can enjoy the heat of the summer later.

In Ancient Chinese Medicine, each season is associated with a natural element so spring is associated with Wood element. Also, each element has corresponding western organs. The western organs of the Wood element are the Liver and the Gall bladder along with the organs that they control: the Eyes and the Ligaments. (I capitalized the organs because in Chinese Medicine, it is more like an organ is considered to be the organ itself and its energetic functions).

However, Chinese Medicine is not just concerned about the physical body, it believes that our spiritual health is also important. The health of our Wood element can greatly effect this higher self and vice versa. It enables us to make plans, have a clear vision and allows our energy to move freely in the body. In other words, eating well during the spring can have an effect on the spiritual aspect of a person.

Our body should be flexible like a tree in the spring wind both mentally and physically. A healthy tree can easily yield to any wind and not fall over. We try to create this in our body by nourishing the liver and giving our body a break from all heavier, fatty, denatured foods, chemicals and intoxicants.

The energy of spring is more ascending and expansive like the new shoots on the plants. In a similar fashion, the liver’s energy tends to move upwards and is more active. To create this outside climate inside our body, Chinese Medicine recommends that the diet be the lightest of the year and to eat more sweet and pungent flavored foods. More complex carbohydrates like grains, cereal grasses, legumes, seeds, young beets, carrots along with all new spring foods are great sweet foods. Pungent cooking herbs like basil, fennel, marjoram, rosemary, caraway, dill, bay leaves are great to help the liver’s active energy.

As I mentioned earlier, we need to give our liver a break from heavier foods. As spring comes, we naturally tend to eat less. In fact, people have been traditionally doing their fasting early spring to make a smoother transition into spring and be able to cope with summer’s heat easier. Many cultures do their annual fasting in the spring that is around what is known today as Ash Wednesday in Christianity until Easter or around the time of the first full moon after the spring equinox. The detoxifying process can be a very spiritual experience.

The bitter, sour and detoxifying foods can help this fasting process. Bitter foods are burdock root, dandelion root/leaves, artichoke, lettuce, spinach, asparagus, amaranth, quinoa, alfalfa, radish, citrus peel. Foods that detoxify and cool the liver are mung beans, celery, seaweed, lettuce, cucumber, watercress, tofu, millet, chlorophyll- rich foods, mushrooms, rhubarb stem/root. Also fresh ginger, oats, sage, fennel, pine nuts, flax seed oil are also beneficial for the liver. In addition, small amount of vinegar or lemon have all three properties. For instance, people often drink a little lemonade in the morning with maple syrup or sugar (but not honey!) and cayenne pepper to get the liver ready for the day. (Caution: do not take too much vinegar or lemon, as you can achieve the opposite effect). The juice of one lemon is great.

Our eating and cooking habits should change as spring moves in. Food should be cooked quickly at higher temperatures in other words the quick sauté method is preferred. Also, it is best to eat dinner earlier than during the winter months. I would say dinner should be done by 6-8pm. According to Chinese Medicine, Liver time when our liver is the most active is between 11pm and 1am so our food should be digested by this time so the liver can do its jobs more efficiently … and it has 100+ jobs that it does regularly …

Spring is definitely the time when we eat less and eat lighter foods. In general, the liver likes to be cool and well nourished. We should be minimizing salt, fats, meats and eggs and eat more vegetables, legumes and grains. Of course, all over-processed foods should be avoided. Just like we do spring cleaning in our homes, we need to ‘clean’ out the inside of our body.

Source

  • Paul Pitchford: Healing with Whole Foods
  • Art: Unkown

Gourmet kitchari (moong bean stew)

I don’t know if the ground hog’s prediction is right or wrong but it is still cold here. So let’s go to a more exotic place like India and get a popular dish. No worries, no exotic foods will be used. You should be able to find all the ingredients here in the US at any grocery store. If your grocery store does not have them, you can try any Indian or Asian store but really all these ingredients are common in the US. I serve the dish with whatever vegetables I can get in the store, spinach, kale, cauliflower etc.

This dish is more of a gourmet version of the simple kitchari with the addition of mustard seed, cinnamon, cardamom and chili pepper. You can also add your favorite vegetarian dishes to make it more complete and fun. I used spinach, paneer, fried mushrooms and rice. Kitchari is such a healthy dish even if you serve it with all these other foods. If you want to experience the healthiest dish on the planet, please check out my simple kitchari recipe from last year.

RECIPE

Ingredients

  • 1 onion
  • 1 cup of mung beans
  • vegetable oil (I used home made ghee. )
  • 1 Tbsp fresh ginger, minced
  • 10-15 mustard seeds
  • 1″ stick of cinnamon
  • seeds of 3 green cardamom pods (discard green shell)
  • 1 tomato, chopped (canned is fine)
  • 1/2 tsp cumin seeds
  • 1/2 tsp cumin powder
  • 1 tsp coriander powder
  • 1 tsp turmeric powder
  • 2 cloves of garlic
  • 1 cup of stock (more if you want a soup)
  • 1 green chili pepper (you can remove the seeds if you don’t like your dish too hot)
  • salt and black pepper to taste
  • yoghurt
  • cilantro
  • lime or lemon

Direction

  • Clean and soak mung beans overnight but at least for 2 hours. Pour off soaking liquid and use fresh cold water to cook the beans for 1 hour.
  • Making the gravy. Saute the onion on medium high heat. You can add the cinnamon stick.
  • When you smell the nice aroma of the cinnamon, add the ginger, cardamom seeds, mustard seeds and cumin seeds, Stir and cook for about 5 minutes.
  • Add the powders (turmeric, cumin, coriander), stir. Add garlic, stir.
  • Add 1 chopped tomato and cook for about 5-10 minutes until it becomes saucy.
  • Add chopped chili pepper and cold stock, stir.
  • Bring to a boil, turn down and cook for 30 minutes.
  • Add in the cooked mung beans and cook for 15 more minutes or untl beans are done.
  • Add salt and pepper to taste.
  • Serve warm with rice, yoghurt, cilantro and lemon.
  • I also used paneer with spinach stew and fried mushrooms.

enjoy!

Recipe, photo and text by twincitiesherbs.com.

Beet salad with caraway seeds

This is a simple tasty salad that is great for the winter. I just cook the beets and then use vinegar, oil, caraway seeds and salt to prepare the salad. I like to make a big jar full and keep it in refrigerator. You can serve it as a side dish.

For me, beets are the perfect plant to transition from the the winter into spring. Yes! Spring will come sooner or later, OK most likely later in the Midwest …

Beets are grounding, nourishing and detoxifying making it to be the perfect vegetable for this time of the year for the winter and the spring. They are sweet and rich in nutrients for healthy body with important vitamins and minerals. They nourish and detoxify the liver getting the body ready for the spring.

I used only one spice, caraway seeds. The bitter and aromatic caraway seeds have been around for a long time and used in many European countries to make food taste good. It is one of the herbs that the ancient Greek doctors first started using in cooking because of its health benefits especially for digestion. I often take caraway seeds for granted but it is such a neat little herb that needs a little more attention. Please check this website for more info on caraway seeds .

Ingredients

  • 4 smaller beets (about 1 lb)
  • 1 Tbsp caraway seeds
  • 1/8-1/4 cup vinegar + 7/8 -3/4 water
  • 1 Tbsp vegetable oil (I used sunflower oil)
  • 1/2 tsp salt or to taste
  • pinch of sugar
  • black pepper, to taste

Preparation

  • Cook beets for 1 hour until soft but not mushy. I like to put them on a steamer.
  • When done take the peel off with a sharper small knife. Slice or shread the beets thin. You can do this with a knife or a slicer.
  • Make the dressing. Put 1/8 cup of vinegar in 1 cup cup. Add enough water so the cup is full. So you are adding 7/8th of a cup of water. Pour it in a medium sized bowl.
  • Add sliced cooked beets, caraway seeds, salt, oil and a pinch of sugar. Mix.
  • Grind some black pepper on the salad if you wish. Mix.
  • Serve at room temperature on the side of any dish.

enjoy!

Source

Photos, recipe and text by twincitiesherbs.

Rhubarb cobbler

Enjoy this true American deliciousness! The juicy base is sweet and sour nicely complementing each other and is covered with the perfectly crumpling, soft topping … Oh and it is begging for a bit of vanilla ice cream. Enjoy!

Cobbler is an American deep-dish fruit dessert. It became a favorite right after I took my first bite. Cobbler is simple yet it is bursting with rich flavor; there is something about it that surely grabs everyone’s attention.  You can make it with whatever fruit is available in the season. My mother-in-law made it with rhubarb and berries and that is how I keep making it. Foreigners often complain that Americans don’t have a cuisine of their own. Well this one is an American specialty for sure. 

I looked up the history of cobbler so I will try to summarize what I read.  Well, one is certain that it is a North American dessert. It seems like it was invented by the settlers from the Old World when they tried to make one of their stupendous pies but they did not have all the tools and ingredients that was available back at home.  As an immigrant, I can relate to this experience.  The word cobbler might come from the word ‘cobeler’ that meant wooden bowl.  They might have attempted to make a more simple version of a traditional pie recipe in a small wooden bowl by the fire.  Also, another meaning could come from the word cobbler, the person who mends shoes; kind of like how the dough is mended together like a patchwork. However, none of these speculations of the word’s origin is official.  

As I mentioned earlier, I like to make the cobbler with rhubarb, especially in the spring. It is the first fruit, oops I meant to say vegetable here. Yes people often think it is a fruit because of its fruity, sour taste but it is in fact a vegetable. I can’t believe I get excited about rhubarb but it is really the first new plant that shows up at the farmers market in the Midwest … and there is nothing else here for weeks. While it is not a fruit, it can be prepared with sugar to –kind of cheat- to pretend that like they are fruits.  I also like to add rhubarb because the sour flavor nicely offsets the sweetness of the berries.

Besides its fame in the culinary world, rhubarb has favorable health benefits too. Rhubarb is native to Siberia and has been around for thousands of years. It has been grown in Asia for its medicinal properties. With the big migration, it was adopted in Europe as well. The settlers brought it over to the United Staes in the 1700’s and was known as the pie plant. The whole plant except for the leaves are used. The stalks are used as food and the roots are used as medicine. The leaves contain oxalic acid and can be poisonous in larger quantities and are therefore not used. It is cooling and detoxifying to the liver which makes it an ideal spring vegetable. In addition, the plant contains high amounts of manganese, magnesium, calcium, potassium, polyphenolic flavonoids and Vitamines B complex, C, and K. It has a favorable effect on digestion, bone growth, skin health, metabolism, cardiovascular health and improves circulation.    

Berries are also healthy. Particularly, raspberries and blackberries have a sweet and sour flavor and neutral thermal nature. These qualities make the berries ideal for baking. They nourish the kidneys and the liver and also build and cleanse the blood of toxins.

This is a crowd pleaser! The only complaint I have ever heard was why I didn’t make more and I bring this dessert often to potlucks so I know a lot of people have eaten it. I really think cobbler is as good as pie is or even better. The trick is to get the best rhubarb and the sweetest berries you can find. You can grow them yourself or get them at the farmers’ market. This is really important as the main part of the cobbler is the fruits! Also, make sure you use the exact measurements! Remember it is still kind of a pie recipe. Can’t just say I take a little bit of this and and a little of that …

RECIPE

This recipe is straight out of the cookbook Joy of Cooking.

Serving size: 8 people

Ingredients

  • Have all the ingredients at room temperature exept for the butter
  • 1 lb of rhubarb cut into 1/2 inch pieces (in the store get the thinner stalks)
  • 1 lb of berries – I used blackberries and raspberries
  • ½ cup of sugar or more only if your fruits are not sweet enough. Only use more if your berries are not sweet. 1/2 cup is plenty otherwise, trust me!
  • salt
  • 2 Tbsp of  flour or 1 Tbsp of corn starch
  • 1 1/3  cup of all purpose white flour
  • 1 tsp of baking powder
  • 2 Tbsp of sugar
  • 5 Tbsp of cold unsalted butter
  • 2/3 cup of cream or 1/2 cup of milk (honestly milk is fine too)
  • 1 lightly beaten egg for the top
  • extra sugar for the top
  • vanilla ice cream for serving

Directions

  • Preheat the oven to 375 F. 
  • Have ready an oven proof baking dish that is about 2 quarts large in volume and 2 inches deep (ex 11 x 4 x 2 inch).  
  • Take fruits and the rhubarb out of the freezer if they are frozen, let them defrost. Wash rhubarb stalks and cut them into 1/2-1 inch long. If they are wide, you will have to cut them in half as well. Place the rhubarb and the berries in the dish. They need to be at room temperature before you can put the cobbler into the oven. 
  • Add pinch of salt, cornstarch and sugar and mix. Set aside and wait for at least 15 minutes or at least until rhubarb exudes some juice.
  • In a large bowl, combine the flour with the baking powder, pinch of salt and sugar.
  • Add the butter and mix. This is such a satisfying experience for me to do by hand but if you prefer you can use your food processor for this step. 
  • Add the cream or milk stirring with a wooden spoon until the dough comes together. Gently need the dough in the bowl 5-10 times if needed, turning and pressing any loose pieces into the dough. Dust the top and the bottom of the dough.  
  • Now we will make a patchwork. Divide the dough into 8 parts and flatten each piece between your two hands about 1/4 inch thick. Place this piece on top of the fruit mix. Keep doing this until you have used up all the dough and the fruits are completely covered.  The dough should be workable but not sticky. If the dough becomes too sticky and hard to work with, put it into the fridge for about 10 minutes to become the proper consistency. This can happen in the summer when it is warm outside.
  • Lightly brush the top of the dough with the eggs and sprinkle with a little sugar. 
  • Put the cobbler in the oven and bake for about 35-40 minutes or until the top is golden brown and the berries are bubbling. 
  • Let stand at room temperature for at least 15 minutes before serving. 
  • You can serve the cobbler with vanilla ice cream if you wish.

enjoy!

Sources

  1. Irma S. Rombauer: Joy of Cooking
  2. Paul Pitchford: Healing with Whole Foods
  3. http://www.etymonline.com/word/cobbler
  4. https://www.healthbenefitstimes.com/rhubarb/

Buckwheat pancakes with Rhubarb sauce

Surprise your mom for breakfast with these delicious, healthy pancakes for Mothers’ Day or just treat yourself any time.

This naturally gluten-free pancake recipe is the successful marriage of the traditional American buttermilk pancakes and the Russian buckwheat pancakes (blini). I wanted to replace the white flour with something healthy and then I remembered the Russian pancakes and started experimenting. Let’s face it, white flour is tasty but is not very nutritious or filling. Furthermore, many of the flour alternatives can be also lesser quality. So after using buckwheat over the years, I decided to experiment and see how it would do here. I have to say the result quickly became a family favorite. 

Buckwheat is an ancient plant but has been forgotten. It has recently become a popular food again in the West because it lacks gluten that causes gastrointestinal problems in so many people. It is a staple in Russia, in fact, the Russians have survived on it for centuries. Eating buckwheat might have been their secret. So why should we eat buckwheat on a regular basis? Even if there is no crisis, buckwheat can be included in our diet as it is incredibly healthy and nourishing. It is not a grain but it is the seed of the buckwheat plant and does not cause digestive problems like wheat does but it actually nourishes the digestive tract.

Let’s look at its energetics. Its neutral thermal nature and sweet flavor are an indication that it is a tonic food. It is rich in protein (13g). It has also intestine cleansing and strengthening and appetite improving ability.  Rutin, a bioflavonoid in the grain strengthens the capillaries and blood vessels, hinders hemorrhaging, decreases blood pressure, and promotes circulation in the hands and feet. Rutin also has the ability to protect against radiation. 

To improve the texture, I added tapioca pearls.  The trick is to grind both grains before you make the pancakes. It is worth it! The store-bought flours yield a lesser quality for sure. You can get the tapioca flour ready ground instead of grinding it yourself if your grinder isn’t strong enough but the store-bought buckwheat flour is too bitter.  Another trick/personal preference is when you grind the grains, leave the flour a little coarse. This gives the pancakes a bit of texture. Try not to grind too long though.

In the spring, I like to serve the pancakes with rhubarb sauce. The rhubarb stems are great in the spring.  It is the first fruit, oops I meant to say vegetable here. Yes people often think it is a fruit because of its fruity, sour taste but it is in fact a vegetable. I can’t believe I get excited about rhubarb but it is really the first new plant that shows up at the farmers market in the Midwest. While it is not a fruit, it can be prepared with sugar to –kind of cheat- make them be like they are fruits.  Rhubarb has favorable health effects as it is cooling and detoxifying to the liver.  (Just on the side, I will have a rhubarb cobbler recipe soon posted when the berries are ready. Please check back). 

EDIT: I have been trying to figure out how to balance the sourness of the rhubarb. As I mentioned before I got the recipe straight out of the cookbook Joy of Cooking but there is something missing. I can’t believe I didn’t come up with this earlier. So I added a little fresh chopped ginger root, orange peel and sprinkled it with a little cinnamon powder and salt. It did the trick so I will add these ingredients to the recipe now.

The PANCAKE RECIPE

What you need

  • 2 cups of freshly grounded buckwheat groats
  • 1 cup of freshly ground tapioca pearls
  • 2 cups of fresh buttermilk or powder would work too
  • 1-1.5 cups of milk (use only 1 cup of milk if using already ground tapioca flour)
  • 1.5 tsp baking soda
  • 3 tsp baking powder
  • 3 tsp cornstarch
  • 3 whole eggs.- lightly beaten (at room temperature)
  • 3 Tbsp of melted butter
  • ½ tsp salt
  • sugar (optional)
  • oil for the pan (I like to use ghee but sunflower or grapeseed oils are fine too)

ground tapoica

Ground buckwheat

Directions

  • Grind buckwheat and tapioca. Put them in a large bowl. 
  • Add the buttermilk and let the mixture sit overnight but at least for 4 hours.
  • Add baking soda, baking powder, salt, corn starch.  I like to add these right before I make the pancakes.
  • Have a bowl ready.
  • Melt butter in a heavy bottom pot and add to the bowl.
  • Wisk eggs. You can beat egg whites separate if you want to make pancakes fluffier.  Add to the bowl.
  • Add milk to the bowl.
  • Mix together and when ready add this mixture to the grains from earlier.
  • Blend batter using a wooden spoon. Stir only until it’s just blended. Do not over stir!
  • Heat a lightly oiled frying pan over medium heat. You can flicker water across the surface and if it beads up and sizzles, it’s ready!
  • Poor or scoop the batter onto the baking pan, using approximately 1/3 cup for each pancake. Brown on both sides and serve hot.
  • Serve with your choice of yoghurt, rhubarb sauce, maple syrup, nuts, fruits, jam etc. 

The RHUBARB RECIPE

What you need

  • 4 cups of rhubarb stalks (Choose firm stalks that are not wilted).  
  • ¼ – ½ cup of sugar (can omit if sugar is an issue)
  • little salt
  • 1 tsp fresh ginger root (finally chopped)
  • 1 Tbsp orange peel
  • cinnamon powder + freshly graded nutmeg – (I use apple spice from penzeys.com)

Preparation

  • Wash and trim the top greens off.
  • Cut into 1 inch pieces lengthwise. If the stalks are wide (more than 1 ½ inches), slice them lengthwise in half.
  • Put rhubarb and sugar in a smaller pot for about 15 minutes or until the rhubarb exudes some juice.  No need to add water! Add also the ginger and orange peel.
  • Bring the mixture to a boil over medium-high heat, stirring constantly.
  • Reduce the heat to low.
  • Cover and simmer, stirring occasionally until the rhubarb is tender and the liquid thickened. (10-15 minutes).
  • Remove from the heat.
  • Let it cool for 15 minutes, the sauce will thicken as it cools.
  • Sprinkle with cinnamon.
  • Keeps in the fridge for up to 1 week.
  • (This recipe is straight out of the cookbook Joy of Cooking).

enjoy!

Sources

Written by twincitiesherbs.com

Sorrel and nettle stew (Sóska és csalán fözelék)

Every year, I look forward to spring just so I can make this dish. The main ingredients are sorrel and nettle. The sorrel gives a really nice, pleasant lemony flavor and the nettles add the substance, texture and protein to the dish. It is a simple recipe to make, the hardest part is really to find the sorrel and the nettles. Our ancestors regularly ate them in the spring but today unfortunatelly they are seldom available in stores. My recipe is based on the Hungarian sorrel stew recipe (sóska fözelék) with the addition of the nettles. Years ago, I could not find any recipes that had nettles so I decided to experiment. In my opinion, the results are fantastic.

Before I post the recipe, I would like to talk about nettles and sorrel. Nettle is like the super food of the US and Europe. When I think of Nettles, two things come to my mind: nutritive tonic and the kidneys. It is very high in protein, vitamins, and minerals and makes a nutritious food for sure. Just to demonstrate its high protein content, Nettles have 40-45 grams of protein compared to beef that has 20 grams. It is rich in iron, silica and potassium. It also supplies vital energy to the kidneys that can be helpful for everybody but especially during pregnancy, menopausal years and old age. In general, it is safe to include in the diet and should be consumed during the spring months. Just make sure you get the leaves before the plants start flowering.

With its sharp, tangy taste, sorrel adds zest to dishes. However, it is not just added for its flavor but it is also a nutritious goodness. Sorrel is a green leafy vegetable with calcium, iron, magnesium, phosphorus, potassium, sodium, zinc, vitamin C and a fair amount of fiber. Polyphenolic acid, flavonoids, anthocyanins are the beneficial organic compounds in sorrel. No wonder our ancestors frequently included it in their diet. It aids digestion, improves energy and circulation, boosts immunity, heart and vascular health, improves kidney health, builds strong bones, improves eye sight, and one’s overall functional health.

RECIPE

Ingredients

  • 1 lb of washed sorrel or you can use spinach too but the dish will taste differently.
  • 1/4-1/2 lb of washed nettles (the nettles should be fresh and stingy but they will not hurt your mouth after you cook them).
  • vegetable oil (I like sunflower)
  • 2 strips of longer bacon (optional)
  • 1 onion finally chopped
  • 2 cloves of garlic
  • 1 tsp of sweet Hungarian paprika (powder)
  • about 1/2 cup of water, vegetable or meat stock (preferably home-made)
  • 1/4 cup of sour cream
  • 1 tsp salt or to taste
  • freshly ground pepper

PREPARATION

  • Saute the onions in some oil until translucent and can smell the wonderful aroma of the onion.
  • If desired add bacon and fry until crisp.
  • Keeping the oil warm add the paprika and the garlic, mix for 30 seconds and add cold water or stock.
  • Add sorrel and nettles.
  • Bring to a boil.
  • Turn the heat down and cook on low heat for about 30 minutes.
  • When done, take off heat and let the dish cool off.
  • Chop the vegetables in a food processor. Here you are trying to create a sauce with a little texture.
  • Add salt and sour cream, black pepper.
  • Serve on mashed potatoes along with fried eggs or hard boiled eggs.

enjoy! Jó étvágyat!

Sources

Hot and sour burdock soup

When I go to Asian restaurants, I always wish I could make their foods. Well, here is one that can be easily made!

Spring is here! In the Midwest, one of the first edible foods in nature is Burdock root. A great way to include burdock in your diet is to make a soup with the roots. Asian cooks rave about their burdock soups that they make in the spring. I’m presenting a burdock root soup here that is inspired by Rosalee de la Foret’s blog. Well, here is one dish that can be easily made! There is really nothing exotic about this soup, all the ingredients can be found here in the US.

The website to the original recipe: https://learningherbs.com/remedies-recipes/hot-and-sour-soup-recipe/

As we transition from the winter into spring, it is important to pay attention to our digestion. Heavy foods in the winter might be clogging our livers that can lead to some dreaded health problems in the spring like fevers and tiredness. We tend to eat heavier foods during the winter months but now as our livers are waking up, our body is ready to embark on something lighter and easier to digest. The spring season is the time to attend to the liver and the gallbladder. Our body tends to cleanse itself naturally as we eat less. In addition, it is nice to add some bitter plants that aid the liver to accomplish this process. Our ancestors ate a lot of bitters in the spring. One of these spring bitters is burdock.

Burdock is a lovely plant. It has a distinct flavor. It is earthy, slightly sweet, and bitter. The bitter flavor is lacking in our diet today and is what our liver needs at this time. It cools and clears the stagnation that was caused by the heavier winter foods. Oh and one more … it is also aphrodisiac! So yes! … you can make it for your date dinner, too!

This soup works great in the spring. The burdock’s earthy, heavier flavor pairs nicely with the carrot’s sweet and light flavor. In addition to bitter flavor, the liver also needs the sour flavor that it gets from this sour dish as well. This soup is a big favorite in our family, yes even the kids like it. Perhaps it is because of its interesting, well balanced flavors. In fact, it has all five flavors: sweet, salty, bitter, sour, and pungent!

Ingredients

  • 1 qt (or more to well cover the vegetables) of home-made stock (vegetable or pork, beef, chicken, fish). For the meat stock recipe, please refer to my Stuffed Cabbage recipe.
  • 1 cup of shredded burdock root (peeled and shredded through the largest holes of your grader) – if you don’t have it in your backyard, it is available at farmers’ markets, co-ops or also from Harmony Valley in Veroqua, WI.
  • 2 cup of shredded carrot (peeled and shredded)
  • 2 clove of garlic
  • 1 Tbsp of minced ginger
  • 2 handfuls of mushrooms (like morelle, shitake)
  • 3 Tbsp cornstarch mixed with 4 Tbsp of water
  • 4 Tbsp of rice or white vinegar
  • 2 lightly beaten egg yolks
  • 1 Tbsp sesame oil
  • scallions
  • soy sauce
  • hard boiled eggs
  • hot red pepper or sriracha sauce (optional)

Recipe

  1. Bring stock to a boil.
  2. Add carrots, Burdock roots, mushrooms, the crushed garlic and ginger. After it boils, turn it down to low medium heat for about 5 minutes.
  3. Add vinegar and the cornstarch mixture. Keep stirring it becomes thick for about 2-3 minutes.
  4. Turn off the heat and stir egg yolk in gently. Add salt and hot red pepper (optional).
  5. Serve in a deep bowl. Garnish with scallions and add soy sauce to taste.
  6. You can add hard boiled eggs too. Bring some water in a pot to a boil and add the eggs at room temperature. Boil them for 7 and a half minutes. Take them out and put them into cold water. Peel and serv. If the eggs are cold, straight out of the fridge then the cooking time is 8 minutes.

Enjoy!

Sources: