Honey butter is very easy to make. All you have to do is mix soft butter with a little honey. For a dairy free version you can use coconut butter, it is equally delicious. Serve it anytime you want to add a little hint of sweetness to your food… it is great for pancakes or toast. My favorite is corn pancakes!
RECIPE
INGREDIENTS
8 Tbsp butter or coconut butter, room temperature
1 Tbsp honey
METHODS
1. Mix the soft butter with the honey. If it is too cold in your space, you can heat it up. It will solidify soon after you add the honey or it can be placed in the refrigerator.
2. Store on the counter at room temperature or the fridge if it gets too hot.
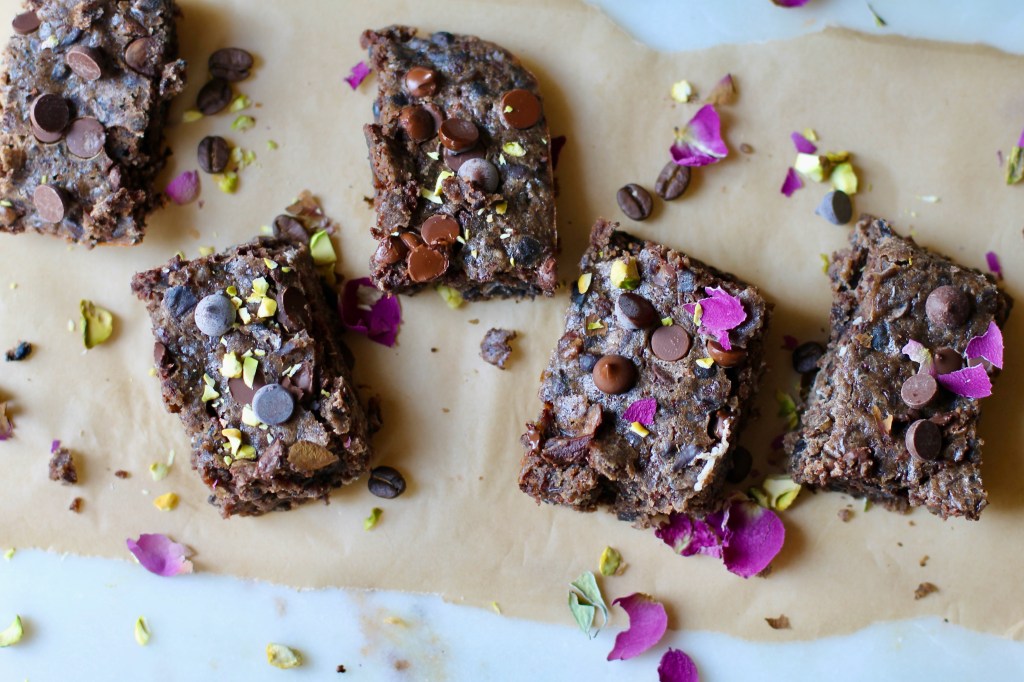
This festive chocolate bark is great for the holidays! Give it as a gift or treat yourself! It reminds me of the trail mix that I take with me when I go hiking … just a bit fancier of course.
It is super easy to make and is delicious! For the topping, you can use any nuts and dried fruits that you like. It is your choice and the combinations are endless! I used pistachio nuts and cranberries. Oh and the smell of the roasted nuts … priceless.
The perfect dessert … sweetened with only dried fruits and made crunchy with only nuts!
RECIPE
INGREDIENTS
12 oz high quality chocolate chunks or chips (I used 70% dark chocolate)
handful nuts, chopped
handful of dried fruits, chopped
1 tsp coarsely ground salt
METHOD
Preheat oven to 350 F.
On a baking sheet, toast the nuts in the preheated oven for about 6-9 min. Cut them into smaller pieces if you wish. Cut the dried fruits if you wish.
Melt the chocolate in a double boiler or a pot with a thick bottom. Spread the chocolate evenly onto a rimmed dish with a spatula. Try to get the thickness about 1/4″. The dish should be large enough to hold the melted chocolate. I used a 8 x 11 ” casserole dish.
Drop the dried fruits, toasted nuts and the salt pieces on the top.
Let it cool completely for 2-4 hours or refrigerate for 15 minutes.
When the chocolate is set, using your hand, break the chocolate into pieces.
They can be stored in an airtight container for weeks.
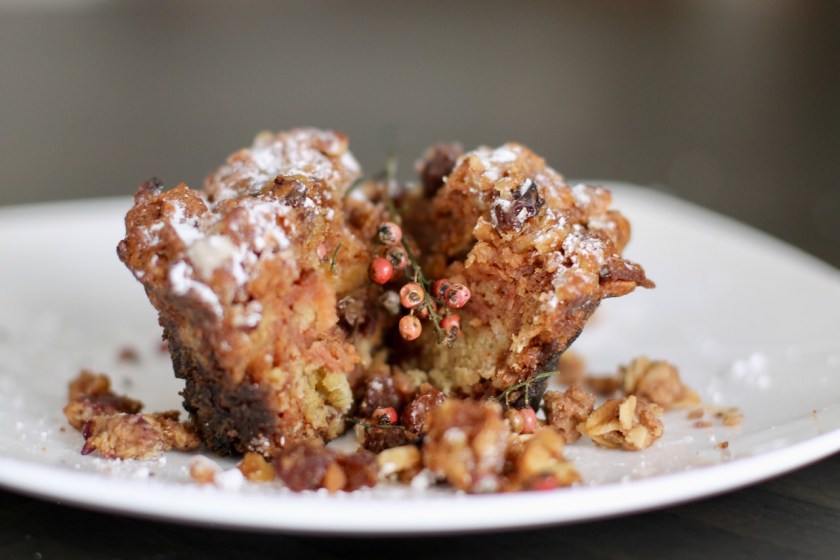
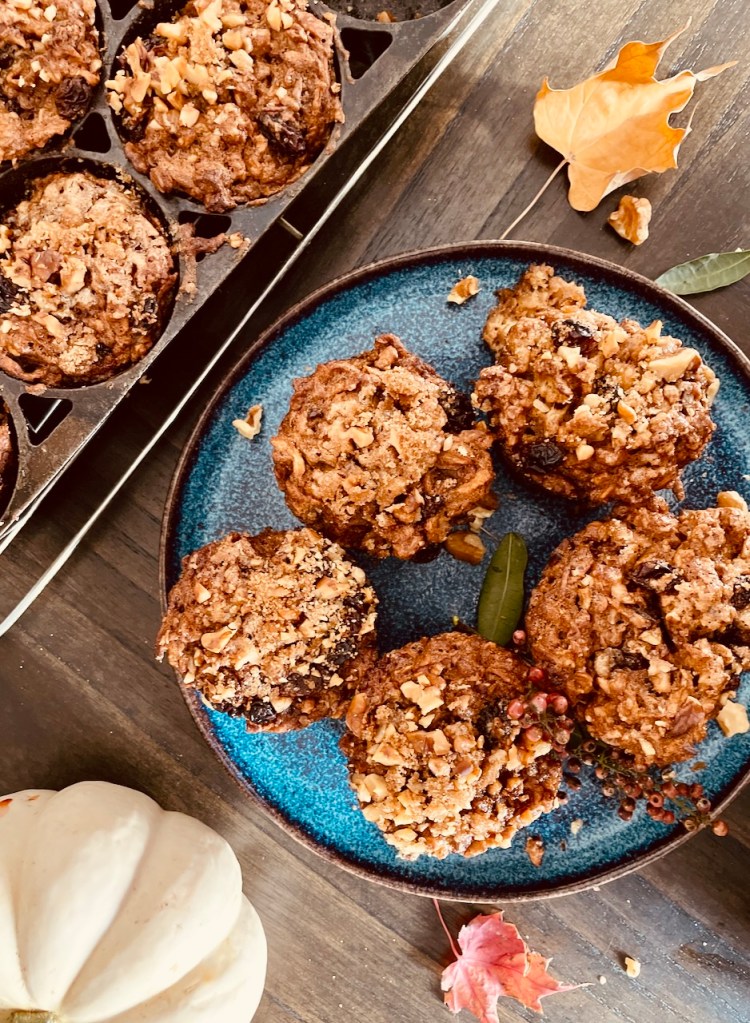
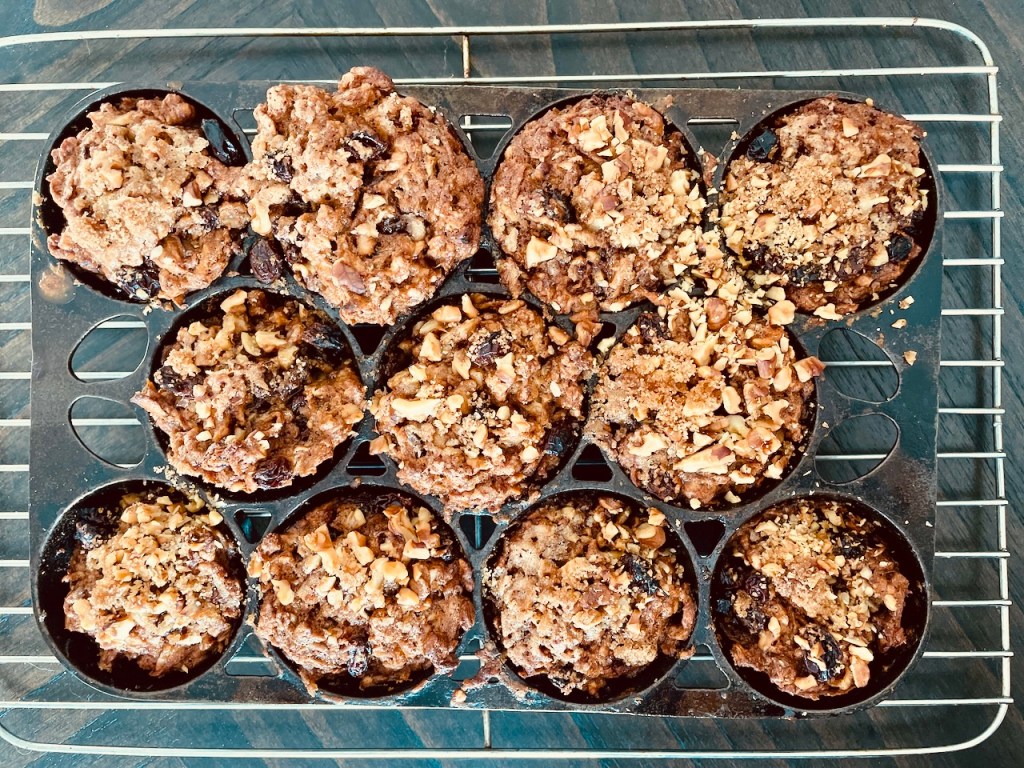
I ate my first oatmeal muffin when we visited my husband’s grandmother over 30 years ago. She made them for breakfast for us. I really liked it after I took the first bite and I have been making them ever since. I served them for breakfast when my parents came to visit us from Hungary and they were equally impressed. I remember my mom returned to Hungary with a muffin tin so she could make these delicious muffins.
These apple oatmeal muffins are easy to make and are delicious. The oats give a nice texture and important nutrients. They are packed with raisins and nuts and infused with apple spice. I also added some grated apples to satisfy my autumn cravings and make the muffins moist. Also, as the apples made the muffins moist, I was able to remove the milk. I forgot to squeeze the juice out of the apples and didn’t add the milk … and my new recipe was born! I believe this recipe is even better than the original!
RECIPE
Serves 11 – 12 muffins
INGREDIENTS
1 cup wheat flour
1 cup old fashioned oatmeal
2 tsp apple cinnamon spice or cinnamon
1 tsp baking soda
2 tsp baking powder
pinch of salt
1/4-1 cup sugar (plus more for the top)
8 Tbsp butter or coconut oil, melted
3 eggs, lightly whisked
1 tsp vanilla
1 cup raisins
1 cup walnuts, chopped
2 heaping cups grated apples with the liquids (any baking apples like Fuji, Granny smith, Haralson would work well)
METHOD
Preheat oven to 350 F. Grease a muffin pan.
In a medium bowl, whisk together the flour, oatmeal, baking soda, baking powder, salt, apple cinnamon spice. Set aside.
In a separate bowl, cream vanilla, sugar, melted butter and eggs. Set aside.
Grate the apples. Set aside.
In a large bowl, mix the flour and the butter mixture. Fold in the apples, nuts and raisins. Mix just until combined. Don’t over mix, otherwise the muffins will be tough not tender.
Scoop the dough into a regular 11 – 12 cup muffin tin. Divide batter evenly between muffin cups. Sprinkle sugar on the top. (If there is an empty cup, fill the empty space with water).
Let the mixture sit for 1 hour if you have time.
Bake for 30 minutes.
Allow the muffins to cool for 10 minutes before taking them out of the tin. Then transfer them to a wire rack and wait for 10 minutes to completely cool.
Serve at room temperature.
Store on the counter covered with a cloth or in an airtight container.
This is a very nourishing, easy to make soup based on the Hungarian egg-drop soup recipe. It is a sweet and sour soup made with eggs, carrots and sorrel and is seasoned with the wonderful synergy of the caraway seeds and paprika. Serve with bread of your choice!
This recipe uses sorrel. Unfortunately, it is harder and harder to get in stores so I decided to grow my own. We actually built a raised bed garden so I can have sorrel every year. It is such a giving plant. It is a perennial plant and it will come back year after year. You get to harvest it in late spring and early fall. I have harvested it even during the summer when it was not too hot.
Sorrel is a unique vegetable with a distinctive sour, lemony flavor. Try to find it in your grocery store, farmers market or if possible grow your own. If you don’t have sorrel, you can use mustard greens, arugula, yellow dock or even spinach. If you use these alternate vegetables, make sure you add 1 tablespoon of lemon juice.
TIP
MAKING THE ROUX I use roux in this recipe. It is made with an easy French culinary technique that gives dishes an interesting nutty taste and thickens the dish. All you have to do is add flour to some oil in the sauce pan on medium high heat and stir for a couple of minutes until it turns a nice, orange color. Then add cold or room temperature water, stir and it is ready. Just make sure the liquid you add is at cold or room temperature to avoid lumps from forming. Warm or hot liquids will make the roux lumpy, unappealing. Once the cold or room temperature water has been poured in, hot water can be added. Making the roux is not necessary. According to many Hungarians, adding roux would ‘frenchify’ the dish. Hungarians must have added this technique after people from France immigrated into Hungary. I have made the soup with it and without it and both worked great.
DRY ROASTING THE CARAWAY SEEDS I like to dry roast the caraway seeds to remove its stronger flavor and make it more pleasant tasting. Just simply roast the caraway seeds and add this finished product to the soup. I prefer the caraway seeds whole in the soup; however, if you don’t like seeds in your soup, feel free to grind the seeds and then add the powder to the soup.
Oh I can still smell that wonderful aroma that the synergy of paprika and dry roasted caraway seeds create … Enjoy this delicious unique sweet and sour soup!
RECIPE
4-6 servings
INGREDIENTS
8 cup broth (vegetarian or chicken) or water
1 tbsp lemon juice if not using sorrel
oil (vegetable or lard)
1 tbsp flour (optional)
1 bunch sorrel, washed and chopped
1 cup carrots, peeled and shredded or match sticks
1 medium onion, finally chopped
1 tsp Hungarian sweet paprika
1 bay leaf
1-2 tbsp whole caraway seeds
2 egg yolks
1 tbsp vinegar
1 tbsp dehydrated vegetable seasoning (optional)
parsley, chopped for serving
Hot pepper to taste
Salt and pepper to taste
bread or croutons for serving
METHOD
1. Have 1/4 cup of cold stock or water ready.
2. TOASTING CARAWAY SEEDS. Put the whole seeds in a dry skillet over medium low heat. Toast for 2-3 minutes, shaking the pan until they become fragrant. This simple step mellows the sharpness and unlocks a beautiful, nutty warmth. You can grind the seeds if you wish. Set aside.
3. Sauté the onion in a medium sized pot for 5 minutes. Add the shredded carrots and continue cooking them for another 5-10 minutes. This mixture gives a really nice flavor to the soup. I invite you to taste it.
4. Add 1 Tbsp flour to make the roux. Stir for 3 minutes or until it turns a beautiful orange color. (You can omit this step).
5. Add 1 tsp paprika and stir for 1 minute.
6. Add the cold water that was set aside in the first step. Stir well.
7. Add stock, bay leaves, sorrel and caraway seeds. Bring to a boil and turn down. Cook for 15 minutes covered.
8. Turn off the heat and take off the top.
9. Separate 2 eggs and lightly beat the yolks. Add a small amount of liquid from the soup, mix and slowly add to the soup while stirring. (My mom made this soup with just the yolks but if you would like feel free to use the whole eggs).
10. Add vinegar and dehydrated vegetable seasoning (optional).
11. Season with salt, black pepper and hot red pepper to taste.
Surprise your mom for breakfast with these delicious, fluffy pancakes for Mother’s Day or just treat yourself any time!
These pancakes are a happy marriage of the traditional American buttermilk pancakes and the Russian buckwheat pancakes (blini). The mixture of the buckwheat and the tapioca gives these pancakes a fluffy and tender texture with a sweet and nutty flavor. This pancake recipe is naturally gluten-free.
I wanted to replace the white flour in the traditional American pancake recipe with something healthy as white flour is tasty but is not very nutritious or filling. I remembered the Russian pancakes called blini; however, blini on its own is too dry for me. Furthermore, many of the flour alternatives can be lesser quality. So after using buckwheat and tapioca over the years, I decided to experiment. I have to say the result quickly became a family favorite.
Buckwheat is an ancient plant but has been forgotten. It has recently become popular again in the West because it lacks gluten. Gluten can cause gastrointestinal problems in so many people. Buckwheat is a staple food in Russia, in fact, the Russians have survived on it for centuries and got them through difficult times. Eating buckwheat might have been their secret.
So why should we eat buckwheat on a regular basis? Even if there is no crisis, buckwheat can be included in our diet as it is incredibly nourishing.
Buckwheat is very healthy. It is not a grain but it is the seed of the buckwheat plant. It does not cause digestive problems like wheat does. Instead, it actually nourishes the digestive tract. Its neutral thermal nature and sweet flavor are an indication that it is a tonic food. It is rich in protein. It also has intestine cleansing, strengthening and appetite improving abilities. Rutin, a bioflavonoid in the grain strengthens the capillaries and blood vessels, hinders hemorrhaging and promotes circulation in the hands and feet. Rutin also has the ability to protect against radiation.
To improve the texture of the pancakes, I added tapioca. Tapioca is a type of starch that’s derived from the starchy vegetable called cassava root. It is a popular flour to use for its starchiness when replacing wheat flour but it doesn’t provide many important essential nutrients. Combining tapioca with the nutritious buckwheat solves this issue though.
You can serve the pancakes with anything your heart desires. I think nuts and maple syrup are essential. In the summer, I like to serve them with fresh fruits, rhubarb sauce and in the winter apple compote or apple sauce. Please check out my rhubarb sauce recipe that I had posted earlier.
TIPS
This is my well tested pancake recipe, I have been making them for many years regularly on the weekends. I tested the recipe with butter and with coconut oil, both worked great! Also, I used milk and almond milk, both worked well as well.
The trick to making these pancakes is to grind both the buckwheat groats and the tapioca pearls in a blender fresh before you make the pancakes. It is worth it! I have a Vitamix but any blender will work. The store-bought flour yields a lesser quality in texture and flavor in my opinion. Of course, you can make the recipe with flour that you get at a store.
Another trick is when you grind the grains, leave the flour a little coarse. This gives the pancakes a bit of texture. Keep checking the flour to figure how much time you need for grinding. I grind the buckwheat for about 3 seconds and the tapioca for about 15 seconds. Hint: stop grinding them before they become a fine flour consistency, they should be grainy.
Also, I like to use buttermilk. Traditionally, buttermilk is used in pancakes. I like using it because it makes the pancakes taste better. You get this really nice buttery flavor and soft texture. Also, it makes the pancakes healthier as it helps digestion.
I used to buy buttermilk but since I found this simple hack, adding apple cider vinegar to milk, I don’t buy buttermilk anymore. Try it, it works well. This method can be used with almond milk as well. Check out my recipe on how to make buttermilk.
If you make the recipe please feel free to share how you liked in the comment section.
RECIPE
Makes about 21 pancakes
I created this recipe so please don’t share it without giving proper citation.
INGREDIENTS
1 cup freshly grounded buckwheat groats or buckwheat flour (please read note above)
1 cup freshly ground tapioca pearls or tapioca flour (please read note above)
2 whole eggs, lightly beaten or 1/2 cup unsweetened apple sauce
2 Tbsp of melted butter or coconut oil
oil for the pan
½ tsp salt
1 Tbsp sugar (optional)
Chopped nuts, for serving
maple syrup, for serving
fruits, for serving
yogurt, for serving
Ground buckwheat flour
ground tapioca flour
METHOD
Grind buckwheat and tapioca. Grind buckwheat on the highest setting for about 3 seconds. Grind tapioca on the highest setting for 15 seconds. Of course the time will depend on how strong your blender is. Please check for more info in the introduction and pictures above. (Omit if using store bought flour).
Put buckwheat and tapioca flours in a large bowl. Add the buttermilk, mix. Let the mixture sit overnight but at least for 4 hours. (I leave it on the counter overnight. If you put it in the fridge, make sure the batter is at room temperature before making the pancakes).
Add baking soda, baking powder, salt, eggs, corn starch or arrowroot, melted butter or oil and sugar (optional). Mix well.
Heat a skillet or griddle over low to medium-high heat and grease with oil if need be. When skillet is hot (if you flick water onto the skillet, it should sizzle), take a ¼ cup of batter and pour onto skillet. Let cook for a couple of minutes (until the pancakes begins to bubble slightly). Flip and let cook for another 1-2 minutes until pancake are a slightly brown .
Serve hot with your choice of yogurt, rhubarb sauce, maple syrup, nuts, fruits, jam etc.
A few years ago, I had black bean brownies at a potluck. I love brownies but they tend to be rich and heavy. I remember looking at the brownies on the table and wished I could have had one … and soon afterwards the woman who baked the brownies came to me and invited me to try it … I explained to her that I really wanted to have one but brownies were a bit rich for me. Then she assured me that these brownies were not the regular brownies but they were made with black beans. Hmm I thought this is an interesting take on brownies … I kind of hesitated but then I gave it a try… and I am so glad I did! These are absolutely delicious, decadent brownies even better than the original!
These are very tasty, chewy and chocolaty brownies, no one will guess they are made with black beans. Try to use the best quality chocolate that you can possibly get as the chocolate is still an important part of the recipe. This is definitely a very healthy alternative to the original brownie recipes.
So why use black beans? Well, they are actually sweet. They also add protein to the brownies. The protein in the black beans helps to curb the blood sugar spikes that you would see with regular desserts.
RECIPE
Yields 12 slices
Ingredients
1 cup dried black beans or 1 can (15 oz) black beans, rinsed and drained
1/2 – 1 cup sugar
1 tsp baking powder
1/4 tsp salt
1 large egg, lightly beaten
1/4 cup coconut oil or unsalted butter, melted
1/2 cup cocoa powder
1 tsp vanilla extract
1 tbsp coffee liquor
1 cup chocolate chips, divided
1/2 cup walnuts, chopped
Directions
Preheat the oven to 350°F (175°C). Grease an 8 x 8 x 2 inch baking pan or line it with parchment paper.
Clean and soak the beans for 8 hours. Remove the soaking liquid and discard. Cook the beans in fresh water for 2 hours. Strain. (Omit if using canned beans).
Add the black beans without its liquid to a food processor and chop until smooth. I don’t have a food processor, so I just mash the black beans with a potato masher. It works great.
In a bowl, mix the chopped black beans, egg, coconut oil, cocoa powder, sugar, baking powder, coffee liquor, vanilla extract and salt until the mixture is smooth and well combined.
Stir in the chocolate chips and the nuts. You can do 1/2 cup of chocolate chips and save the other half for the top.
Pour the batter into the prepared baking pan and spread it evenly.
You can put half the chocolate chips on the top.
Bake for 20 – 25 minutes or until a toothpick inserted into the center comes out clean.
Let the brownies cool completely in the pan before slicing.
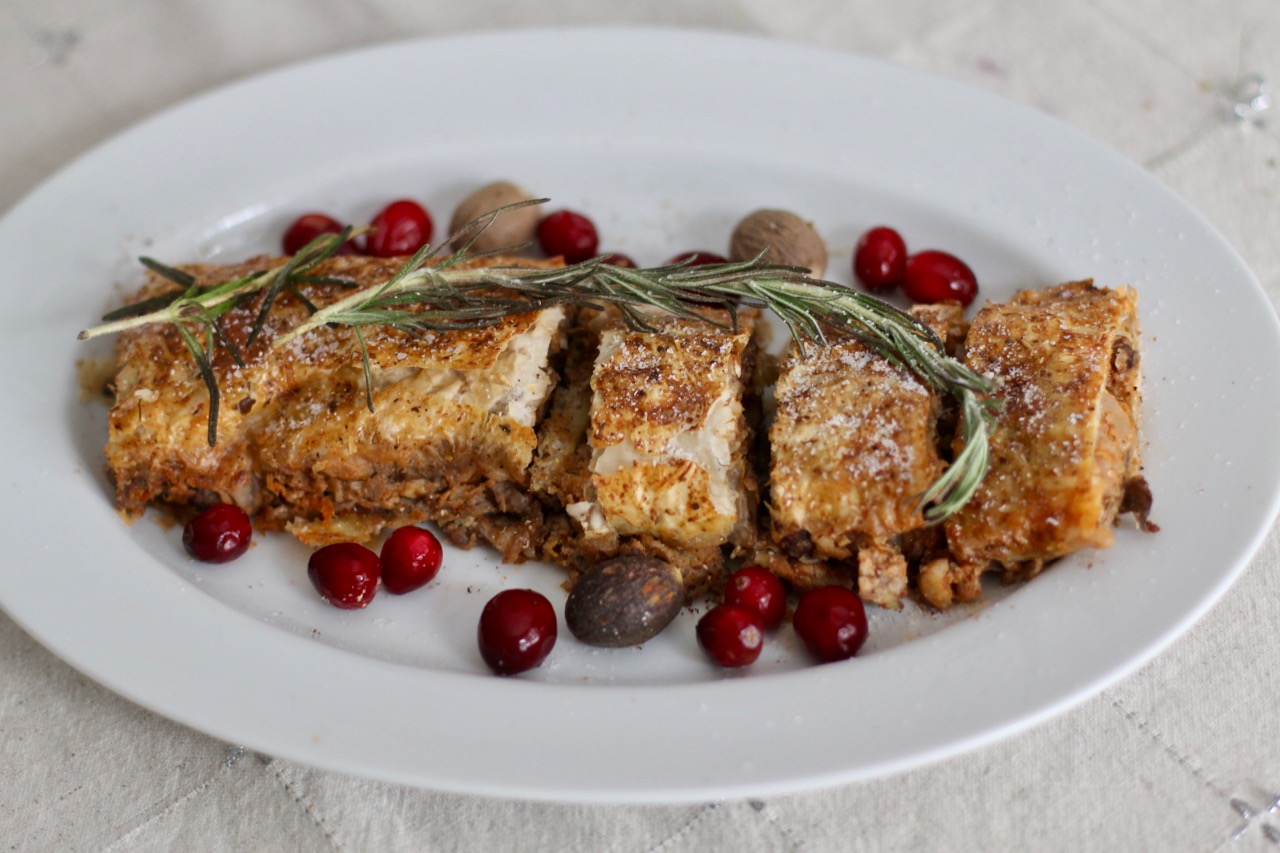
Our grandmothers, great-grandmothers used to make delicious sweets for Christmas. I don’t have the exact recipe my great-grandmother used; however, I have this modernized version, it works as a great replacement. The three main ingredients are raisins, walnuts, and coconuts along with some other flavorings, they are made into small balls. Then, they are dipped in chocolate of your choice and voila! … this healthy sweet AKA szaloncukor is ready to be hung on your Christmas tree or if you can’t resist you can just eat is as it is!
In the old days, they used honey, nuts and dried fruits like quince, raisins and apples. They also added foraged herbs that varied from country to country and region to region and often included fennel, lavender, rose petals, juniper berries, sumac etc. Ever since the exotic spices arrived from the East, people have been using cardamom, cinnamon, nutmeg etc. I personally really like adding shredded coconuts and oranges as they are readily available and taste delicious.
RECIPE
INGREDIENTS
1/2 cup walnut, chopped
3/4 cup raisins, chopped
1/3 cup shredded coconut
peel of 1/2 orange, grated or 1 tsp dried orange peel
juice if 1 orange or 1 Tbsp orange juice
pinch of salt, more for decorating
1 tsp cinnamon
1/4 tsp cardamom powder
1 tsp vanilla extract
300 gr or 11 oz chocolate chips
6 Tbsp coconut oil or unsalted butter
METHOD
Mix the raisins, nuts and shredded coconut. Place them in a bowl.
Add the vanilla extract, orange peel and the juice, cinnamon, cardamom and salt. Mix.
Put them in the fridge for 10 – 20 min so dough is not too warm or soft.
Take a handful out of the mixture at a time.
Create the bon bons. Make either smaller balls 1 inch in diameter, or make rectangular shapes.
In a double boiler, start slowly melting the chocolate chips. Add the butter. Mix until you get a ‘flowy’ consistency, meaning when you lift up a ladle full of chocolate, the chocolate flows down evenly.
Dip each bon bon in the melted chocolate. I used a fork and let the unused chocolate fall back in the pot.
Place them on a wire rack and let them cool.
Cut out squares of paper or cloth, big enough to cover the prepared bon bons (about 15 x 1 5 cm or 5 x 5 inch). Parchment paper works great too. Place the bon bons in the middle of this squared shaped paper or cloth and wrap the ends around. Twist the ends tightly to create the classic szaloncukor shape. Please see my picture for clarification.
December brings forth Winter Wonderland and the Holidays. When I think of Christmas dishes, warming and festive winter foods come to my mind. For me Christmas is a lot about cooking and baking … and of course music. I’m already looking forward to all the baking and cooking I will be doing and singing along my favorite Christmas music…
This is a recipe that I borrowed from my daughter. She has been making it for herself so she doesn’t have to eat my pancakes. Then I realized it is actually good. The pancakes are very simple but nutritious and delicious. Basic ingredients are oatmeal, eggs, bananas … oatmeal, eggs, bananas … oatmeal, eggs, bananas … that is it and just add a few things to make it taste better. Of course, this is a very kid friendly recipe.
Dairy free and gluten free with the substitution of gluten-free oats.
RECIPE
Serving: generous portion for 1 adult
Ingredients
2 eggs
1/2 cup of old fashioned oatmeal, coarsely ground (use gluten-free for gluten free version)
1 1/2 crushed ripe bananas
1/2 tsp cinnamon or apple spice
pinch of salt
lemon zest (optional)
oil for baking
1/4 tsp baking soda
syrup of your choice
fruits (optional)
Preparation
1. Lightly beat the eggs in a medium sized bowl.
2. Mash the banana and add to the bowl.
3. Add 1/2 cup of oatmeal to a blender and blend until you get a coarse flour consistency. Add to the bowl.
5. Just like any other grains, I like to let the mixture soak for an hours. However, it can be baked right away.
6. Bake in a preheated oiled pan on medium low heat on both sides for 3-4 minutes. Flip over and bake for a few minutes. Both sides should be nice and golden brown in color.
7. You can add fruits on top of the pancakes while baking in the pan.
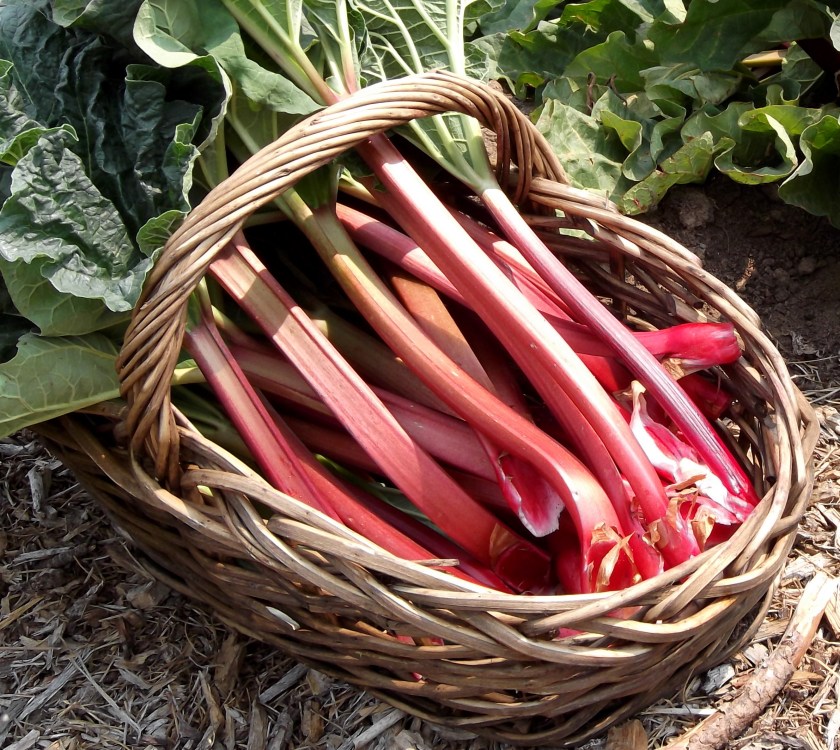
In the United States and Europe, rhubarb is known as the pie plant and in fact we tend to use it in sweet dishes. However, in Asia, it is more used in savory dishes. Today, I’m presenting a savory dish that was inspired by a blog. The rhubarb gives the sour taste that is balanced out nicely with the sweet and hot Chinese sauce and the bitter bamboo shoots. I chose broccoli as the main vegetable for the dish. If you prefer a vegetarian alternative, please check out my previous recipe that is a similarly made with tofu.
Rhubarb is everywhere here in the Midwest right now. It is almost ready in my garden but it has been available for a few weeks at the farmers’ market for sure. It is actually a healthy plant. Rhubarb has favorable health effects in the spring and the summer as it is cooling and detoxifying to the liver.
So what’s up with the ketchup? Is it Chinese? … I think of American cooking when I hear the word ketchup but in fact it originated from China. It is basically a sweet and tangy sauce made with tomatoes, sugar, vinegar and spices. It actually means fish sauce as they traditionally added fermented fish sauce to it. For this recipe, we just need the basic ketchup so go ahead and just use store-bought ketchup – unless of course you want to make it yourself.
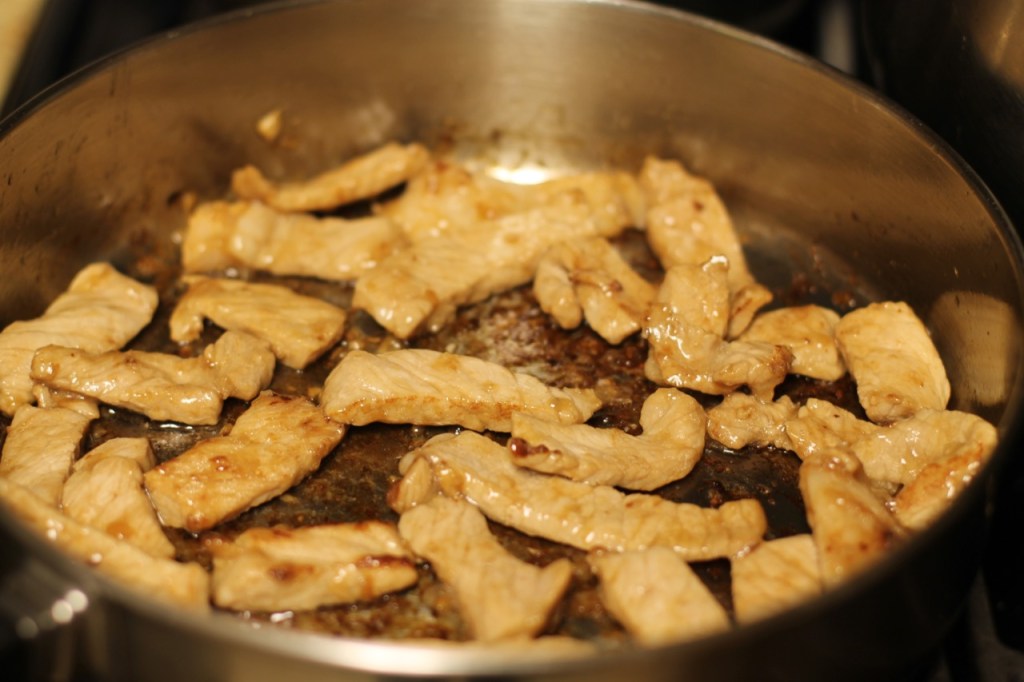
This is a very tasty dish! I really wanted to make a dinner with rhubarb and I found this recipe. I made a few changes to suit my taste. I cut the pork into long strips instead of squares. I replaced the green peppers with broccoli or you can use both. Also, I wanted to bring in more of the bitter flavor so I added bamboo shoots to offset the sourness of the rhubarb. For garnishing, I also added peanuts to get a bit of crunchiness. I think this is a fabulous recipe with an interesting twist to the usual sweet and sour pork dish that is served in restaurants with pineapples.
RECIPE
Ingredients
300 g pork fillet, cut into thin long stripes or 1 inch cubes
About 3 medium stems of rhubarb (200 g) cut into 1 inch batons – please use a scale
1 Tbsp brown sugar
1 large onion, peeled, halved and cut into thin slivers
2 heads broccoli
1 thumb of ginger, peeled and chopped (1 Tbsp)
sesame oils
1 small can of bamboo shoots
rice or rice noodles
Marinade
1 Tbsp soy sauce
3 Tbsp rice vinegar
1 tsp honey
1 garlic clove, peeled and crushed
1 Tbsp grated ginger, peeled
1 Tbsp corn starch
Sauce
2 Tbsp tomato ketchup
4 tbsp rice vinegar
1 tsp honey
1 Tbsp sesame oil
2 Tbsp soy sauce
1 Tbsp cornstarch
1 cup water
5 cloves garlic, finely chopped
Garnish
1 spring onion, finely sliced
1 red chili pepper, finely chopped (optional)
cilantro
handful of chopped peanuts
soy sauce
Instructions
twincitiesherbs.comtwinctiesherbs.com
Prepare rice according to its instructions. I used rice noodle last time.
Cut the pork pieces into longer (2 inches) thin (half inch) stripes. You can do squares too but the Chinese do long stripes traditionally.
Whisk together the marinade ingredients, add the pork, cover well and set aside for at least a half an hour or up to a couple of hours.
In another bowl, whisk together the sauce ingredients. Cover and put aside.
Heat oil in a large frying pan and add the rhubarb batons in a single layer. Cook for about a minute and a half and keeping them moving. Add a heaped tablespoon of soft light brown sugar, toss and cook for about minute more. You want them to have tenderized but still to have some bite. If they start breaking up, you’ve gone too far. Whip them off the heat immediately. Scoop into a bowl and set aside.
Take the pork out of the refrigerator, pour off the marinade and dry with a towel.
Put a tablespoon of vegetable oil in a wok and stir-fry the pork on a medium-high heat for three or four minutes, until golden brown. Remove and keep to one side.
Make sure you’ve prepped all the vegetables before you start cooking the main event, because they will cook fast.
Saute the sliced onion until translucent. Add the ginger and the broccoli. Continue sauteing for about 5 minutes on medium high heat. Cook until it is crunchy. Give the sauce (from above) a quick whisk, then pour it into the pan. Add the rhubarb and the bamboo shoots and bring to a boil, reduce the heat and simmer for three or four minutes until thick. Add the pork and toss and coat well until the pork is warm.
Add soy sauce and chili pepper if needed.
Serve over rice, garnished with the sliced spring onion , cilantro, nuts.