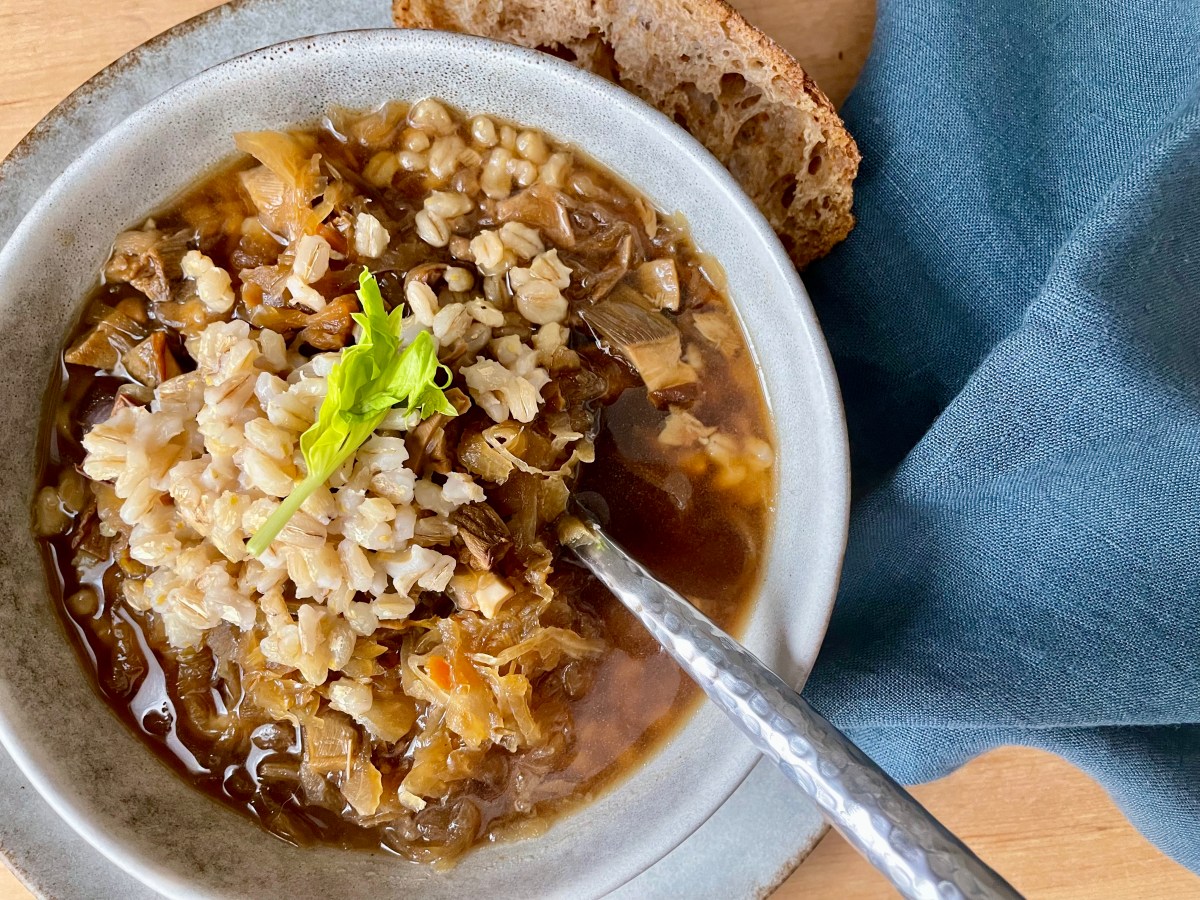
Poppy seed cake with chocolate ganache

This is my husband’s favorite cake that his mom made for his birthday every year. The recipe comes from the New York Times Cookbook, even his grandmother made it. When I talked to my husband’s cousins, they all raved about this cake, the Poppy seed cake … No surprise they all think it is the best cake on Earth … it is moist, crunchy and delicious …

This cake takes some time and patience to make but is not too difficult. Make sure all ingredients are at room temperature, it should be around 65-70 F.

The recipe has three parts: the dough, the vanilla creme (creme patisserie) and the chocolate ganache. Please read the following notes on how to make the cake.

The dough requires sifted flour. Sifting flour is an easy process, cooks generally use a flour sifter. If you don’t have one no worries, you can use a strainer or a wire whisk. The idea is to get air into the flour. Then once sifted, measure out the 2 cups, using a knife to level the top. Return the extra flour into the flour bin.

You need two 9″ round cake forms. For a long time I only had one cake form and I was fine. I just had to wait until the form cooled off after baking the first batch. I ended up buying a second one a few years ago. It is nice to have two but you can get by with only one.

The vanilla creme is pretty straight forward. I used a double boiler to cook the ingredients. If you don’t have a double boiler, you can use a metal bowl that fits on the top of the bottom pot securely but does not touch the bottom of the pot.

The chocolate ganache is what brings all the ingredients, the cake together. It should be made a little softer than generally made for cakes … should stick to the surface but not become hard. Also, the sweetness of the chocolate is a personal preference. I like the semi sweet chocolate personally but you can use whatever you prefer, of course.

RECIPE

Makes about 8 slices

Ingredients

Dough

  • 2/3 cup whole poppy seed
  • 1 cup milk
  • 12 Tbsp butter
  • 1/2 -1 cup of sugar (to taste)
  • 2 cup unbleached wheat flour, CUT/SIFTED
  • 2 1/2 tsp baking powder
  • 1/8 tsp salt
  • 1 tsp vanilla extract
  • 4 egg whites (save 3 yolks for creme)

Vanilla cream

  • 1 cup milk
  • 3 egg yolks (saved from earlier step)
  • 3 Tbsp sugar
  • 3 Tbsp flour
  • 1 tsp vanilla extract

Chocolate ganache

  • 12 oz baking chocolate, sweet
  • 1 cup heavy cream
  • 1/8 tsp salt
  • add sugar to your taste
  • 1/2 tsp vanilla extract

Preparation

Please check notes above for more info on how to make this cake.

Making the dough

  • Preheat oven to 350 F.
  • Have all ingredients at room temperature (65 – 70 F).
  • While still cold, separate the eggs. Set aside 1 egg yolk so you get 4 egg whites and 3 egg yolks in separate bowls.
  • Soak the poppy seed in 1 cup milk overnight but at least for 2 hours.
  • Cream butter with sugar. Set aside.
  • Cut and sift flour. Please note the amount of flour used is for cut and sifted amount. So measure out 2 cups of flour and sift. Take the measuring cup again and measure out 2 cups of the sifted flour and using a knife level the top. Return remaining four to its bin.
  • Sift in baking powder and salt.
  • Add the poppy seed mixture and vanilla to the flour mixture, mix gently. Add the butter/sugar mixture and keep mixing. Make sure to scrape from the bottom of the bowl to catch any hidden pockets of flour. Do not over-mix. I do the mixing by hand but you can used a food processor on a low setting. Set aside.
  • Beat the 4 egg whites on high speed until stiff.
  • Gently fold egg whites into the dough.
  • Grease and lightly flour cake forms or just simply use parchment paper.
  • Separate dough between two cake forms.
  • Try to make sure the top stays flat.
  • Bake for 20 – 30 minutes or until an inserted tooth pick comes out clean.
  • Let the cake forms cool completely before removing the cakes.

Making the vanilla cream

  • In a double boiler, bring milk to a gentle boil over medium heat.
  • Meanwhile, whisk the three egg yolks, sugar together. Add flour, mix. Add warm milk gradually and mix.
  • Pour mixture back into the double boiler pot and cook on high medium heat. Whisk continuously for about 5 minutes or until mixture thickens.
  • Take off heat and add vanilla.
  • Let it cool.

Making the chocolate ganache

You can use a clean double boiler here again. Melt the chocolate and add the heavy cream, vanilla extract and sugar. Mix.

Assembling the cake

  • Place the vanilla creme in-between the two cake layers. (Use the ‘prettier’ cake for your top layer. You can also flip one of the cakes over and use the bottom for the top so you get a more even appearance). Spread chocolate ganache on the top. This ganache will be slightly liquidy when placed on the cake but will harden in the refrigerator.
  • Decorate the top to your liking.
  • Refrigerate the assembled cake for at least 1 hour before serving.
  • Store in the refrigerator.

enjoy!

Photos and text by twincitiesherbs.com.

Source: Joy of Cooking, 1978 edition

Festive strudel with cabbage, mushrooms and lentils (Vegetarian)

I like challenges … well ok sometimes it is a bit uncomfortable … but then I end up with something delicious like the dish I’m presenting here today.

The savory stuffing made with cabbage, mushrooms and lentils is wrapped in a flaky strudel dough and is seasoned with the warming spices of the season. To make it even more festive, serve it with port sauce and brussel sprouts with chestnuts.

I was looking for a vegetarian Christmas dish… seriously, traditionally would there be such a thing? I have seen mushroom strudel served in the winter before but did not find it filling enough as a main dish. Then came the idea … maybe because I was craving cabbage strudel the whole fall … to make the strudel with half mushrooms and half cabbage … then added the lentils and the cheese in place of the meat, a few spices and … this festive dish was born. Cabbage is a staple vegetable for the winter and has been traditionally paired with mushrooms. My non-vegetarian guests really enjoyed a slice with their meat dish. Of course, the vegetarians were asking for seconds.

RECIPE

Ingredients

  • oil
  • 5-7 sheets of filo dough
  • 1/4 cup chopped shallots
  • 4-8 oz mushrooms (crimini) (chopped into small pieces)
  • Quarter sliver of a medium sized savoy cabbage. ( Discard the lager veins of the cabbage so you are left with the tender leaves only).
  • 1 celery stalk
  • 2 garlic cloves
  • 1 tsp paprika
  • 1/4 cold stock (vegetarian or chicken) or water
  • 1/4 cup uncooked lentils (1/2 cup of cooked lentils)
  • handful of chopped walnuts
  • handful of lightly chopped hazelnuts
  • 1 egg + 1 egg for egg wash
  • 8 oz (220 gr) of feta cheese
  • 1 Tbsp grainy mustard
  • few thyme springs
  • 2 tsp chopped fresh rosemary leaves or 1 tsp dried rosemary
  • freshly graded nutmeg
  • 1 tsp salt + more for the top
  • ground pepper to taste

Port sauce Ingredients

  • 1 cup of port or white wine
  • 1/2 cup stock (meat or vegetable)
  • 1/4 cup minced shallots
  • 1 Tbsp butter or oil
  • 1 Tbsp flour
  • 2 springs of thyme
  • 1 spring rosemary
  • 1 bay leaf
  • 1/2 cup heavy creme
  • salt and pepper
  • 1 garlic clove

Directions for the strudel

Preheat oven to 380 F.

Take filo dough out of the freezer. Let it thaw slowly.

Clean and soak the lentils for a few hours. Cook lentils.

Chop up the shallots and the celery and sauté them in some oil for 5- 10 minutes. Add the mushrooms and continue sauteing for 5 more minutes or until the mushrooms are tender. Add paprika and the garlic to activate for 1 minute, stir and add the cold stock (1/4 cup). Add the cabbage. Add chopped thyme leaves, nutmeg and chopped rosemary leaves. Cook the mixture for about 10 minutes on low heat. Set aside.

Chop up the nuts. I leave the hazelnuts chunkier. The walnuts are coarsely chopped. A small food processor can be used. Add to previous onion mixture.

In a medium sized bowl, add 1 lightly beaten egg, mustard, the nuts, the cooked lentils, mushroom/ cabbage mixture from above, feta cheese, salt and pepper. Mix well.

Let the stuffing cool, refrigerate for about 1 hour.

Take 7 sheets of filo dough and lay it on a wooden board. I like to put a piece of parchment paper below the filo dough, it is helpful for rolling. Drizzle some oil and grade some nutmeg. Spread the filling evenly on the sheet leaving 1 inch on each side empty. Roll it up. Placed it in an oiled baking dish.

Lightly beat 1 egg, add some freshly graded nutmeg and salt. Spread it on top of the rolled strudel. Wait for 5-10 minutes until egg wash is absorbed. Apply the egg-wash again. The 1 egg should cover the strudel both times. You can sprinkle additional salt and nutmeg on the top. This will make the crust really tasty.

Bake in the pre-heated oven for 25-30 minutes or until top is nice and brown.

Put left-over filo dough if there is any left in the fridge gently wrapped up in plastic bags so the leaves don’t dry out.

Serve hot with the port sauce (see below) and brussel sprouts with chestnuts. I also like to add cranberry sauce (recipe).

Directions for the port sauce

In a small pot, saute the shallots in some oil or butter. Add the flour for 1 min, stir. Add the garlic, stir for 30 seconds.

Add the wine and stock. Stir.

Add the thyme and rosemary springs. Cover the pot.

Cook for about 20 minutes.

Take out the bay leaves, thyme and rosemary springs.

Take off the heat, add the cream, salt and pepper.

Serve right away. Can be stored in the fridge for many days.

enjoy! Happy Holidays!

Recipe, photos and text by twincitiesherbs.

Pickled garlic – the Chinese way

Here is an old time favorite of mine … It was getting colder here so I thought it would be time to prepare for the winter. I enjoy eating garlic during the colder months, it is very healthy but I can live without that harsh taste. Pickling the garlic keeps all its health benefits but the garlic loses its strong taste. So this week, I would like to post a recipe for pickling garlic, the Chinese way. It is so easy to make and it is so delicious … but yes it will take 12 weeks to make…

In the recipe, proportions are given. The amount will depend on how much garlic you use. I used 4 heads of garlic. You can figure out the liquids after you put the garlic in the jar. Add the peeled garlic, enough to fill about 3/4 of the jar. Mix the 2 liquids, about half the soy sauce and half the rice vinegar and pour over the garlic. Make sure the liquid covers the garlic.

You will also need a jar. I like to use a wide mouth jar so I can take the garlic out easily. Also, I sterilize the jar before putting anything in it.

RECIPE

Ingredients

Jar of garlic, peeled

1/2 part soy sauce

1/2 part rice vinegar

1/2 part honey

Directions

Please see above for directions.

Peel the garlic. When you peel the garlic, make sure you do it gently and not cut the garlic. If you do, not a big deal, just the cloves will be a little unappealing but still edible.

Fill the jar 3/4 full with the peeled garlic.

Pour the vinegar/soy sauce mixture over the garlic and let it macerate for 6 weeks. Make sure the garlic is well covered with the liquid.

Then after 6 weeks remove the vinegar/soy sauce mixture and discard half of it. Replace it with honey. Pour this liquid back in the jar. You can gently warm up the honey so it can be mixed with the macerate.

Wait for six more weeks and then the pickled garlic is ready.

enjoy!

Text and photos by twincitiesherbs.com

Sauerkraut dish with kielbasa

This delicious dish is very easy to make. I probably should have called it the bachelor/bachelorette sauerkraut dish … but it is not just for the bachelors/bachelorettes, it is the perfect dish whenever you want to make something quick but tasty and healthy. Of course, you can never go wrong with sauerkraut, it is so healthy.

It is a super easy recipe but I would like to note a few things. The onion has to be finally chopped and the dish needs to be cooked well otherwise it will have a raw taste.

There are two types of sauerkraut. One is preserved with vinegar and the other is processed with salt. I prefer the salted version as it is less acidic and is better for health. This version acts as a probiotic and supports gut health and digestive functions. Of course, the vinegar version would be fine to use, too.

RECIPE

Serves 6-8 people

Ingredients

  • 1 onion, finally chopped
  • oil (sunflower, lard)
  • 4 large slices of bacon, chopped into small pieces
  • 1 tsp sweet paprika powder
  • 1 cup of cold meat stock
  • 1 apple, cored, peeled and chopped
  • 1 tsp caraway seeds
  • 1/2 tsp mustard
  • 2 lbs of sauerkraut, well rinsed
  • red chili pepper (optional)
  • 1 lb of kielbasa or sausage
  • sour cream to serve
  • rice or potatoes to serve
  • bread
  • salt and pepper to taste

Directions

  • Chop the onions making sure they are finally chopped. Also chop the bacon. Sauté onions and bacon in some oil for about 10 minutes on medium high heat. Sauté the apple pieces for a few minutes.
  • Add the paprika, stir for 1 minute to activate and add the cold stock, stir.
  • Rinse sauerkraut well with water.
  • Add the sauerkraut, stir. Continue adding, the mustard, red chili pepper (optional) and caraway seeds. You can add the meat too. If the meat is already cooked, you do not have to add it at this point. Although I personally like it if any meat is cooked in the dish regardless whether it is precooked or not. If you don’t include it at this step, just add it at the end.
  • Cook for 45-60 minutes until the sauerkraut is well cooked.
  • Season with salt and pepper.
  • Serve with sour cream and your choice of bread, potatoes or rice.

enjoy!

Soup with sauerkraut, potatoes and beans (Jota)

In the summer when we were hiking in the Julian Alps in Slovenia, we found a quaint little restaurant that served simple and very tasty dishes. When we went hiking, we treated ourselves to a delicious lunch every time. Here, I found this interesting soup with sauerkraut, potatoes and beans.

Jota, the Slovenian soup with sauerkraut, potatoes and beans is just a simple dish that can warm your body and soul on a cold winter night or a cool, rainy day in the mountains in the summer.

RECIPE

Ingredients

  • oil
  • 1 large onion, diced
  • 2 strips of bacon
  • 2 cloves of garlic clove, crushed
  • 1 tsp of sweet paprika powder (optional)
  • 1 tsp caraway seeds, 2 bay leaves, 1 Tbsp black peppercorns (optional)
  • 2 cups of uncooked kidney beans or 30 oz canned kidney beans
  • meat stock
  • 1 fresh tomato, diced or canned
  • 1 tbsp tomato paste
  • 1 pound potatoes (diced)
  • 1 pound sauerkraut (drained and rinsed)
  • 1 heaping Tbsp of flour
  • sour cream
  • salt and pepper to taste
  • eggs or sausage

Method

  • Clean and soak the beans overnight or for at least 8 hours. Rinse soaking water off. Add fresh cold filtered water, bayleaves and cook the beans for 1.5 hour or until soft but not mushy. Set aside.
  • In a large pot, sauté onion and bacon for 10 minutes. Add paprika, stir and add garlic, stir. Add a tomatoes, tomato paste, stir and cook for 10 minutes. Drain and rinse sauerkraut. Add potatoes, sauerkraut, caraway seeds, bay leaves, pork and stock. Bring to a boil, reduce heat and simmer, uncovered and stirring occasionally, for at least 30 minutes or until potatoes and sauerkraut are very tender and the mixture is thick.
  • At the end, in a small bowl put 1 Tbsp of flour, mix it with some cooking liquid until smooth. Add into soup and cook for 5- 10 minutes.
  • If you like your soup to have a thicker consistency, you can take out the potatoes and put them in a blender with some of the cooking liquid.
  • Add the cooked beans with some of its liquid and warm up the pot so the beans are warm. Season with salt and pepper to taste.
  • Serve with bread, sour cream, eggs/sausage.
  • This can be served right away but will taste better the next day or even just a few days later.
The menu

enjoy!

Photos and text by twincitiesherbs.

Beet salad with caraway seeds

This is a simple tasty salad that is great for the winter. I just cook the beets and then use vinegar, oil, caraway seeds and salt to prepare the salad. I like to make a big jar full and keep it in refrigerator, it will keep for at least a month. You can serve it as a side dish.

For me, beets are the perfect plant to transition from the the winter into spring. Yes! Spring will come sooner or later, OK most likely later in the Midwest …

Beets are grounding, nourishing, and detoxifying. These qualities make them the perfect vegetable for this time of the year, for both winter and spring. They are sweet and rich in nutrients with important vitamins and minerals. They nourish and detoxify the liver, getting the body ready for the spring.

I used only one spice, caraway seeds. The bitter and aromatic caraway seeds have been around for a long time. They are used in many European countries to enhance the flavor of our food. It is one of the herbs that the ancient Greek doctors added to cooking for its health benefits. It is especially beneficial for digestion. I often take caraway seeds for granted but it is such a neat little herb that needs a little more attention. Please check this website for more info on caraway seeds .

RECIPE

Ingredients

  • 4 medium sized beets (about 1 lb)
  • 1 Tbsp caraway seeds
  • 1/8 cup vinegar
  • 1 Tbsp vegetable oil (I used sunflower oil)
  • 1/2 tsp salt or to taste
  • black pepper, to taste

Preparation

  • Cook beets for 1 hour until soft but not mushy. I like to put them on a steamer.
  • When done take the peel off with a sharper small knife. Slice or shred the beets thin. You can do this with a knife or a slicer.
  • Make the dressing. Put 1/8 cup of vinegar in 1 cup cup. Add enough water so the cup is full so you are adding 7/8th of a cup of water. Pour it in a medium sized bowl.
  • Add sliced cooked beets, caraway seeds, salt and oil. Mix.
  • Grind some black pepper on the salad if you wish. Mix.
  • Serve at room temperature on the side of any dish. You can add sautéed beet tops.

enjoy!

Source

Photos, recipe and text by twincitiesherbs.

White black bean chili soup

-can be vegetarian

This tasty soup is a fun twist to the regular chili soup. The difference is that the beef is replaced with turkey or chicken and the chili beans are replaced with white or black beans but otherwise it is very similar to the well known beef chili soup. Of course, you can add all your favorite ingredients that you would otherwise add to a chili soup.

The biggest change in the recipe is the meat. Many people prefer the lighter turkey or chicken meat. The chicken or turkey is very nice here, the thigh gives more flavor and is cheaper but the breast would work well too.

Perhaps it would be more accurate to call this soup black and white chili soup. The white makes sense with the white meat but I used black beans instead of white beans because I think it has more flavor. Of course, you can use either.

I decided to post this recipe now because beans especially black beans are great in the winter. The warming black beans have a sweet flavor and nourish the kidneys. They are antibacterial, anti-parasitic, detoxifying and have high levels of disease fighting antioxidants, numerous vitamins and minerals, protein and fiber. In addition, it has heart, skin protecting and anti-cancer properties. It also improves digestion and is great for overall health. It is native to the Americas and have been used for thousands of years. No wonder the natives ate it with almost every meal.

I like to make up my own chili spice, please follow the recipe below or buy it in a store already made.

You can experiment with the vegetables of course, I added corn, carrots and green beans. In the summer, I like to add zucchini too. But please feel free to add whatever you would like.

Vegetarian readers might be wondering if this soup could be made vegetarian. The answer is yes! – you can take out the meat and just use vegetarian stock and I also added eggs. I have made it without meat, it is tasty.

Surprise your guests at a party or just treat yourself. Honestly, we believe that this version is even tastier than the original soup.

RECIPE

Ingredients

  • 1 large onion
  • vegetable oil
  • 2 celery stalks, chopped
  • 3 medium sized carrots, sliced
  • 2 strips of bacon (optional)
  • 1 lb ground chicken or turkey thigh or breast
  • 2 large tomatoes or 29 oz canned chopped tomatoes
  • 5 tsp of chili seasoning (please see recipe below)
  • 2 garlic cloves
  • 8 cups chicken stock
  • 4 oz corn (frozen)
  • 8 oz vegetables. I used green beans. Also zucchini would be fine
  • 2 cups of uncooked black beans or 28 oz of canned beans
  • 1 jalapeño pepper, chopped
  • salt and pepper to taste
  • yellow cheddar cheese
  • chips
  • sour cream
  • cilantro

Chili seasoning ingredients

  • 1 Tbsp (3 tsp) chili powder
  • 2 tsp cumin powder
  • 1 tsp oregano
  • 1 tsp smoked paprika
  • 1 tsp coriander powder
  • 1/4 tsp cayenne pepper (optional)

Preparation

  • Wash and soak beans in cold water for 8 hours or overnight. Pour off the liquid and wash well. Add cold filtered water and cook for 2 hours or until soft but not falling apart. Omit if using canned beans. The home-made beans are well worth the extra effort though, they taste so much better.
  • Make the stock. Omit if using ready made stock.
  • Heat oil in a large pot with a large surface area. Sauté the chopped onion for 5 minutes. Mix. Add the celery. Sauté for 10 more minutes.
  • Render the bacon.
  • Add the chili seasoning and the crushed garlic cloves for 1 minute. Stir.
  • Quickly add the tomatoes, stir. Cook for about 10 minutes or until the tomatoes make a nice sauce.
  • Add the carrots, vegetables and jalapeño pepper. Add enough stock so the liquid covers the soup well. Cook for 1 hour or until the carrots are soft.
  • Add the black beans with its liquid and more stock if needed to cover everything.
  • Season with salt and pepper to taste.
  • Serve hot with sour cream, chips, cilantro.

enjoy!

Text and photo by Twinctiesherbs.

Roasted potatoes with rosemary

My recipe today is potatoes with rosemary … yes that is it, just the two main ingredients plus the garlic, oregano and the salt. They should complement many winter meat or vegetarian dishes easily. I like using them in cooking because they both taste great and are good for digestion. I get very excited about rosemary in general as it has such rich and colorful history steeped in the culinary world, legends and folklore.

Rosemary is such a culinary delight, a popular plant in the kitchen especially during the colder months. Chefs use it in a wide variety of dishes from soups, bean dishes to meats particularly for lamb and chicken. It is not just used for enhancing the flavor of a dish but it also helps digestion. Also, it can preserve food, an important consideration in the old days before refrigerators were invented so I can imagine that rosemary was essential in a Medieval kitchen…

The aromatic rosemary (Rosmarinus officinalis) has been around for thousands of years. It is native to the Mediterranean region. Its Latin name is derived from the words ‘ros’ which means dew, and ‘marinus’ that means sea and as its name suggest it can in fact survive on the spray of the sea air. Persian doctors valued it as one of their best remedies. It has also been recognized as a powerful medicine in the Mediterranean countries. Rosemary along with the other digestive remedies of the region like thyme, oregano, fennel have been used in the culinary world for their medicinal values. Earlier, the ancient doctors started using them in dishes so people could get their benefits on a daily basis. So yes we can thank these wise doctors for all these fabulous dishes.

Ancient cultures thought of rosemary as a protective plant that could ward off evil. If we look at all the benefits that rosemary has, this statement would become more clear and less mysterious. Its health benefits come from its anti-oxidant, anti-inflammatory, anti-bacterial, anti-fungal, anti-cancer abilities. It is also a restoring remedy as it can improve heart, liver, gallbladder, brain and kidney functions, circulation, digestion and the nervous system. It brings warmth to a cold, debilitated body. In the 13th century, Queen Elizabeth of Hungary claimed that rosemary wine was the secret to her long life and cured her paralyzed legs.

I’m now sitting here at my desk with a bunch of rosemary and sniffing its aromatic oils…

RECIPE

Ingredients

  • 2 lbs of red potatoes
  • 2 tsp sea salt
  • 2 tsp dried oregano
  • 2 garlic cloves (crushed)
  • leaves of 4 stalks of fresh rosemary or 2 tsp of dried rosemary
  • 1/4 cup of oil

Directions

  • Preheat oven to 475 F.
  • Soak the potatoes in cold water so the dirt can come off easily. I like to leave the peel on but if you prefer, you can peel the potatoes without soaking. If using fresh, take the rosemary springs and pull the rosemary leaves back on the vine to get the leaves off. Cut the potatoes into cubes (halves and quarters) and put them in a larger bowl with the oil, crushed garlic, oregano, salt and the rosemary. Toss until the potatoes are well coated.
  • Oil a baking sheet and spread the potatoes on it.
  • Bake in a preheated oven for 25-30 minutes or until potatoes are golden and tender. Flip the potatoes twice during baking to ensure even browning.
  • Serve warm, preferably the same day.
  • enjoy!

Sources

Matthew Wood: Earthwise

Photo, recipe, text by twincities.herbs.com

Stuffed turnip (Фаршированная репа)

Happy New Year, Everyone!

Hope you all had a lovely Holiday and got to eat lots of delicious food. Now I feel that it would be nice to eat something refreshing, more cleansing though … and turnip is a tasty vegetable that could be used. I always think of the Russian folk tale, The Giant Turnip when I hear the name, turnip. In fact, turnip is an important staple in the Northern countries like Russia. So let’s go to Russia and get their famous recipe for stuffed turnip.

This is a very simple dish at its best. The main ingredients are the nutty buckwheat, the earthy mushrooms and the pungent turnips that mainly create this special dish. There are no exotic ingredients or spices. Honestly, I only used thyme, salt and pepper to flavor.

I got this recipe from a website called http://www.Russianrecipebook.com but I made some minor changes. I cooked the buckwheat in stock instead of just water. In addition, when cooking, you need to be careful with the turnips as they cook fast. They need to be boiled for only about 10-12 minutes to get the right consistency. Otherwise, it is a very easy and quick recipe. This dish is more like the everyday people’s food.

Wonder if we had cooked tasty dishes like this in my Russian classes, I would speak Russian now …

Turnips have been used in folk medicine for thousands of years. A cold climate loving vegetable, it is native to Northern Europe and is still popular today. Turnips have many beneficial properties. They are great source of vitamins, minerals, anti-oxidants and fiber and may be used among others for indigestion, detoxification, diabetes, jaundice. In Chinese Medicine, they have a neutral thermal nature and have pungent, sweet and bitter flavor at the same time. They are considered to be useful for their dispersing abilities in lung ailments; however, this quality is only available in its raw form. They are also used for improving circulation and remove damp conditions in the body. The green top is also valuable.

RECIPE

Serves about 2-4 people. – I cooked 1 cup of raw buckwheat to have some on the side (adjust other ingredients accordingly).

Ingredients

  • 4 smaller-sized turnips or less if bigger
  • 8 oz fresh mushrooms, chopped (I used crimini)
  • 1/4 cup uncooked buckwheat (1/2 cup of cooked buckwheat)
  • 1/2 cup of bone or vegetable broth or water
  • 1/8 cup shallots or half of a small onion, finely chopped
  • 2 tablespoons chopped parsley 
  • 1/4 cup grated cheese (mozzarella, provolone, cheddar, or Parmesan for extra flavor)
  • 3 tablespoons bread crumbs
  • Salt and pepper to taste
  • Vegetable oil and/or butter
  • 1 tsp fresh or 1/2 tsp dried thyme (optional)

Directions

Preparing the buckwheat

  • Clean buckwheat kernels and soak for a couple hours.
  • In a medium sized pot, start boiling the stock or water. Add the buckwheat to the boiling liquid and cook for about 10 – 15 minutes or until they are soft but not mushy. Add salt and pepper to taste. Set aide.

Preparing the turnips

  • Clean well and peel the turnips. Boil them for about 10 – 12 minutes or until they are just soft enough to scoop out the insides. The bigger ones will take more time. This is the most difficult part of the recipe. You really need to keep an eye on those turnips, they should be slightly cooked. Try not to overcook them. When done, take out turnips and let them cool. You can put them in cold water.
  • Cut off enough of the bottoms to create a flat surface that will allow them to stand upright on a baking sheet. Save the cut portion. With a spoon and/or a small knife, scoop some of the flesh out of the top end to form a cup. Save the scooped flesh as well, they are so tasty. (You can scoop the inside of the turnip out with a watermelon scooper or a measuring spoon).

Preparing the stuffing.

  • Sautee the onions or shallots in some oil for about 5 minutes. Meanwhile thoroughly clean the mushrooms and chop them up. Add them to the onions and continue to sauté them for about 10 more minutes or longer for some wild mushrooms and then let them cool.
  • Add the cooked buckwheat, bread crumbs, grated cheese and the saved chopped turnip pieces. Mix well. I would like to invite you to take a bite of the stuffing, try to see if you like how it turned out.

Stuffing the turnips

  • Preheat oven to 375°F.
  • On a well-greased baking sheet, arrange the turnips in an upright position with the scooped-out wider portions facing up (like cups). (I used tomato sauce for the bottom of the pan). Fill the turnips with stuffing. Ideally the stuffing should be above the surface of the turnips, although this will depend on the size of the turnips, and the amount of stuffing.
  • Put a small piece of butter on top of each turnip and bake in the pre-heated oven for about 20 minutes, until the turnips are heated through and crusty on top. The turnips should not be raw but nicely baked. If it is still raw, just bake it a little longer.

Mushroom sauce recipe

Ingredients

  • 4 ounces of mushrooms
  • 1 tsp fresh thyme or 1/2 tsp dried thyme
  • 3/4 tsp dried sage or 2 fresh leaves
  • 1/4 tsp of dried rosemary crushed or 1 fresh spring
  • 1 Tbsp oil
  • 1 cup of stock
  • 1/4 cup of creme

Directions

  • While the stuffed turnip is baking, prepare the mushroom sauce. In a saucepan, warm oil over medium heat, add rosemary for 1 minute. Add mushrooms and cook until they release their liquid and mushrooms are well browned. Stir frequently. Add thyme, sage and let cook for one minute. Add stock, stir, and let simmer for 10 minutes and reduce heat to low.
  • Transfer half of gravy to a blender and puree until completely smooth. Add pureed mushrooms back into mushroom mixture and stir. See if you like the consistency. If not thick enough, puree a little more of the mixture.

Serve turnips hot, with sour cream and mushroom sauce. Decorate with parsley. I also made additional stuffing to serve on the side.

Enjoy!

Source

Photos and text by twincitiesherbs.com.

Old fashioned popcorn

I figured folks might not be very interested in complex dishes after the holidays and I would like to spend time with my family, so I decided to post a recipe for something simple, making popcorn- the old fashioned way … no gadgets needed, just a pan with its lid that you already have in your kitchen.

Corn does not necessarily have a connection with the winter but I chose making popcorn for now because I enjoy listening to the popping sound that the corn kernels make as they are popping. As our lives are slowing down, our sense of hearing is more heightened, we can hear things that we might not have paid attention to before. And those warm popcorn straight out of the frying pan hmm so delicious ….

This is a nice and tasty snack to be enjoyed during the long winter nights. You can add a little butter, salt and pepper and other seasonings of your choice. I personally like to have it without anything added.

There are 4 things you should try to watch out for:

Pan should be hot before you put the kernels in.

Keep lifting the top of the pan to release the extra steam.

Keep shaking the pan to avoid the kernels from burning.

When the kernels stop popping, take the pot off immediately.

RECIPE

Ingredients

  • 1/4 cup of corn kernels or more if you have a bigger pan.
  • seasoning of your choice to taste

Instructions

  • Heat up a pan or a pot with a lid. My pan is 10″ in diameter. When it feels hot, put in about 10 kernels for testing. After they start popping, shake the pot a little so your kernels don’t burn. When they stop popping pour them in a metal bowl.
  • Add in 1/4 cup of corn kernels. About every 1 minute, lift off the top of the pan allowing the steam to escape for one second until you stop hearing the kernels popping. Keep shaking the pan. When you start hearing the kernels pop less frequently, get ready to take pot off the burner.
  • Pour popcorn into the metal bowl.
  • Allow to cool, season if you wish and eat.

enjoy!

Photo, text, recipe by twincitiesherbs.com